Storage
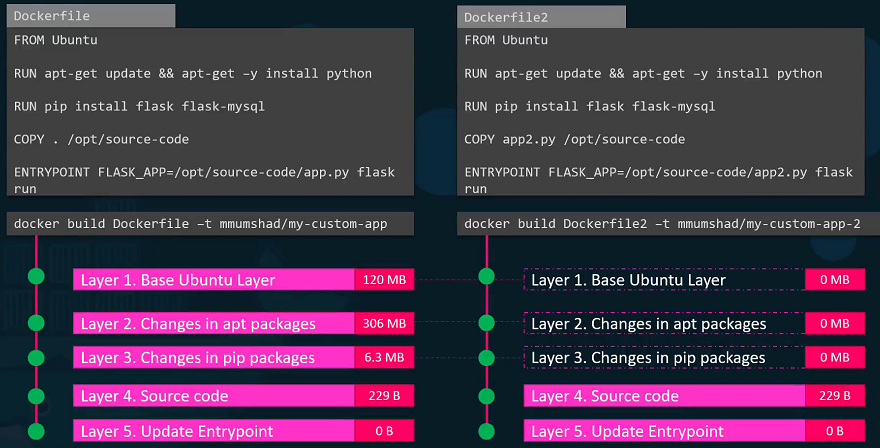
To better understand the advantages of this layered architecture, let’s look at a different Dockerfile that is very similar to our first application. The only differences are the source code and the entry point used to create this application.
When the image is built, Docker does not rebuild the first three layers; instead, it reuses the same three layers from the cache that it built for the first application. It only creates the last two layers with the new source code and the new entry point.
This approach allows Docker to build images faster and efficiently save disk space. It also applies when updating your application code. Docker simply reuses all the previous layers from the cache and quickly rebuilds the application image with the updated source code.
Docker Storage
To understand storage in the container orchestration tools like Kubernetes, It is important to first understand how storage works with containers. Understanding how storage works with Docker first and getting all the basics right will later make it so much easier to understand how it works in Kubernetes.
If you are new to Docker then you can learn some basics of docker from the course Docker for the absolute beginner course, that is free.
There are two concepts comes into the docker, Storage drivers and Volume drivers plugins.
Let’s see how Docker stores data on the local file system. At the first time, When you install Docker on a system, it creates this directory structures at /var/lib/docker.
$ cd /var/lib/docker/

You have multiple directories under it called aufs, containers, image, volumes etc.
This is where Docker stores all its data by default. All files related to containers are stored under the containers directory and the files related to images are stored under the image directory. Any volumes created by the Docker containers are created under the volumes directory.
For now, let’s just understand where Docker stores its files of an image and a container and in what format. To understand that we need to understand Dockers layered architecture.
Layered architecture
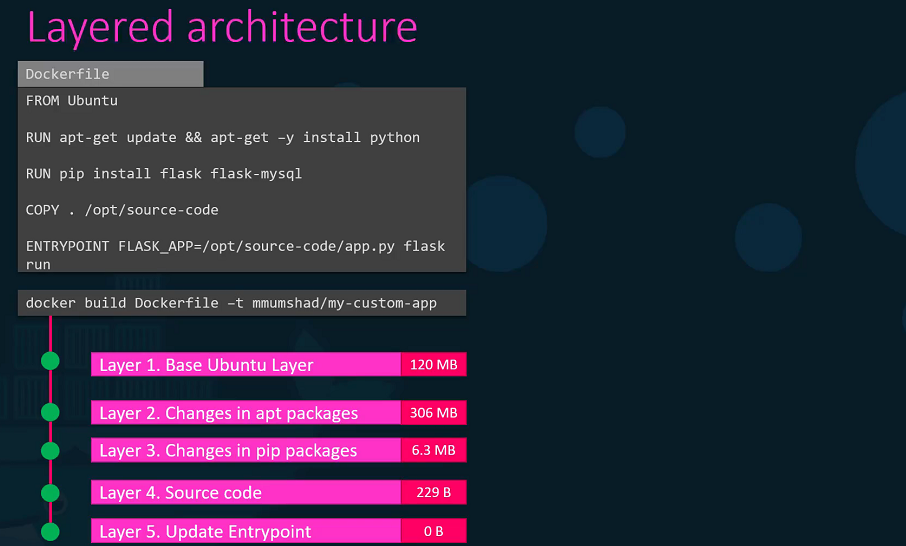
Let’s rearrange the layers bottom up so we can understand it better. All of these layers are created when we run the Docker build command to form the final Docker image. Once the build is complete, you cannot modify the contents of these layers and so they are read-only and you can only modify them by initiating a new build.
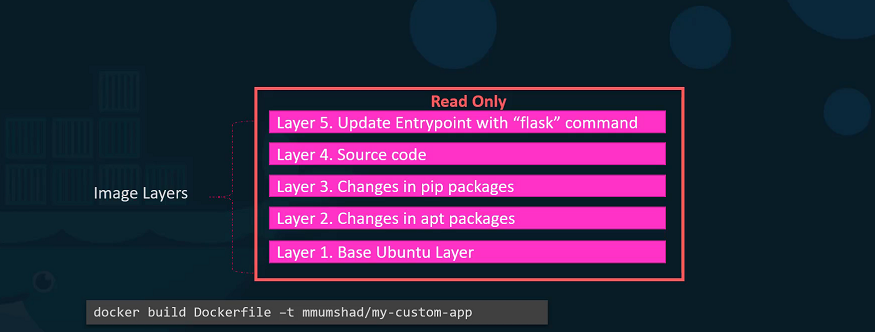
When you run a container based off of this image, using the Docker run command Docker creates a container based off of these layers and creates a new writeable layer on top of the image layer. The writeable layer is used to store data created by the container such as log files written by the applications, any temporary files generated by the container.

When the container is destroyed, this layer and all of the changes stored in it are also destroyed. Remember that the same image layer is shared by all containers created using this image.
- If I will create a new file called temp.txt in the newly created container, which is read and write.
- The files in the image layer are read-only meaning you cannot edit anything in those layers.
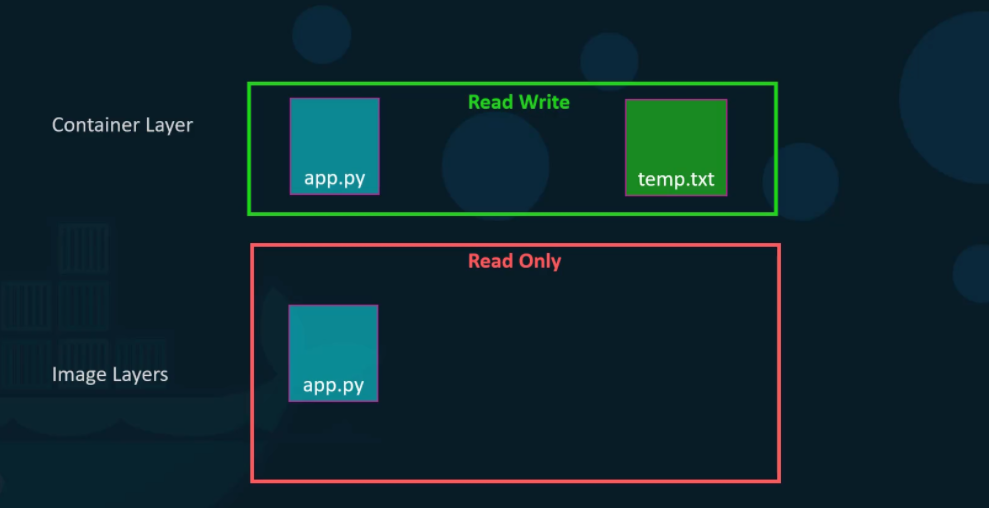
Let’s take an example of our application code. Since we bake our code into the image, the code is part of the image and as such, its read-only. After running a container, what if I wish to modify the source code.
Yes, I can still modify this file, but before I saved the modified file, Docker automatically creates a copy of the file in the read-write layer and I will then be modifying a different version of the file in the read-write layer. All future modifications will be done on this copy of the file in the read-write layer. This is called copy-on-right mechanism.
The Image layer being a read-only just means that the files in these layers will not be modified in the image itself. So, the image will remain the same all the time until you rebuild the image using the Docker build command. If container destroyed then all of the data that was stored in the container layer also gets deleted.
Volumes
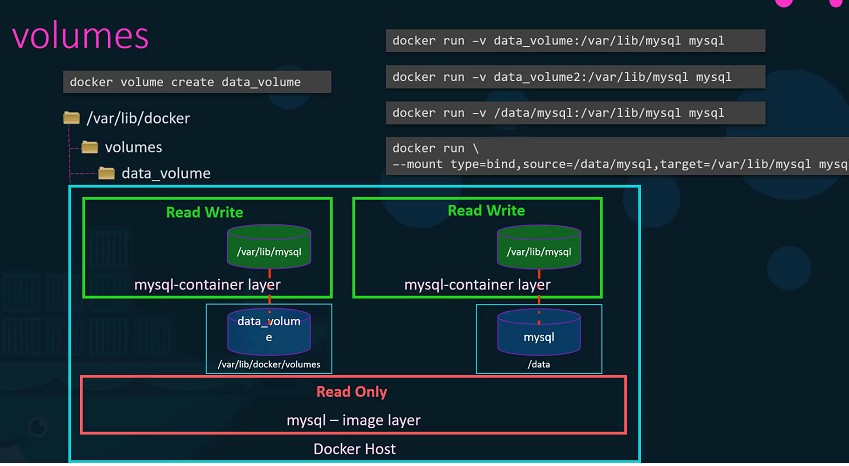
To get a persistent data in the containers, we need to create a volume using the docker volume create command. So, when I run the docker volume create data_volume command, it creates a directory called data_volume under the /var/lib/docker/ volumes directory.
$ docker volume create data_volume

$ ls -l /var/lib/docker/volumes/

drwxr-xr-x 3 root root  4096 Aug 01 17:53 data_volume

$ docker volume ls

DRIVER              VOLUME NAME
  local               data_volume
When I run the Docker container using the docker run command, I could mount this volume inside the Docker containers, with -v options.
So when I do a docker run -v then specify my newly created volume name followed by a colon(:) and the location inside my container, which is the default location where MySQL stores data and that is /var/lib/mysql and at the last image name of MySQL. This will create a new container and mount the data volume.
$ docker run -v data_volume:/var/lib/mysql mysql
Even if the container is destroyed, the data is still available.
What if you didn’t create the Docker volume before the Docker run command. In this image, Docker will automatically create a volume named data_volume2 and mount it to the container.
$ docker run -v data_volume2:/var/lib/mysql mysql

$ docker volume ls

  DRIVER              VOLUME NAME
  local               data_volume
  local               data_volume2
You should be able to see all these volumes if you list the contents of the /var/lib/docker volumes directory. This is called Volume mounting.
What if we had our data already at another location?
Let’s say we have some external storage on the Docker host at /data path and we would like to store database data on that volume and not in the default /var/lib/docker volumes directory.
In that case, we would run a container using the command docker run -v. But in this case, we will provide the complete path to the directory we would like to mount. That is /data/mysql and so it will create a container and mount the directory to the container. This is called Bind mounting.
-
So there are two types of mounts, volume mount and bind mount.
-
Volume mount, mounts of volume from the volumes directory
-
bind mount, mounts indirectly from any location on the Docker host.
-
Instead of -v option, we can preferred --mount option.
$ mkdir -p /data/mysql

$ docker run --mount type=bind,source=/data/mysql,target=/var/lib/mysql mysql
So, who is responsible for doing all of these Operations?
-
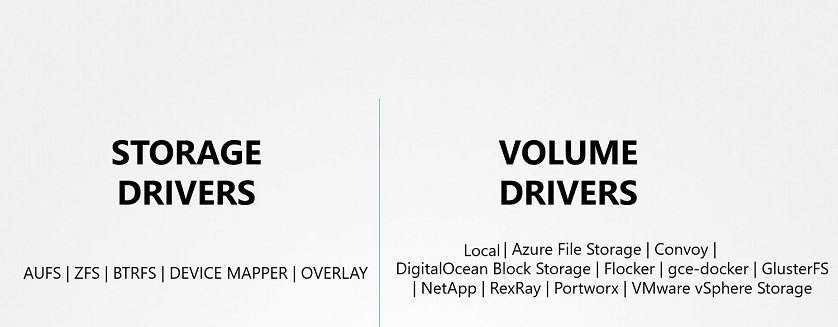
Maintaining of layered architecture, creating a writeable layer, moving files across layers to enable copy and write etc. It’s the Storage Drivers.
-
Docker uses storage drivers to enable layered architecture.
Common Storage Drivers
- AUFS
- ZFS
- BTRFS
- Device Mapper
- Overlay
- Overlay2
- To Selection of the storage drivers depends on the underlying OS. Docker will choose the best storage driver available automatically based on the operating system.
Volume Drivers
We discussed about Storage drivers. Storage drivers help to manage storage on images and containers.
We have already seen that if you want to persist storage, you must create volumes. Volumes are not handled by the storage drivers. Volumes are handled by volume driver plugins. The default volume driver plugin is local.
- The local volume plugin helps to create a volume on Docker host and store its data under the
/var/lib/docker/volumes/directory. - There are many other volume driver plugins that allow you to create a volume on third-party solutions like Azure file storage, DigitalOcean Block Storage, Portworx, Google Compute Persistent Disks etc.
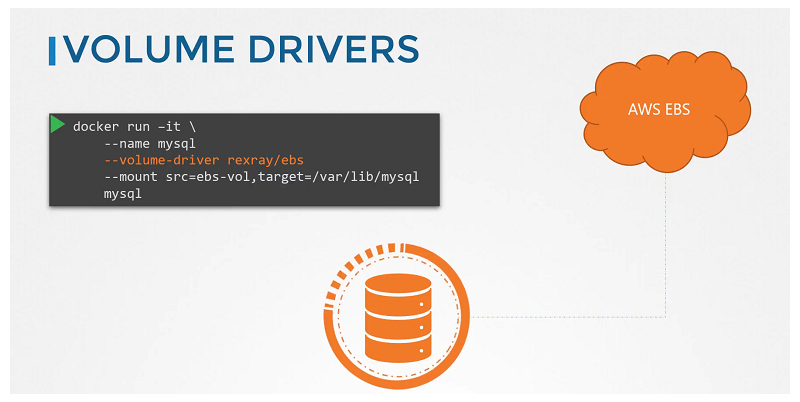
When you run a Docker container, you can choose to use a specific volume driver, such as the RexRay EBS to provision a volume from the Amazon EBS. This will create a container and attach a volume from the AWS cloud. When the container exits, your data is safe in the cloud.
$ docker run -it \
        --name mysql
        --volume-driver rexray/ebs
        --mount src=ebs-vol,target=/var/lib/mysql
        mysql
Container Storage Interface
Container Runtime
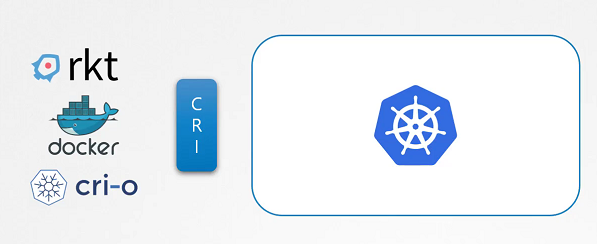
Kubernetes used Docker alone as the container runtime engine, and all the code to work with Docker was embedded within the Kubernetes source code. Other container runtimes, such as rkt and CRI-O.
The Container Runtime Interface is a standard that defines how an orchestration solution like Kubernetes would communicate with container runtimes like Docker. If any new container runtime interace is developed, they can simply follow the CRI standards.
Container networking interface
To support different networking solutions, the container networking interface was introduced. Any new networking vendors could simply develop their plugin based on the CNI standards and make their solution work with Kubernetes.

Container Storage Interface
The container storage interface was developed to support multiple storage solutions. With CSI, you can now write your own drivers for your own storage to work with Kubernetes. Portworx, Amazon EBS, Azure Disk, GlusterFS etc.
CSI is not a Kubernetes specific standard. It is meant to be a universal standard and if implemented, allows any container orchestration tool to work with any storage vendor with a supported plugin. Kubernetes, Cloud Foundry and Mesos are onboard with CSI.
It defines a set of remote procedure calls(RPCs) that will be called by the container orchestrator. These must be implemented by the storage drivers.

Volumes
In this section, we will take a look at Volumes
We discussed about Docker storage, If we don’t attach the volume in the container runtime, when container destroyed and then all data will be lost. So, We need to persist data into the Docker container so we attach a volume to the containers when they are created.
The data are processed by the container is now placed in this volume thereby retaining it permanently. Even if the container is deleted the data remains in the volume.
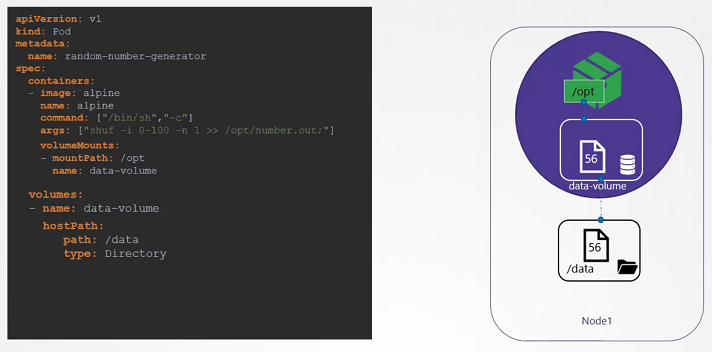
In the Kubernetes world, the PODs created in Kubernetes are transient in nature. When a POD is created to process data and then deleted, the data processed by it gets deleted as well.
For example, We create a simple POD that generated a random between 1 and 100 and writes that to a file at /opt/number.out. To persist into the volume.
We create a volume for that. In this case I specify a path /data on the host. Files are stored in the directory data on my node. We use the volumeMounts field in each container to mount the data-volume to the directory /opt within the container. The random number will now be written to /opt mount inside the container, which happens to be on the data-volume which is in fact /data directory on the host. When the pod gets deleted, the file with the random number still lives on the host.
Volume storage options
In the volumes, hostPath volume type is fine with the single node. It’s not recomended for use with the multi node cluster.
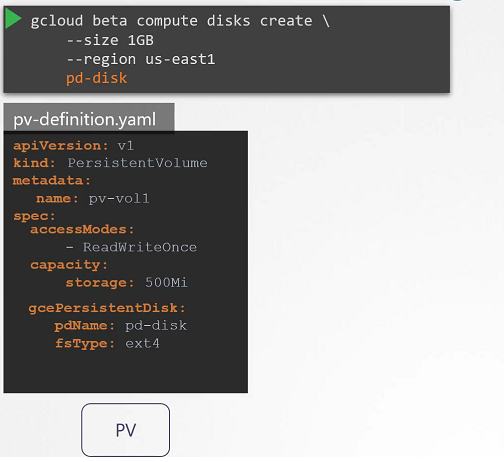
In the Kubernetes, it supports several types of standard storage solutions such as NFS, GlusterFS, CephFS or public cloud solutions like AWS EBS, Azure Disk or Google’s Persistent Disk.
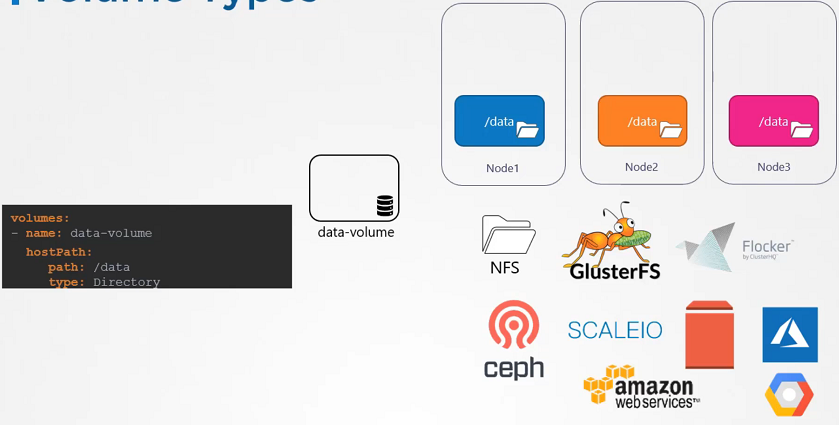
# configuring awsElasticBlockStore
volumes:
- name: data-volume
  awsElasticBlockStore:
    volumeID: <volume-id>
    fsType: ext4
Persistent volume
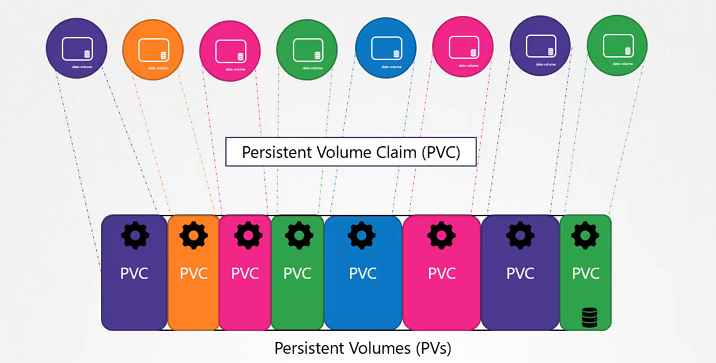
In the large evnironment, with a lot of users deploying a lot of pods, the users would have to configure storage every time for each Pod.
Whatever storage solution is used, the users who deploys the pods would have to configure that on all pod definition files in his environment. Every time a change is to be made, the user would have to make them on all of his pods.
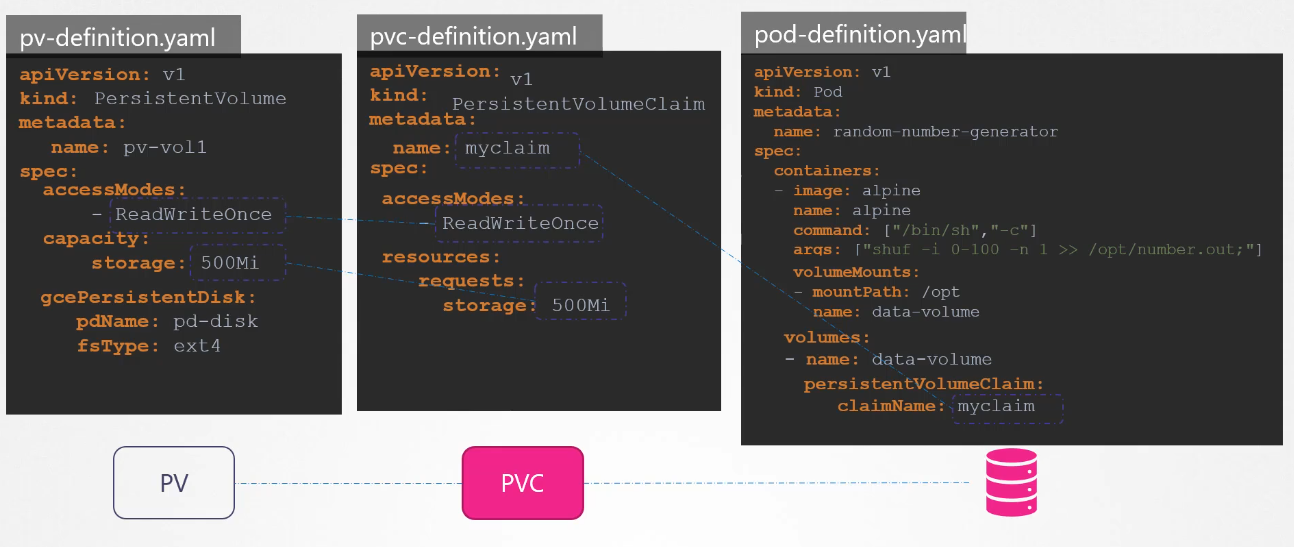
A Persistent Volume is a cluster-wide pool of storage volumes configured by an administrator to be used by users deploying application on the cluster. The users can now select storage from this pool using Persistent Volume Claims.
# pv-definition.yaml

kind: PersistentVolume
apiVersion: v1
metadata:
  name: pv-vol1
spec:
  accessModes: [ "ReadWriteOnce" ] # ReadOnlyMany or ReadWriteMany
  capacity:
   storage: 1Gi
  hostPath:
   path: /tmp/data
$ kubectl create -f pv-definition.yaml
persistentvolume/pv-vol1 created
$ kubectl get pv
NAME CAPACITY ACCESS MODES RECLAIM POLICY STATUS CLAIM STORAGECLASS REASON AGE
pv-vol1 1Gi RWO Retain Available 3min
$ kubectl delete pv pv-vol1
persistentvolume "pv-vol1" deletedPersistent volume claims
Now we will create a Persistent Volume Claim to make the storage available to the node. Volumes and Persistent Volume Claim are two separate objects in the Kubernetes namespace.
Once the Persistent Volume Claim created, Kubernetes binds the Persistent Volumes to claim based on the request and properties set on the volume.
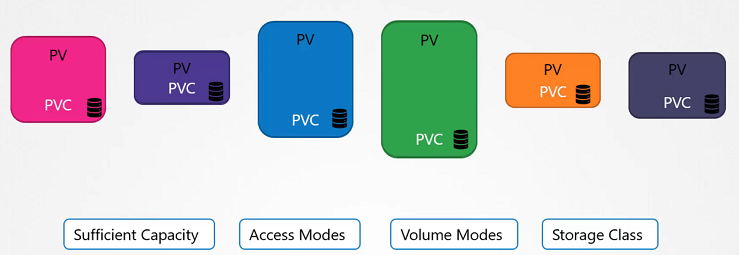
If properties not matches or Persistent Volume is not available for the Persistent Volume Claim then it will display the pending state.
# pvc-definition.yaml

kind: PersistentVolumeClaim
apiVersion: v1
metadata:
  name: myclaim
spec:
  accessModes: [ "ReadWriteOnce" ]
  resources:
   requests:
     storage: 1Gi
# pv-definition.yaml
kind: PersistentVolume
apiVersion: v1
metadata:
name: pv-vol1
spec:
accessModes: [ "ReadWriteOnce" ]
capacity:
storage: 1Gi
hostPath:
path: /tmp/dataCreate the Persistent Volume:
$ kubectl create -f pv-definition.yaml
persistentvolume/pv-vol1 created
$ kubectl get pv
NAME CAPACITY ACCESS MODES RECLAIM POLICY STATUS CLAIM STORAGECLASS REASON AGE
pv-vol1 1Gi RWO Retain Available 10sCreate the Persistent Volume Claim:
$ kubectl create -f pvc-definition.yaml
persistentvolumeclaim/myclaim created
$ kubectl get pvc
NAME STATUS VOLUME CAPACITY ACCESS MODES STORAGECLASS AGE
myclaim Pending 35s
$ kubectl get pvc
NAME STATUS VOLUME CAPACITY ACCESS MODES STORAGECLASS AGE
myclaim Bound pv-vol1 1Gi RWO 1minDelete the Persistent Volume Claim:
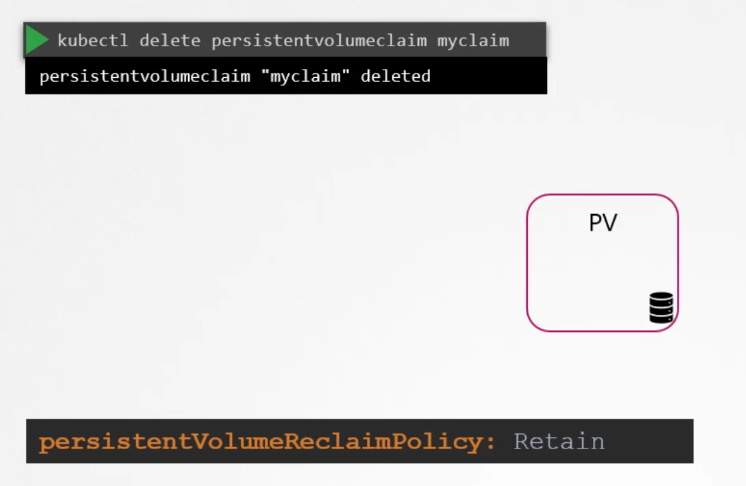
$ kubectl delete pvc myclaimDelete the Persistent Volume:
$ kubectl delete pv pv-vol1 what to do with volume when PVC is deleted
default to
retainand cannot be used by other. Not available for re-use by other claims. Because it hold the data for the previous usage.
recyclescrub the data and make it available again
deletewill delete the volume
Using PVC in POD
In this case, Pods access storage by using the claim as a volume. Persistent Volume Claim must exist in the same namespace as the Pod using the claim.
The cluster finds the claim in the Pod’s namespace and uses it to get the Persistent Volume backing the claim. The volume is then mounted to the host and into the Pod.
Persistent Volume is a cluster-scoped and Persistent Volume Claim is a namespace-scoped.
Create the Persistent Volume
# pv-definition.yaml

kind: PersistentVolume
apiVersion: v1
metadata:
    name: pv-vol1
spec:
    accessModes: [ "ReadWriteOnce" ]
    capacity:
     storage: 1Gi
    hostPath:
     path: /tmp/data
$ kubectl create -f pv-definition.yamlCreate the Persistent Volume Claim
# pvc-definition.yaml

kind: PersistentVolumeClaim
apiVersion: v1
metadata:
  name: myclaim
spec:
  accessModes: [ "ReadWriteOnce" ]
  resources:
   requests:
     storage: 1Gi

$ kubectl create -f pvc-definition.yaml
Create a Pod
# pod-definition.yaml

apiVersion: v1
kind: Pod
metadata:
  name: mypod
spec:
  containers:
    - name: myfrontend
      image: nginx
      volumeMounts:
      - mountPath: "/var/www/html"
        name: web
  volumes:
    - name: web
      persistentVolumeClaim:
        claimName: myclaim

$ kubectl create -f pod-definition.yaml
List the Pod,Persistent Volume and Persistent Volume Claim
$ kubectl get pod,pvc,pv
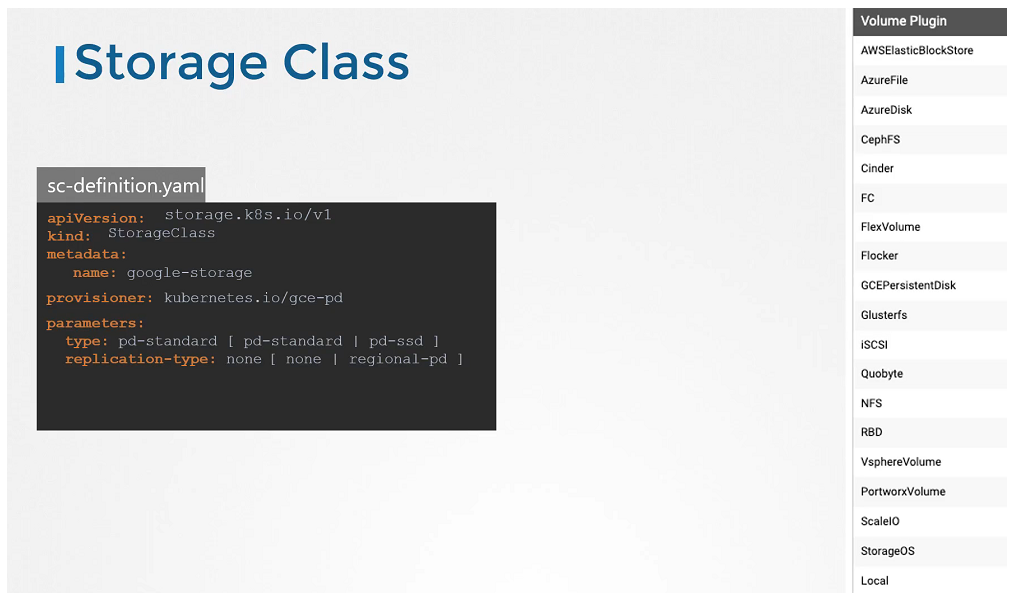
Storage class
We discussed about how to create Persistent Volume and Persistent Volume Claim and We also saw that how to use into the Pod’s volume to claim that volume space.
We created Persistent Volume but before this if we are taking a volume from Cloud providers like GCP, AWS, Azure. We need to first create disk in the Google Cloud as an example.
We need to create manually each time when we define in the Pod definition file. that’s called Static Provisioning.
Static provisioning
Dynamic provisioning
No we have a Storage Class, So we no longer to define Persistent Volume. It will create the PV automatically when a Storage Class is created. It’s called Dynamic Provisioning.
# sc-definition.yaml

apiVersion: storage.k8s.io/v1
kind: StorageClass
metadata:
   name: google-storage
provisioner: Kubernetes.io/gce-pd
Create a Storage Class
$ kubectl create -f sc-definition.yaml
storageclass.storage.k8s.io/google-storage created
List the Storage Class
$ kubectl get sc
NAME             PROVISIONER            RECLAIMPOLICY   VOLUMEBINDINGMODE   ALLOWVOLUMEEXPANSION   AGE
google-storage   Kubernetes.io/gce-pd   Delete          Immediate           false                  20s
Create a Persistent Volume Claim
# pvc-definition.yaml

kind: PersistentVolumeClaim
apiVersion: v1
metadata:
  name: myclaim
spec:
  accessModes: [ "ReadWriteOnce" ]
  storageClassName: google-storage
  resources:
   requests:
     storage: 500Mi
$ kubectl create -f pvc-definition.yaml
Create a Pod
# pod-definition.yaml
apiVersion: v1
kind: Pod
metadata:
name: mypod
spec:
containers:
- name: frontend
image: nginx
volumeMounts:
- mountPath: "/var/www/html"
name: web
volumes:
- name: web
persistentVolumeClaim:
claimName: myclaim
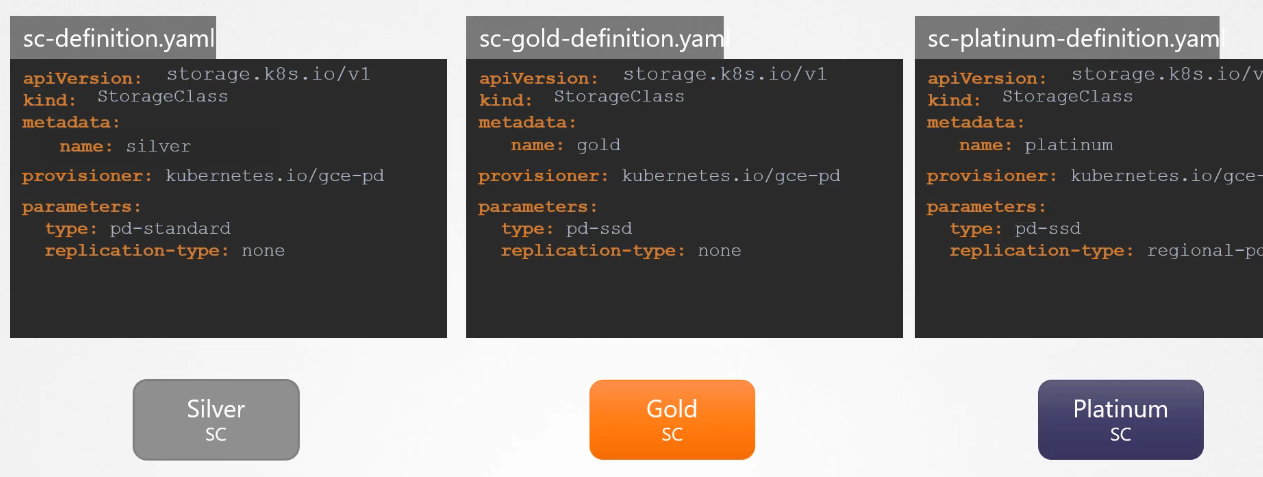
$ kubectl create -f pod-definition.yamlProvisioner options
Whether if you want them to be SDD or replicated