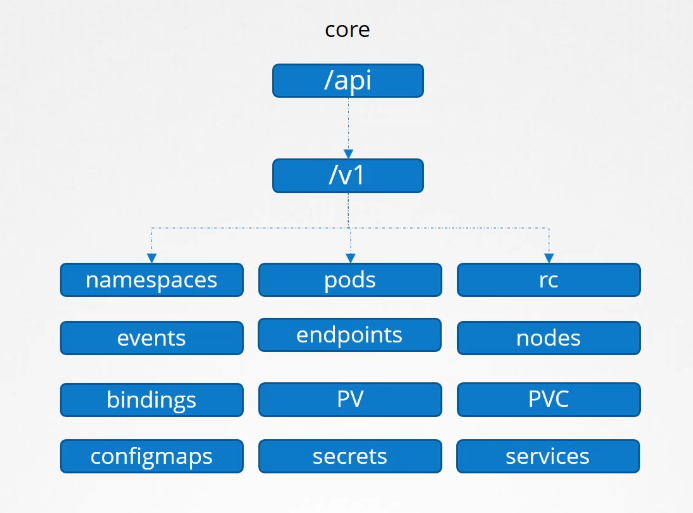
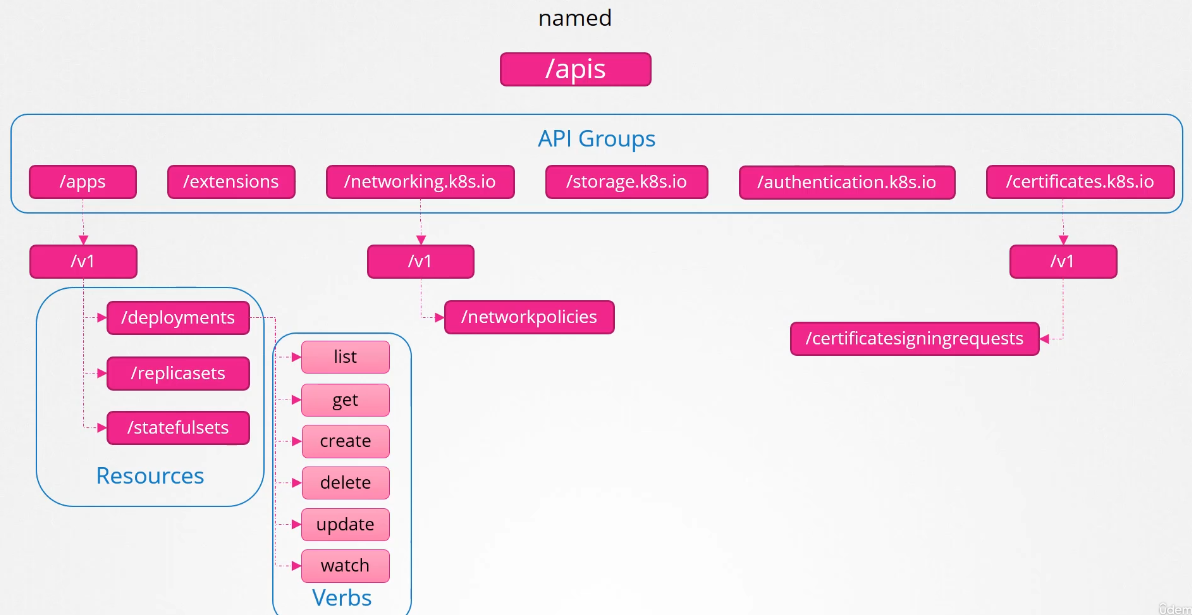
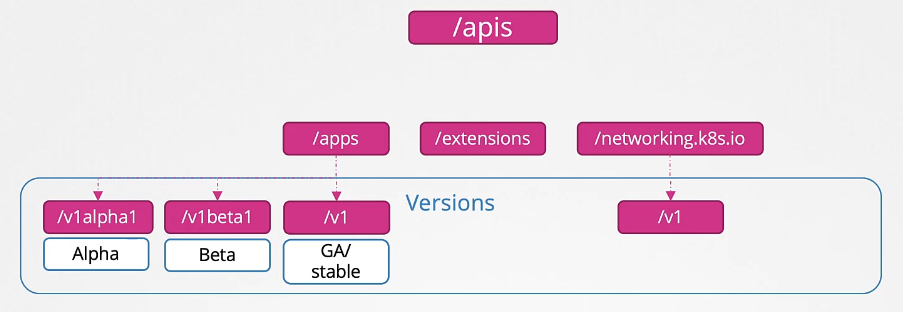
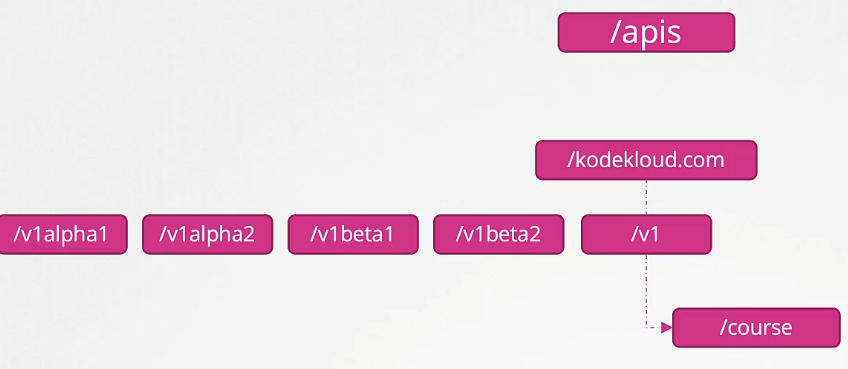
API Groups

/apiis the core/apisis the named group

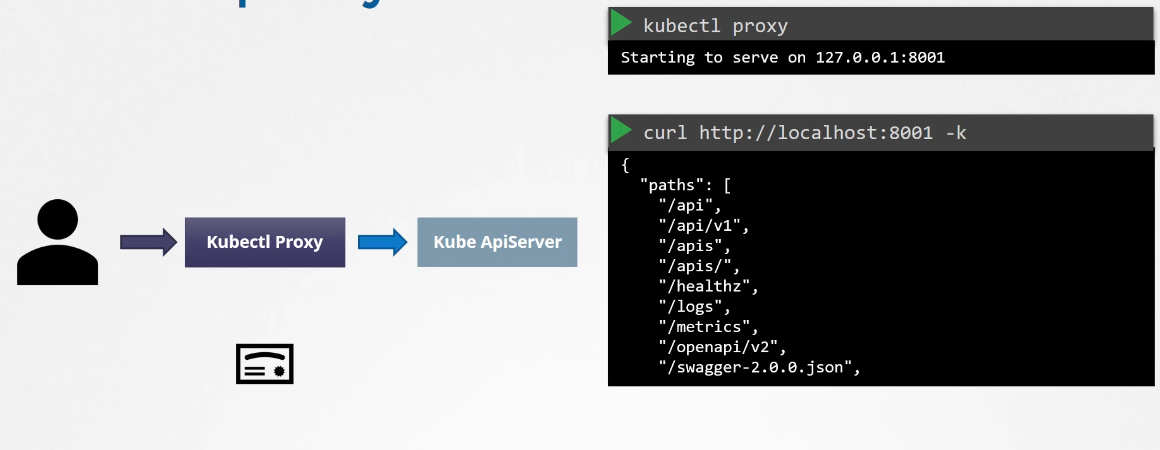
Kubectl proxy is a proxy created by kubectl to access the kube-api-server.

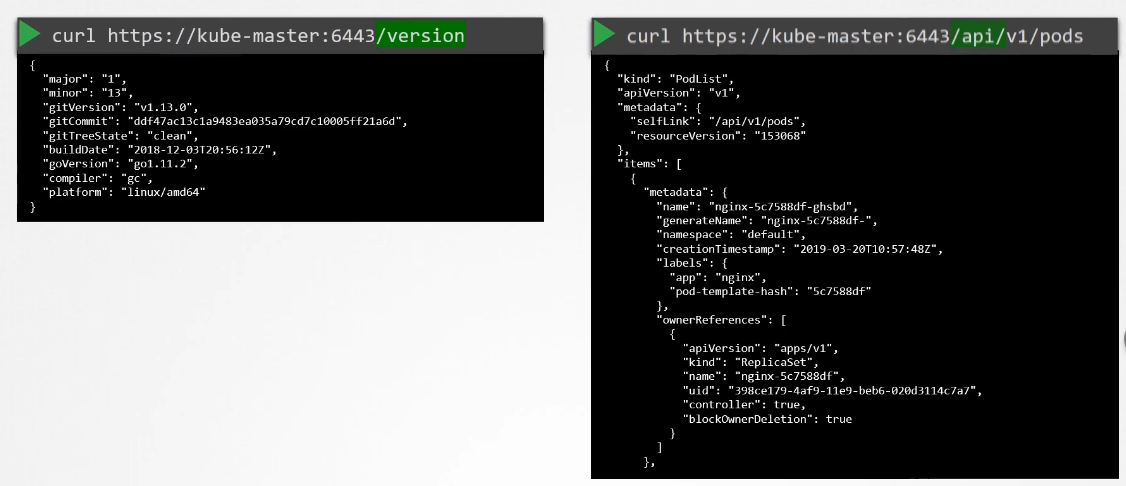
API Versions
When we see the V1 version, it means it is a GA (General Availability) stable version. The API group may have other versions such as v1Beta1 or v1alpha1.
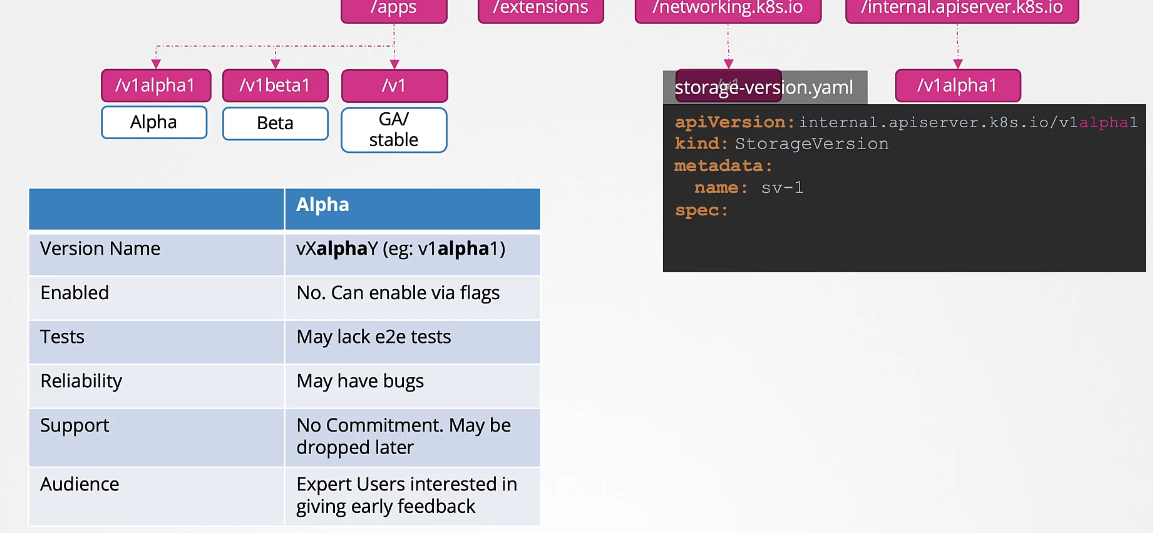
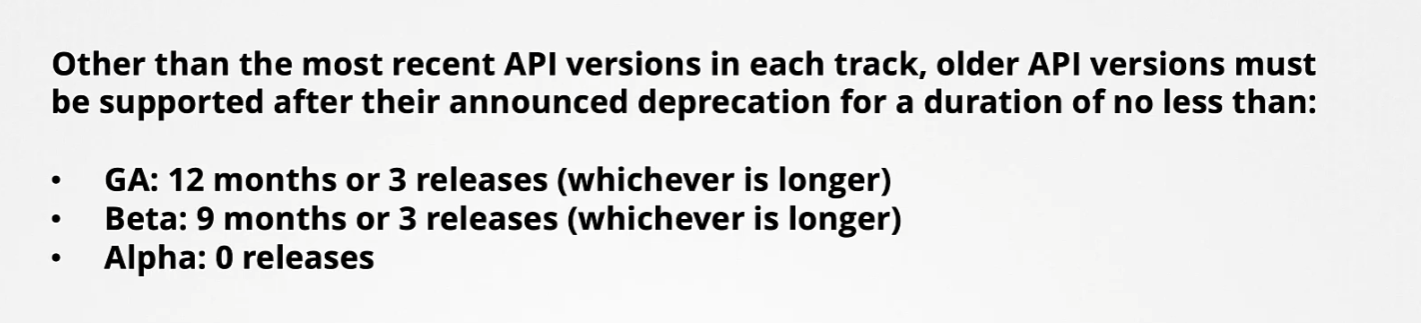
Alpha vs Beta vs GA Comparison
Enable the
v1alpha1version forrbac.authorization.k8s.ioAPI group on thecontrolplanenode.Note: If you made a mistake in the config file could result in the API server being unavailable and can break the cluster.
As a good practice, take a backup of that
apiservermanifest file before going to make any changes.In case, if anything happens due to misconfiguration you can replace it with the backup file.
root@controlplane:~# cp -v /etc/kubernetes/manifests/kube-apiserver.yaml /root/kube-apiserver.yaml.backupNow, open up the
kube-apiservermanifest file in the editor of your choice. It could bevimornano.root@controlplane:~# vi /etc/kubernetes/manifests/kube-apiserver.yamlAdd the
--runtime-configflag in thecommandfield as follows :-- command: - kube-apiserver - --advertise-address=10.18.17.8 - --allow-privileged=true - --authorization-mode=Node,RBAC - --client-ca-file=/etc/kubernetes/pki/ca.crt - --enable-admission-plugins=NodeRestriction - --enable-bootstrap-token-auth=true - --runtime-config=rbac.authorization.k8s.io/v1alpha1 --> This oneAfter that
kubeletwill detect the new changes and will recreate theapiserverpod.It may take some time.
root@controlplane:~# kubectl get po -n kube-systemCheck the status of the
apiserverpod. It should be in running condition.
Install the
kubectl convertplugin on thecontrolplanenode.If unsure how to install then refer to the official k8s documentation page which is available at the top right panel.
Download the latest release version from the
curlcommand :-$ curl -LO https://dl.k8s.io/release/$(curl -L -s https://dl.k8s.io/release/stable.txt)/bin/linux/amd64/kubectl-convert % Total % Received % Xferd Average Speed Time Time Time Current Dload Upload Total Spent Left Speed 100 154 100 154 0 0 6416 0 --:--:-- --:--:-- --:--:-- 6416 100 60.7M 100 60.7M 0 0 142M 0 --:--:-- --:--:-- --:--:-- 142Mthen check the availability by
lscommand :-root@controlplane:~# pwd /root root@controlplane:~# ls kubectl-convert multi-pod.yaml sample.yamlChange the permission of the file and move to the
/usr/local/bin/directory.root@controlplane:~# pwd /root root@controlplane:~# chmod +x kubectl-convert root@controlplane:~# root@controlplane:~# mv kubectl-convert /usr/local/bin/kubectl-convert root@controlplane:~#Use the
--helpoption to see more option.root@controlplane:~# kubectl-convert --helpIf it’ll show more options that means it’s configured correctly if it’ll give an error that means we haven’t set up properly.
What is the base Operating System used by the
python:3.6image?docker run python:3.6 cat /etc/release
Ingress manifest file is already given under the
/root/directory calledingress-old.yaml.With help of the
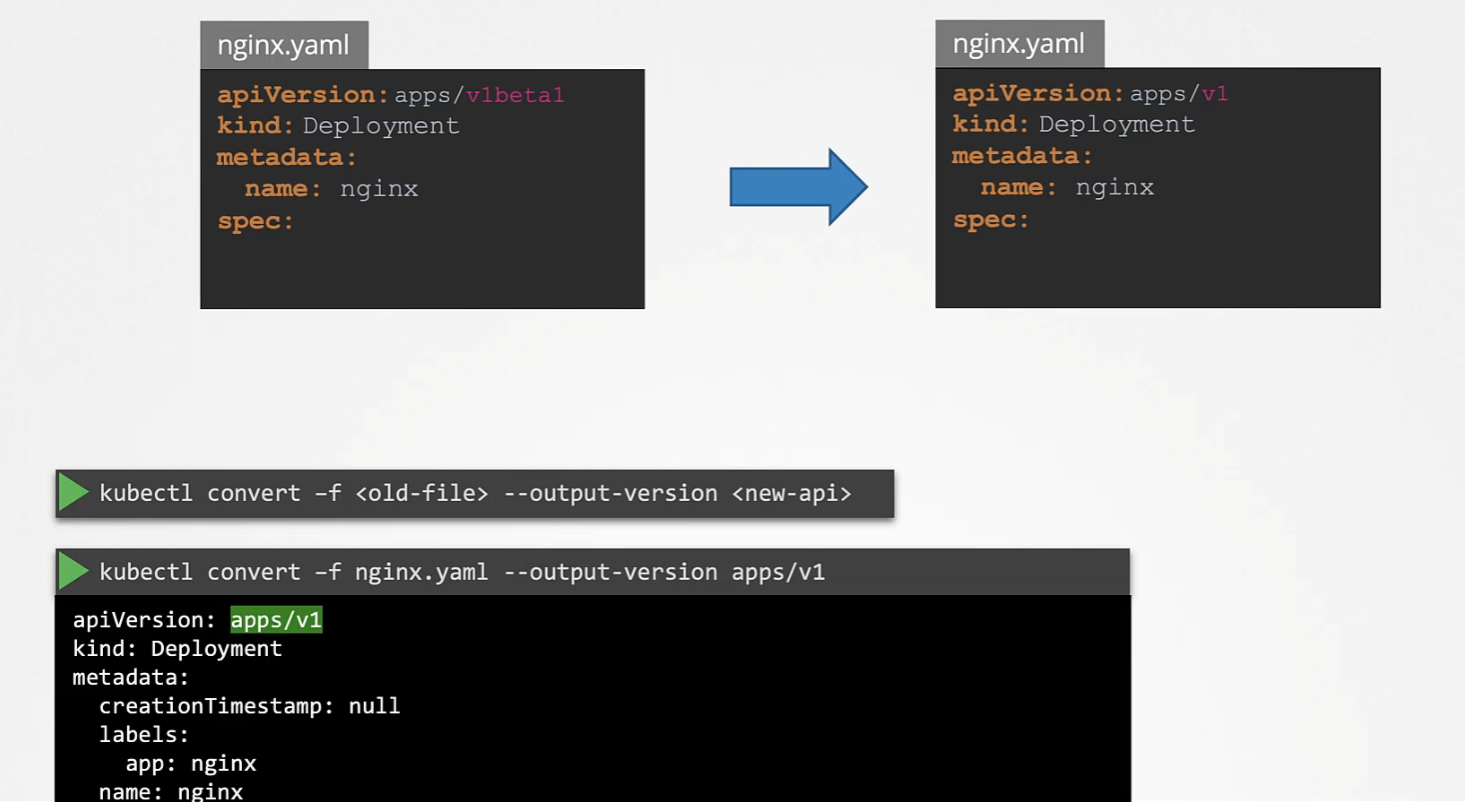
kubectl convertcommand, change the deprecated API version to thenetworking.k8s.io/v1and > create the resource.Run the command
kubectl-convertto change the deprecated API version as follows :-root@controlplane:~# kubectl-convert -f ingress-old.yaml --output-version networking.k8s.io/v1 # store new changes into a file root@controlplane:~# kubectl-convert -f ingress-old.yaml --output-version networking.k8s.io/v1 > ingress-new.yamlAfter changing the API version and storing into a file, use the
kubectl create -fcommand to deploy the resource :-root@controlplane:~# kubectl create -f ingress-new.yamlInspect the
apiVersionas follows :-root@controlplane:~# kubectl get ing ingress-space -oyaml | grep apiVersionNote: Maybe you will not see the service and other resources mentioned in the
ingressYAML on > thecontrolplanenode because we have to only deploy theingressresource with the lat
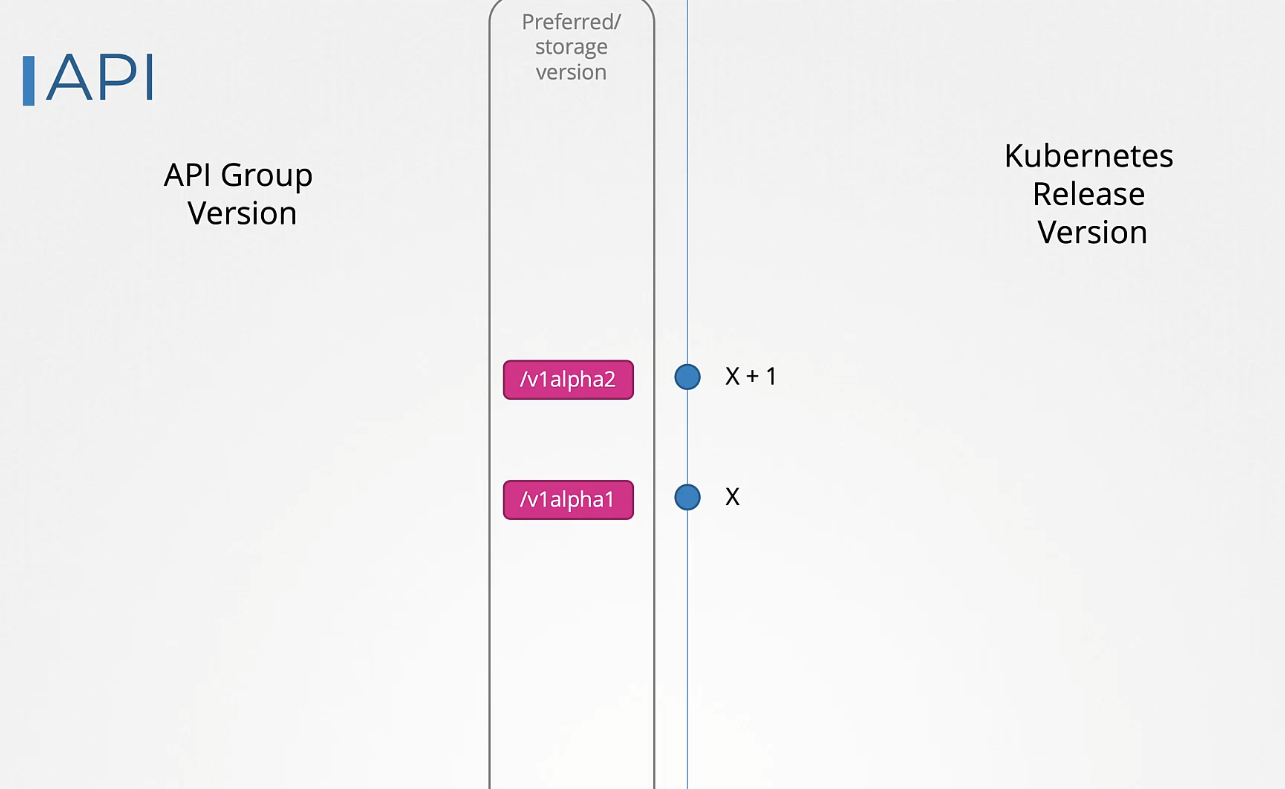
- Alpha: When an API is first developed and merged into the Kubernetes codebase, becoming part of the Kubernetes release for the first time. You cannot use the API version below to create a Kubernetes object without enabling it first:
apiVersion: internal.apiserver.k8s.io/v1alpha1
How to enable/disable API groups?
The order is as follows: alpha → beta → GA (stable).
If a feature goes to Beta mode, maintainers have decided and committed to finishing it and making it stable.

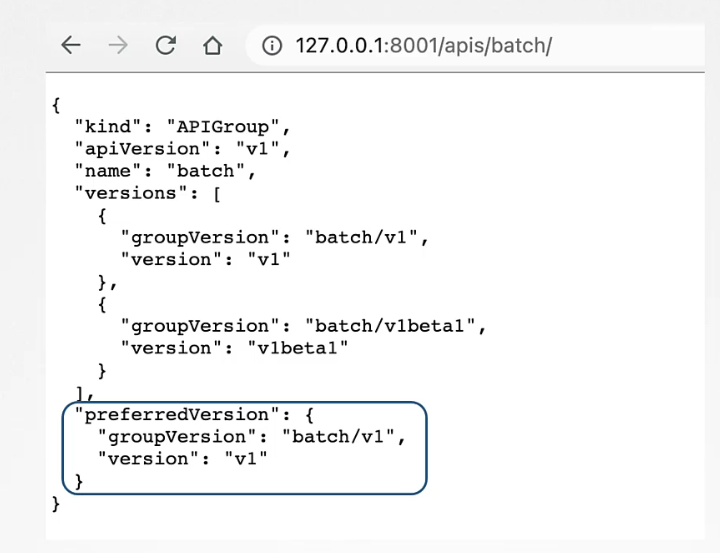
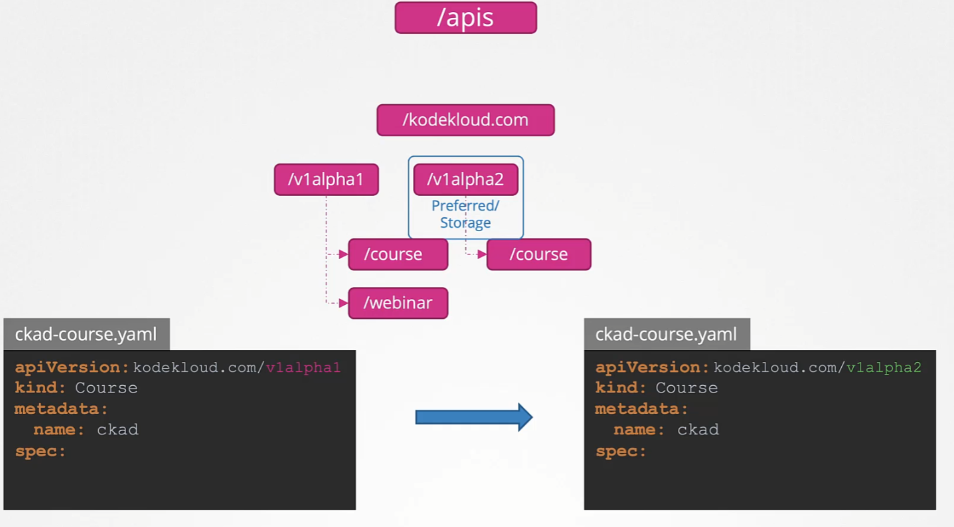
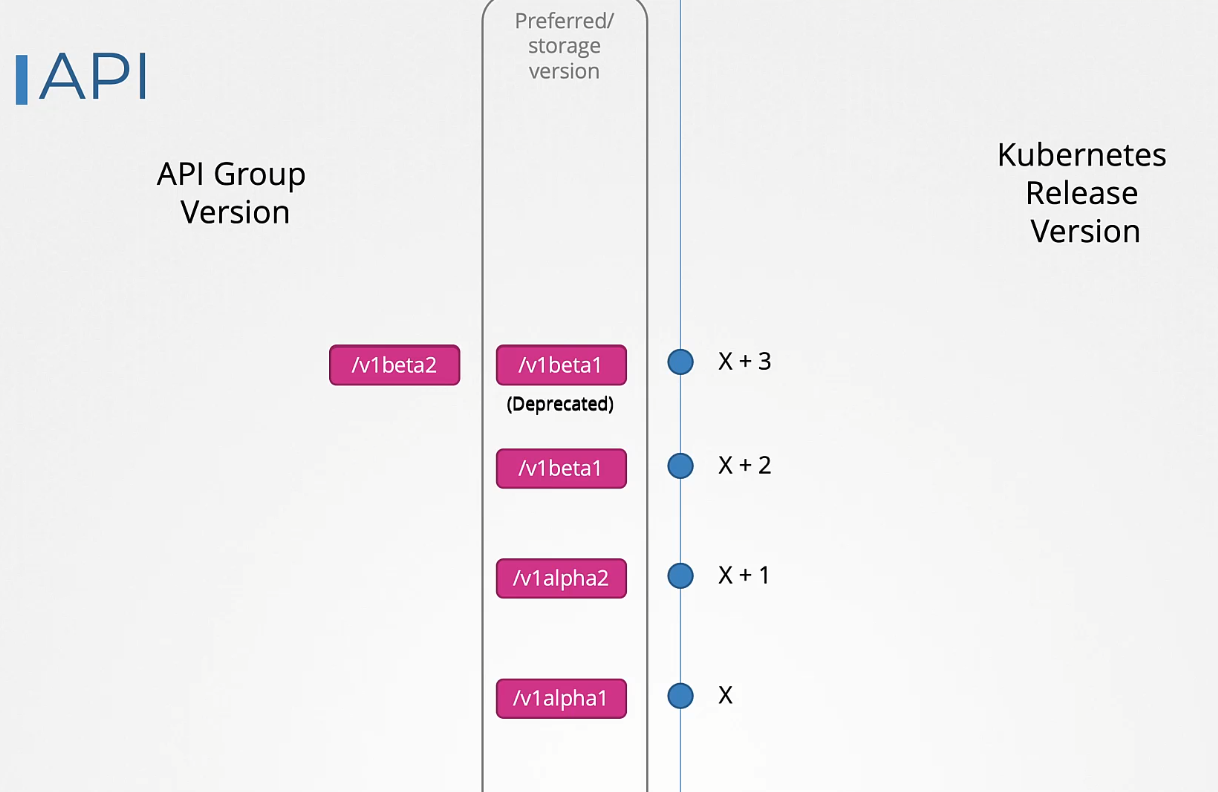
An API group can support multiple versions simultaneously. For example, Deployment supports v1alpha1, v1beta1, and v1. Even though it supports all three versions, only one can be the preferred or storage version.
- Preferred Version: The default version used when retrieving information through the API, such as with the
kubectl getcommand. - Storage Version: The version of the API used to persist objects in the
etcddatabase.

How to Identify the Preferred Version
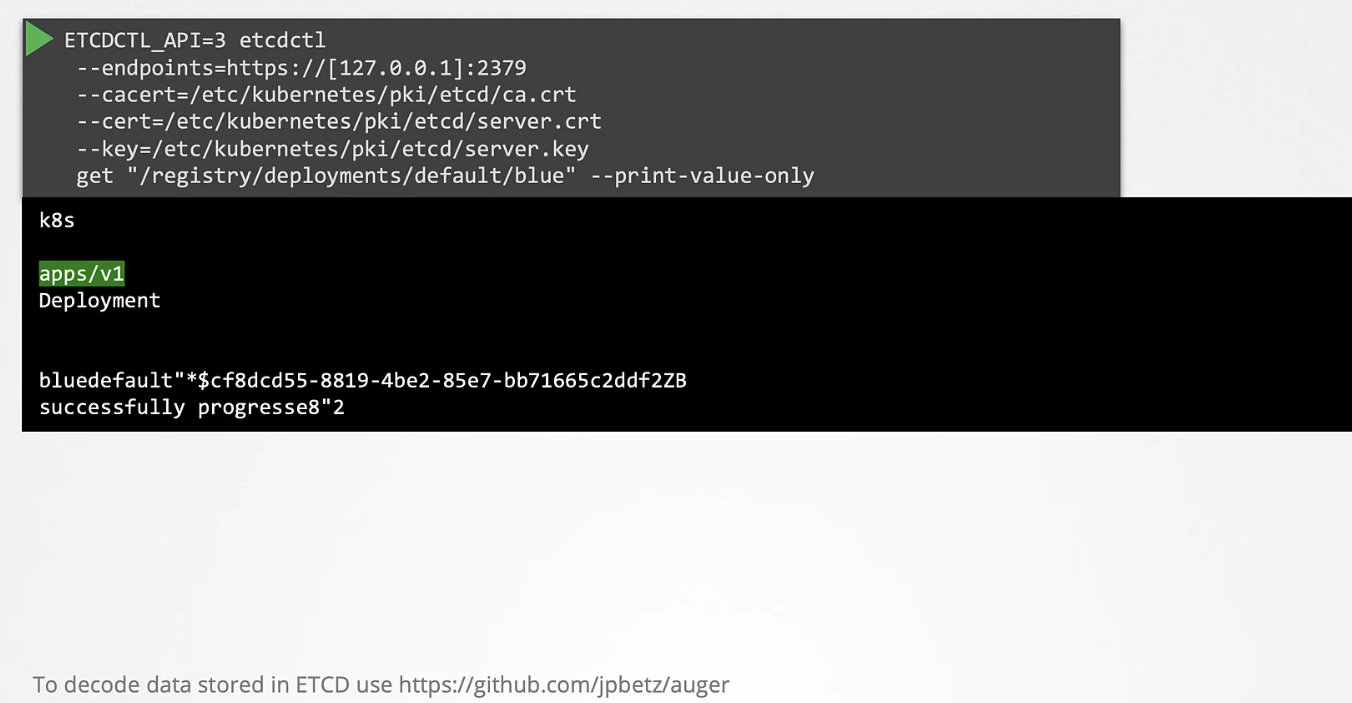
How to View the Storage Version
As of now, it is not possible to see which is the storage version of a particular API through an API or a command. The only way to find out is by looking at the stored object in etcd by querying the etcd database directly.
How API Deprecations Work
Rule #1:
API elements may only be removed by incrementing the version of the API group.
Rule #2:
API objects must round-trip between API versions in a given release without information loss, except for whole REST resources that do not exist in some versions.
Rule #3:
An API version cannot be deprecated in favor of a less stable API version.
Rule 4a:
API lifetime is determined by the API stability level.
- GA API versions may be marked as deprecated but must not be removed within a major version of Kubernetes.
- Beta API versions are deprecated no more than 9 months or 3 minor releases after introduction (whichever is longer), and are no longer served 9 months or 3 minor releases after deprecation (whichever is longer).
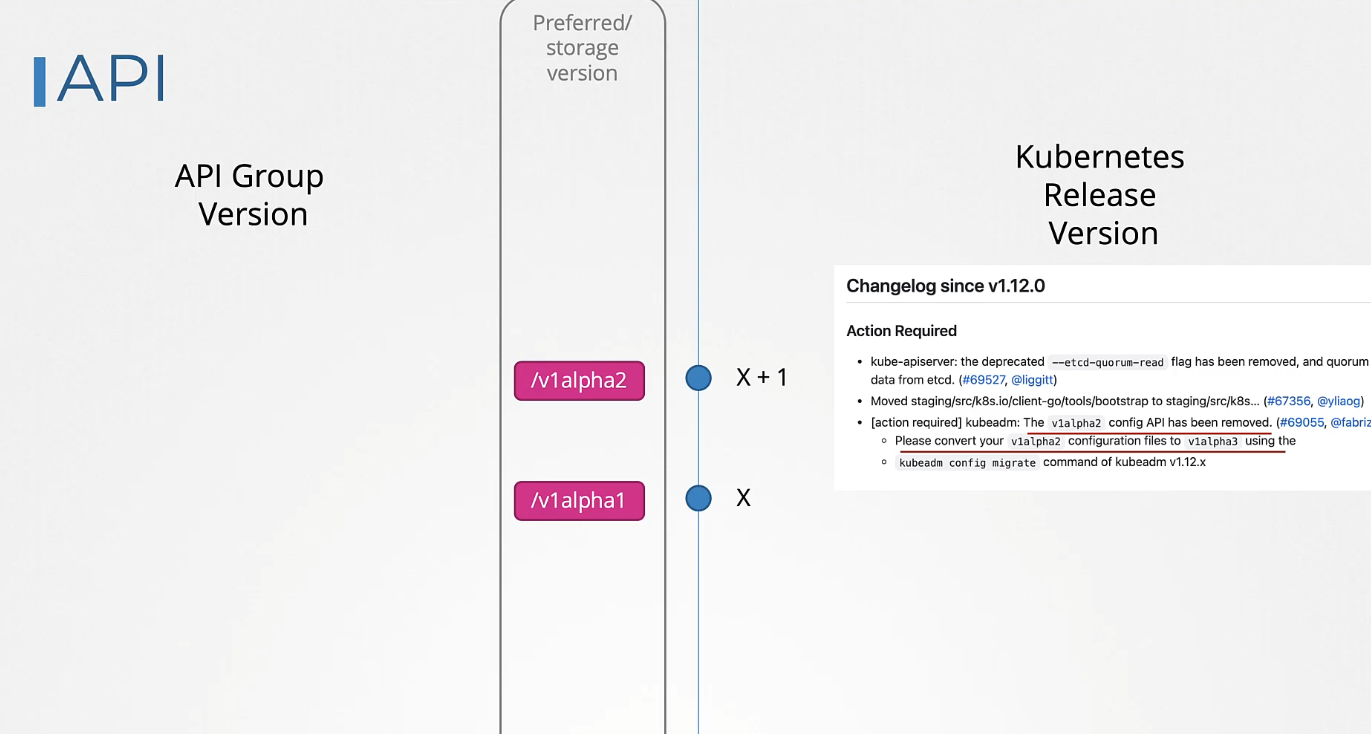
- Alpha API versions may be removed in any release without prior deprecation notice.
This ensures beta API support covers the maximum supported version skew of 2 releases, and that APIs don’t stagnate on unstable beta versions, accumulating production usage that will be disrupted when support for the beta API ends.
Rule 4b:
The “preferred” and “storage” API versions for a group may only advance after a release supports both the new and previous versions.
Rule 5a:
CLI elements of user-facing components (e.g., kubectl) must function after their announced deprecation for no less than:
Rule 5b:
CLI elements of admin-facing components (e.g., kubelet) must function after their announced deprecation for no less than:
Rule 5c:
CLI elements cannot be deprecated in favour of less stable CLI elements.
Rule #6:
Deprecated CLI elements must emit warnings (optionally disable) when used.
Rule #7:
Deprecated behaviours must function for no less than one year after their announced deprecation.
Rule #8:
A feature or behaviour must not be deprecated in favour of a less stable alternative implementation.
Rule #9:
Feature gates must be deprecated when the corresponding feature transitions lifecycle stages. Must function for no less than:
Rule #10:
Deprecated feature gates must respond with a warning when used. Must be documented in release notes and CLI help, indicating if non-operational.
Rule 11a:
Metrics must function for no less than for their corresponding stability class:
Rule 11b:
Metrics must function for no less than their announced deprecation:
For more details, visit the Kubernetes Deprecation Policy.
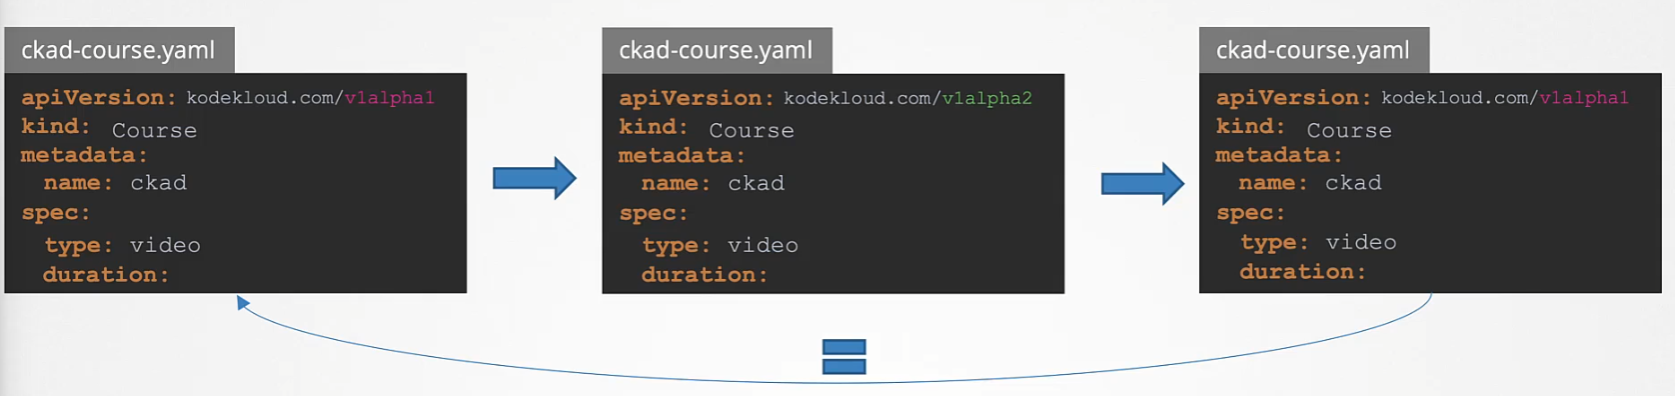
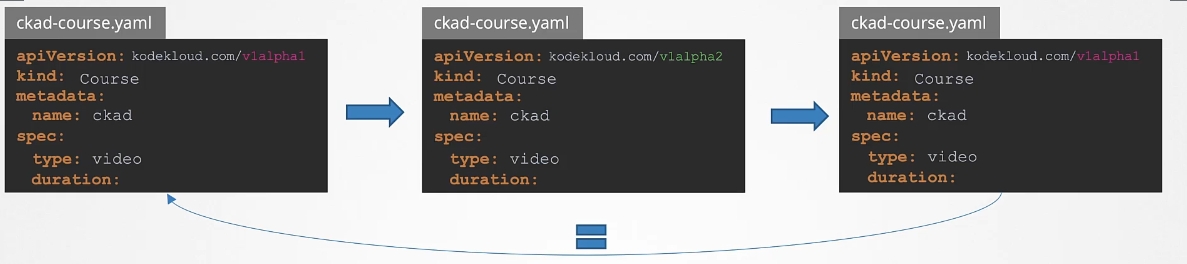
API objects must be able to round-trip between API versions in a given release without information loss, with the exception of whole REST resources that do not exist in some versions.
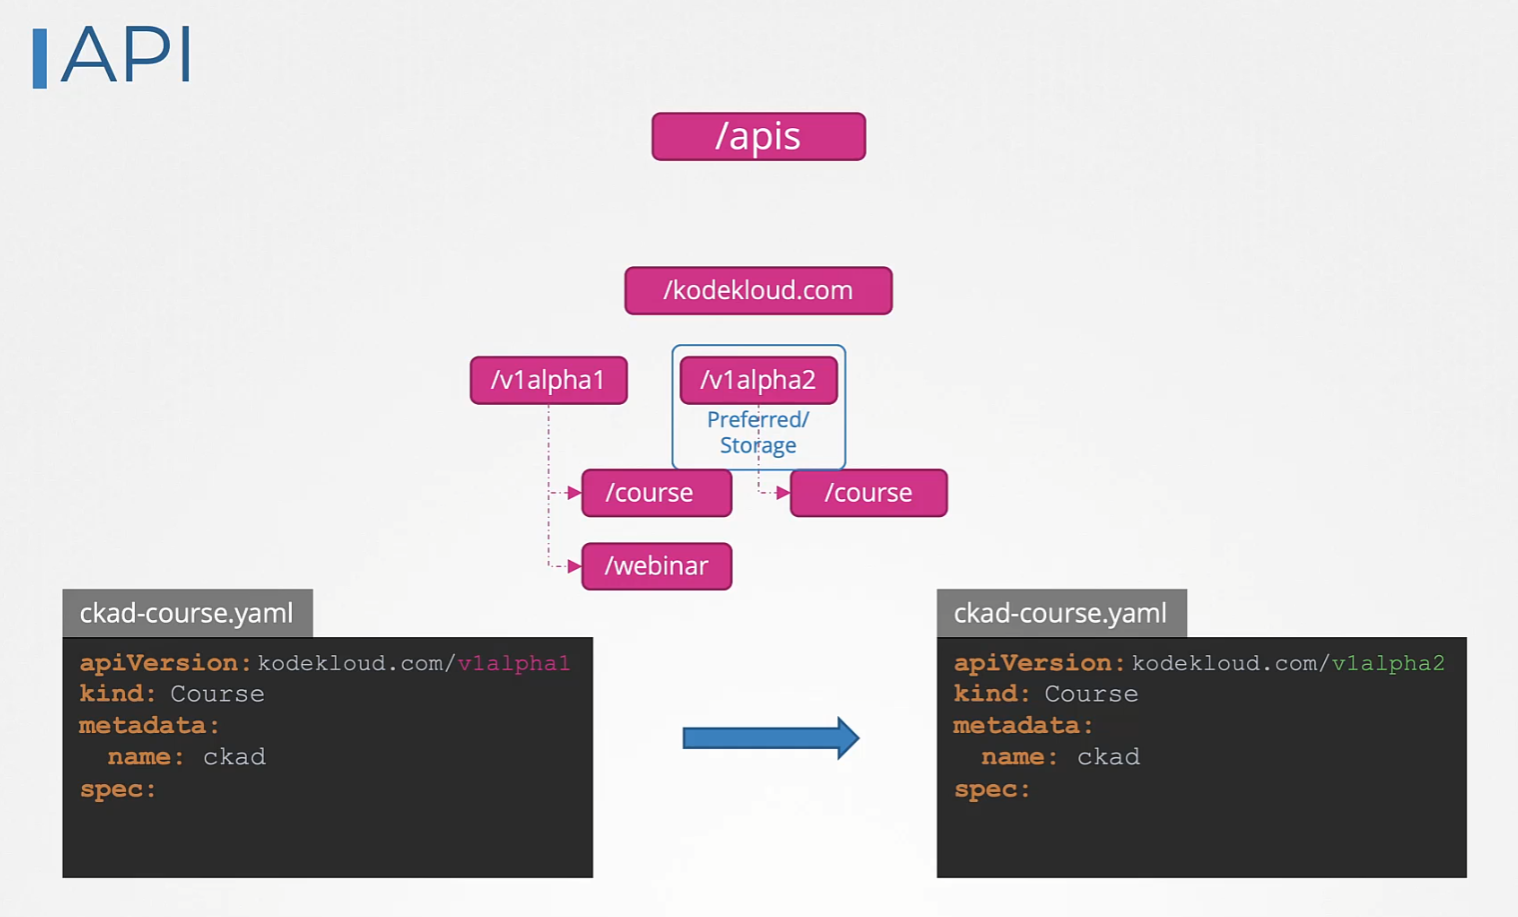
For example, consider a course object in v1alpha1. It has a spec field called type set to video. This is then converted to v1alpha2, where we introduce a new field called duration. This field was not in v1alpha1. When we convert this back to v1alpha1, it will now have the new field, which the original version didn’t have. Therefore, we must add an equivalent field in the v1alpha1 version to ensure the converted v1alpha1 matches the original.
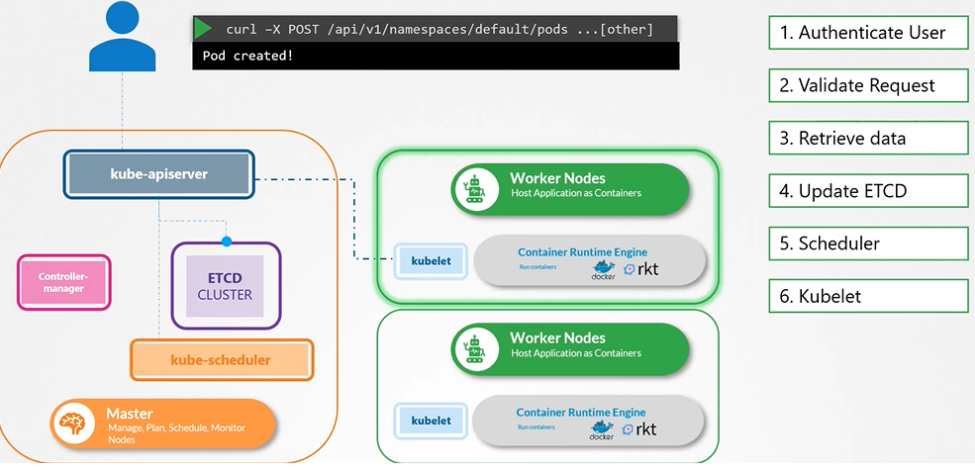
Kube API Server
Kube-apiserver is the primary component in Kubernetes. It is responsible for authenticating, validating requests, and retrieving and updating data in the ETCD key-value store. In fact, kube-apiserver is the only component that interacts directly with the etcd datastore. Other components, such as kube-scheduler, kube-controller-manager, and kubelet, use the API server to make updates in the cluster in their respective areas.
If you are bootstrapping kube-apiserver using kubeadm tool, then you don’t need to know this, but if you are setting up using the hardway then kube-apiserver is available as a binary in the Kubernetes release page. For example: You can downlaod the kube-apiserver v1.13.0 binary here kube-apiserver
$ wget https://storage.googleapis.com/Kubernetes release/release/v1.13.0/bin/linux/amd64/kWWWube-apiserver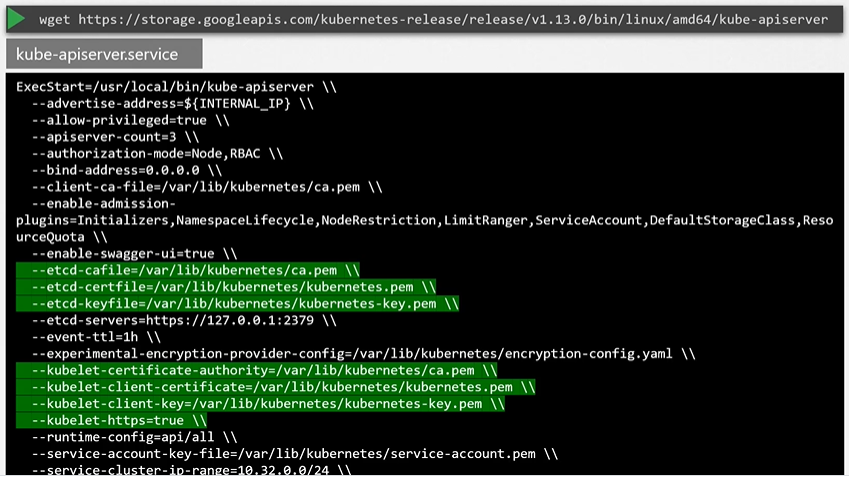
Kubeadm
kubeadm deploys the kube-apiserver as a pod in kube-system namespace on the master node.
$ kubectl get pods -n kube-system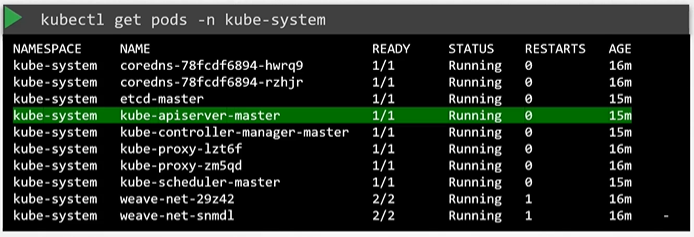
View kube-apiserver options
Kubeadm
You can see the options with in the pod definition file located at /etc/Kubernetes/manifests/kube-apiserver.yaml
$ cat /etc/Kubernetes/manifests/kube-apiserver.yaml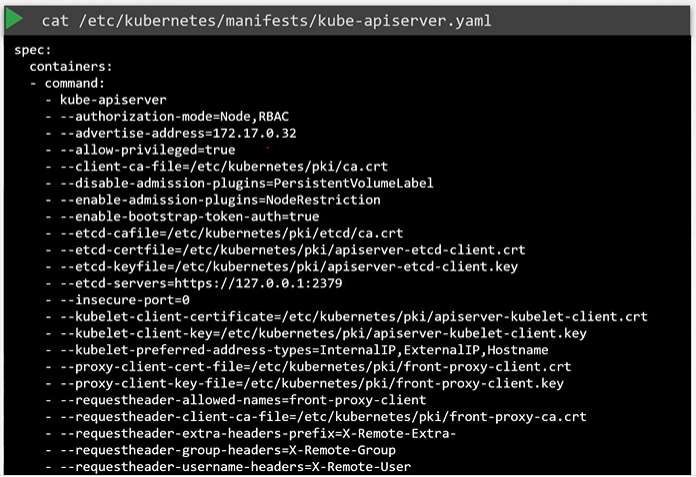
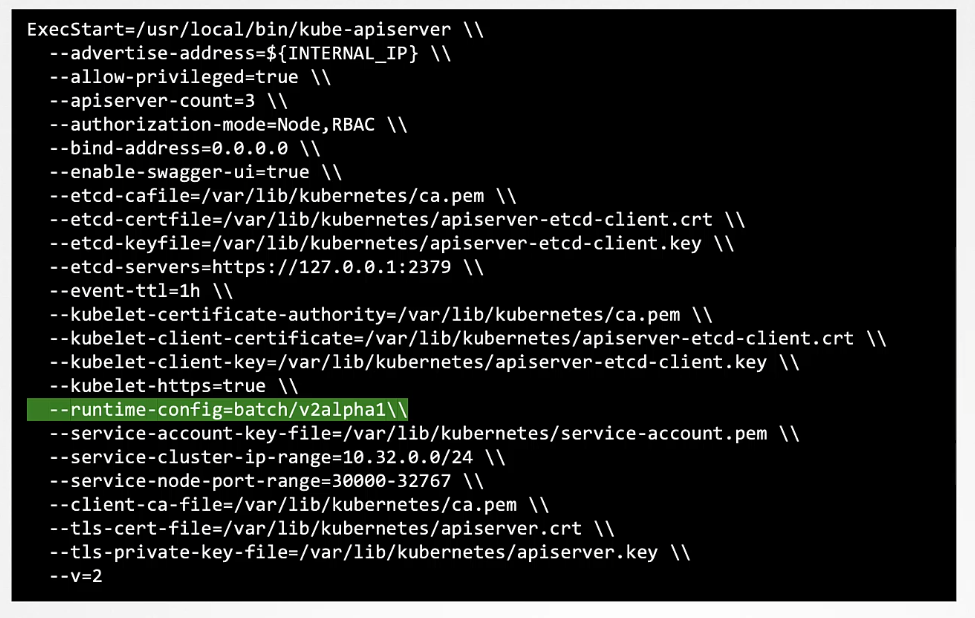
In a Non-kubeadm setup, you can inspect the options by viewing the kube-apiserver.service
Manual
In a Non-kubeadm setup, you can inspect the options by viewing the kube-apiserver.service
$ cat /etc/systemd/system/kube-apiserver.service
You can also see the running process and affective options by listing the process on master node and searching for kube-apiserver.
$ ps -aux | grep kube-apiserver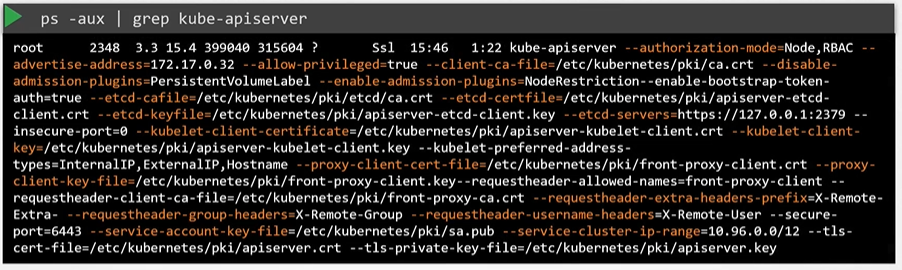
Using API
-
Each API group can have its own version number
-
Use
kubectl api-resourcesfor information about resource types -
Or
kubectl api-versionsfor resource and version information
-
-
Kubernetes uses a core API, which is extensible. This allows additional APIs to be added in API Groups. This flexibility is used in Custom Resource Definition (CRD) to add resources to Kubernetes. Some Kubernetes distributions have added many CRDs. When installing Operators, CRDs are typically involved.
Use kubectl api-resources for an overview of APIs and resources defined in specific APIs
$ kubectl api-resources
$ kubectl api-versions
Understanding the API Access
Kubernetes functionality is exposed by the kube-apiserver core Kubernetes process.
The kube-apiserver is typically started as a systemd process. The kube-apiserver allows TLS certificate-based access only. kubectl makes secured API requests.
Understanding kube-proxy
The Kubernetes APIs are RESTful. This means that they can be accessed using direct HTTP traffic. CURL can be used for direct API access, which is needed when kubectl is not available. Behind the scenes, kubectl uses CURL as well.
Use kubectl --v=10 get pods (or any other command) to see the underlying API request. To make your own API requests using CURL, the appropriate certificates are required. Use kube-proxy to provide a secure interface for curl.
Connecting to the API
To access the API using curl, start the kube-proxy on the kubernetes user workstation:
$ kubectl proxy --port 8001&
$ starting to serve on 127.0.0.1:8001
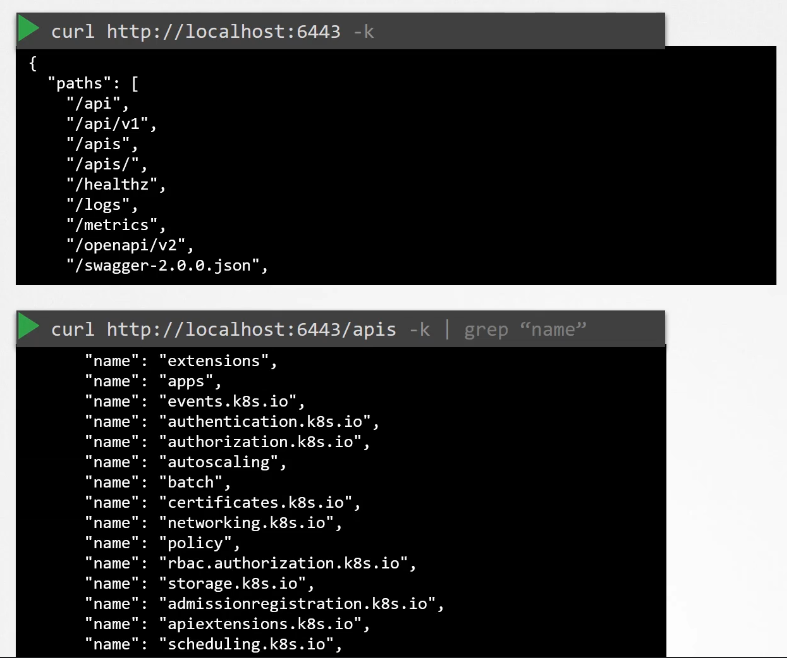
# This shows all the available API paths and groups, providing access to all exposed functions
$ curl <http://localhost:8001>Understanding API Deprecations
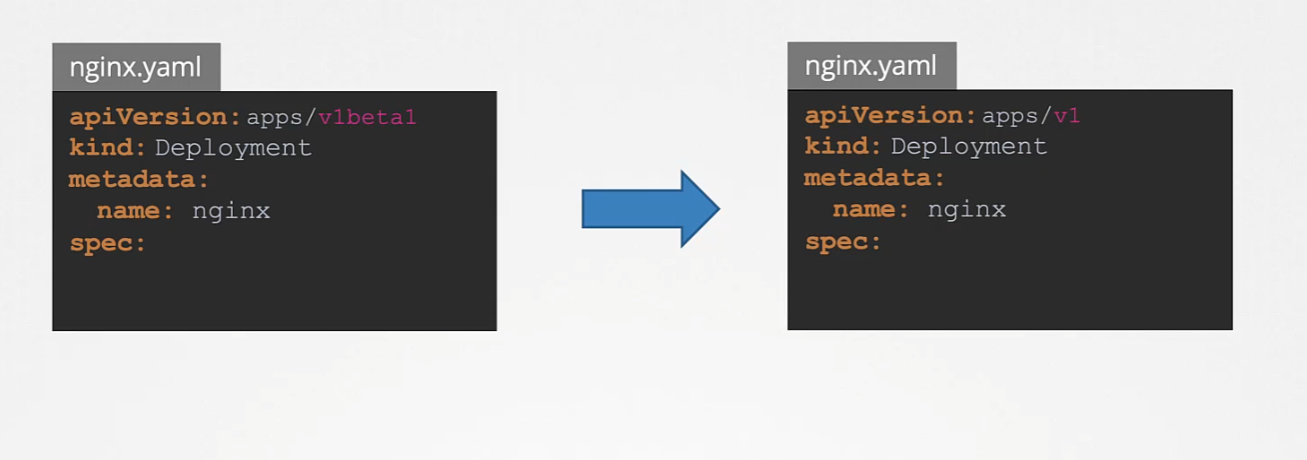
With new Kubernetes releases, old API versions may get deprecated.
If an old version gets deprecated, it will be supported for a minimum of two more Kubernetes releases.
When you see a deprecation message, make sure to take action and change your YAML manifest files!
$ kubectl create -f redis-deploy.yaml
$ kubectl api-versions
$ kubectl explain --recursive deploy-
API elements may only be removed by incrementing the verion of the API group
-
API Object must be able to round-trip between API versions in a given release without information loss, with the exception of the whole REST resources that do not exist in some versions.
Custom Resource Definitions
A controller is a process that runs in the background, continuously monitoring the status of resources it is supposed to manage. In this case, the deployment that we created. When we create, update, or delete the deployment, the controller makes the necessary changes to the cluster to match our actions.
For example, when we create a deployment object, the controller creates a replica set, which in turn creates the number of pods specified in the deployment definition file. That’s the job of a controller.
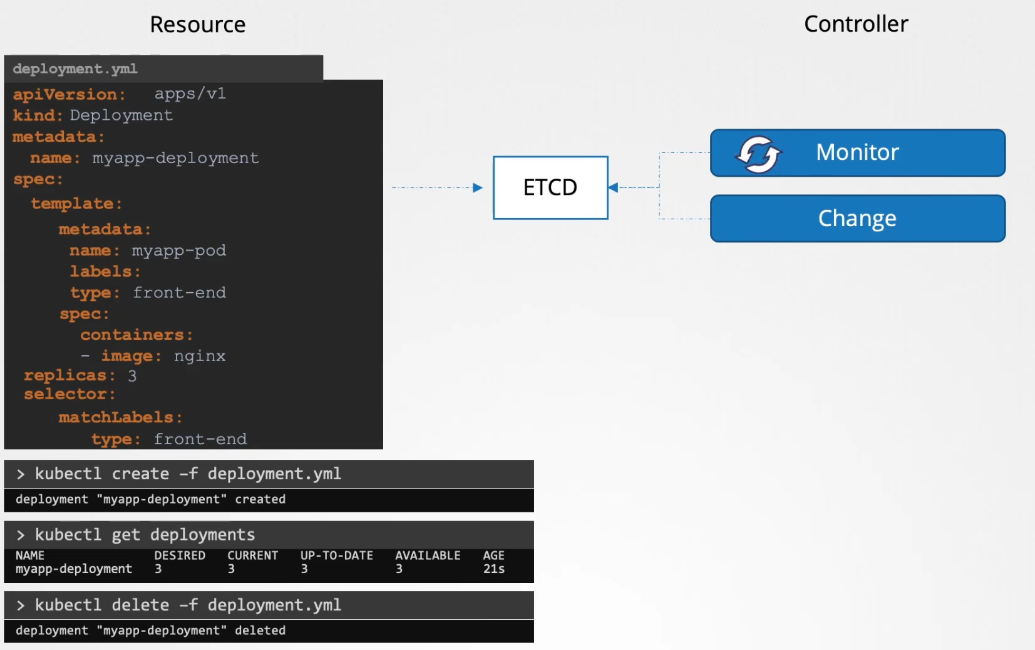
Replica sets, deployments, jobs, cron jobs, stateful sets, namespaces, etc., are just a few of the many resources available on the cluster. Each of these resources has controllers responsible for monitoring their status and making the necessary changes to the cluster to maintain the expected state.

Custom Resource Definitions (CRDs) allow users to add custom resources to clusters, enabling the integration of anything into a cloud-native environment. CRDs make it easy to add resources as extensions to the original Kubernetes API server without requiring programming skills.
An alternative way to build custom resources is via API integration, which involves creating a custom API server. This method requires programming skills.
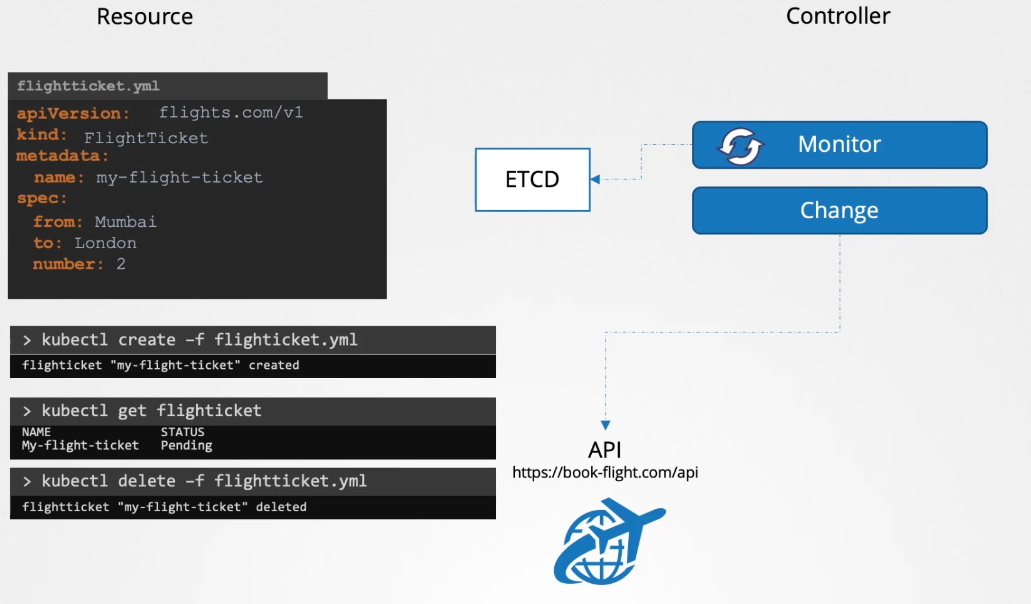
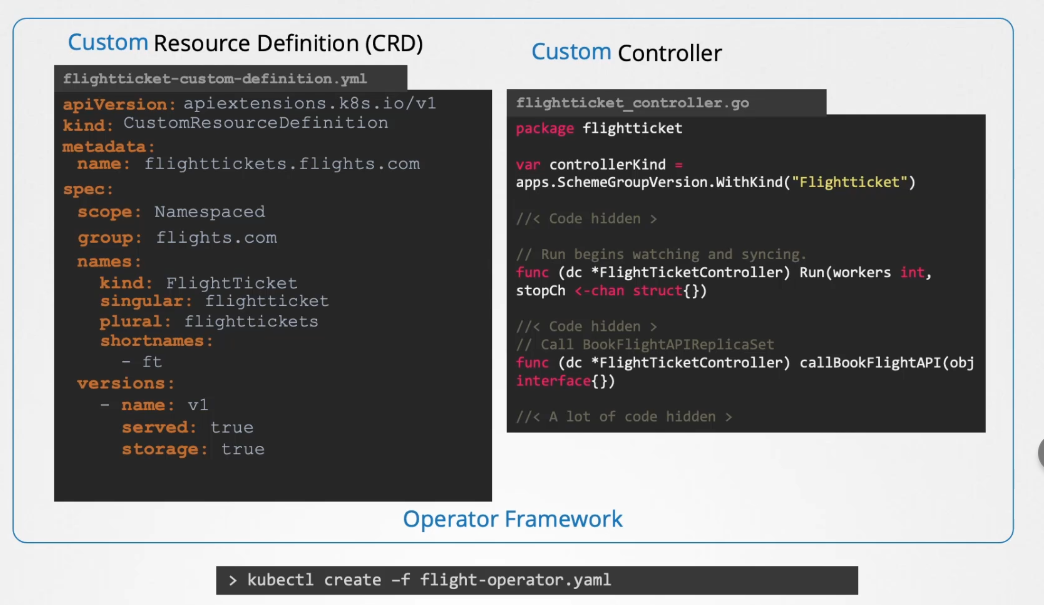
At initial stage, the FlightTicket will be only created in ETCD and nothing happens. To call this API whenever we create a flight ticket object to book a flight, we'll need a controller. We will create a flight ticket controller written in Go to monitor the creation or deletion of the flight ticket resource. When a flight ticket resource is created, the controller will contact the flight booking API to book the ticket. Similarly, when a resource is deleted, the controller will make an API call to cancel the booking.
Custom resource = creating the object Controller = for reacting to it
At a high level, it works as follows: The flight ticket object we created is a custom resource, and the controller we write to handle the booking process by calling the API is known as a custom controller. In summary, we have a custom resource and a custom controller.
CRD Object can be either namespaced or cluster scoped
Answer: true
What is a custom resource?
It is an extension of the Kubernetes API that is not necessarily available in a default Kubernetes installation
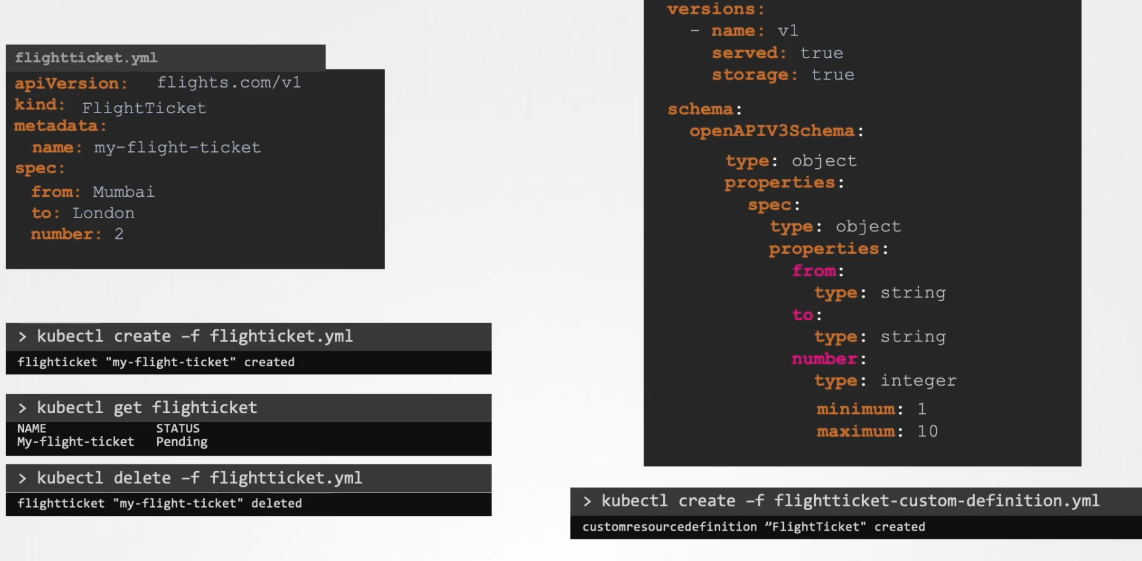
Creating Custom Resources
Creating Custom Resources using CRDs is a two-step procedure
- You’ll need to define the resource, using the Custom
ResourceDefinitionAPI kind - After defining the resource, it can be added through its own API resource
$ cat crd-object.yaml
$ kubectl create -f crd-object.yaml
$ kubectl api-resources I grep backup
$ cat crd-backup.yaml
$ kubectl create -f crd-backup.yaml
$ kubectl get backups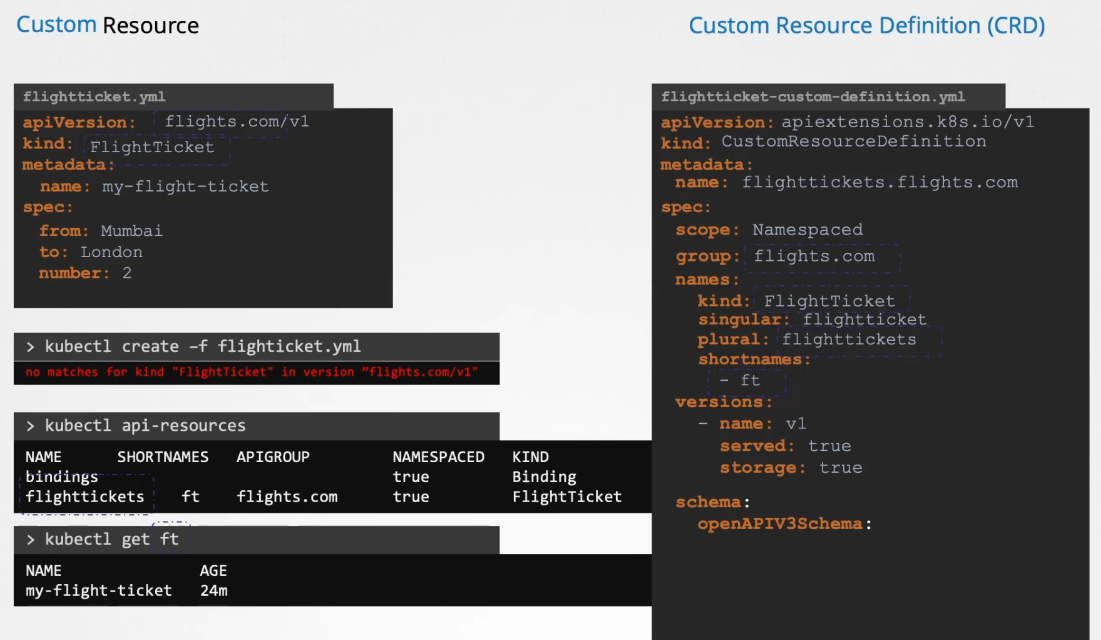
apiVersion: apiextensions.k8s.io/v1
kind: CustomResourceDefinition
metadata:
  name: internals.datasets.kodekloud.com
spec:
  group: datasets.kodekloud.com
  versions:
    - name: v1
      served: true
      storage: true
      schema:
        openAPIV3Schema:
          type: object
          properties:
            spec:
              type: object
              properties:
                internalLoad:
                  type: string
                range:
                  type: integer
                percentage:
                  type: string
  scope: Namespaced
  names:
    plural: internals
    singular: internal
    kind: Internal
    shortNames:
    - int
Custom controllers
We have created a Custom Resource Definition (CRD) and can now create Flight Ticket objects. The data about these tickets is stored in ETCD.
Our next step is to monitor the status of these objects in ETCD and perform actions such as booking, editing, or cancelling flight tickets through the flight booking API. This is where a Custom Controller comes in.
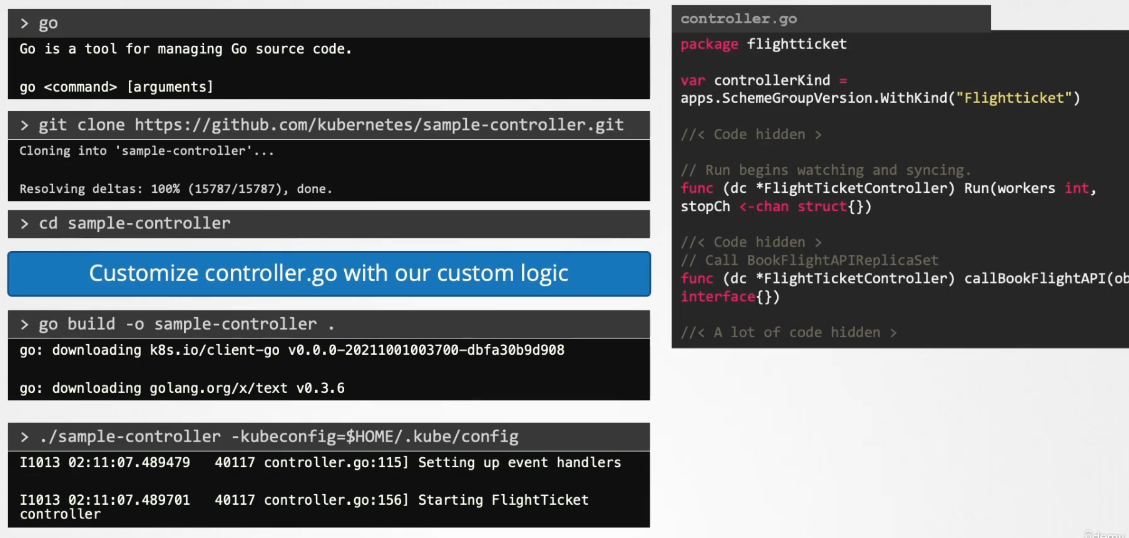
A controller is a process or code that runs in a loop, continuously monitoring the Kubernetes cluster and listening for events related to specific objects, in this case, the flight ticket objects.
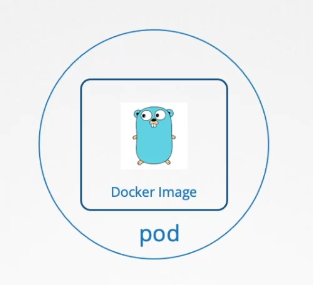
 Once your controller is ready, you need to decide how to distribute it. Instead of building and running it each time, you can package the Custom Controller into a Docker image. You can then run this image inside your Kubernetes cluster as a pod or a deployment.
Operators
Controllers and CRDs can be packaged together and deployed as a single entity using the Operator Framework. By deploying the flight operator, it will internally create the custom resource definition, manage the associated resources, and deploy the custom controller as a deployment. The Operator Framework does much more than just deploy these two components. Let’s explore a real-life use case of an operator.
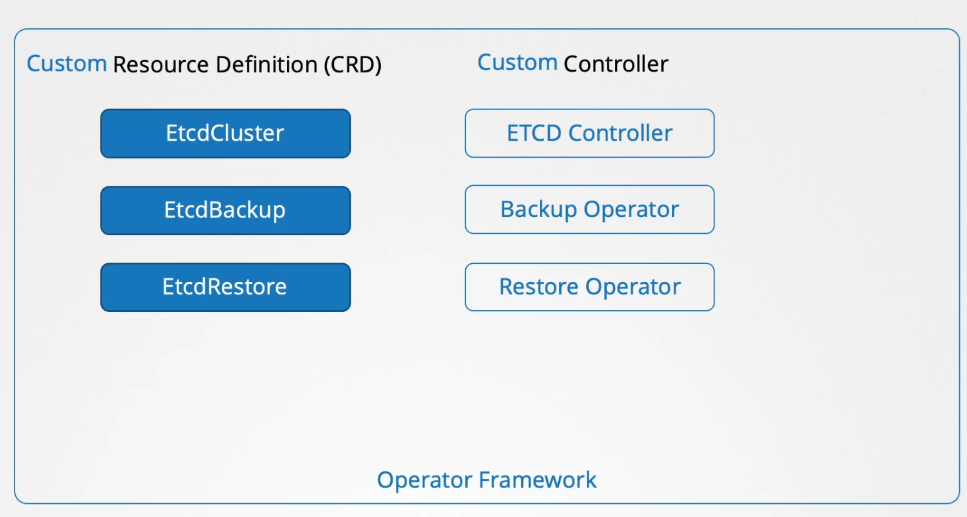
 One of the most popular operators is the ETCD Operator. It is used to deploy and manage an ETCD cluster within Kubernetes. The ETCD Operator includes an ETCD cluster CRD and a custom controller that monitors the ETCD cluster resource and manages the deployment of ETCD within the Kubernetes cluster.
In addition to deploying and managing the ETCD cluster, the operator can perform tasks such as taking backups and restoring backups of the ETCD cluster. These tasks are managed through additional components in the operator, known as the backup and restore operators, which handle these functionalities by interacting with the CRD.
Operators can be added to Kubernetes by developing them yourself. Operators are also available from community websites. A common registry for operators is found at operatorhub.io (which is rather OpenShift oriented). Many solutions from the Kubernetes ecosystem are provided as operators.
- Prometheus: a monitoring and alerting solution
- Tigera: the operator that manages the calico network plugin
- Jaeger: used for tracing transactions between distributed services