Docker containers are designed to be transient, meaning they last only for a short period of time. They are called upon when needed to process data and are destroyed once their task is complete. The same is true for the data within the container—it is destroyed along with the container.
To persist the data processed by containers, we attach a volume to the containers when they are created. The data processed by the container is then stored in this volume, making it permanent. Even if the container is deleted, the data remains.
Volumes in K8s
So, how does this work in the Kubernetes world? Just like Docker, the pods created in Kubernetes are also transient. When a pod is created to process data and then deleted, the data processed by it is deleted as well.
To retain the data, we attach a volume to the pod. The data generated by the pod is stored in the volume, and even after the pod is deleted, the data remains.
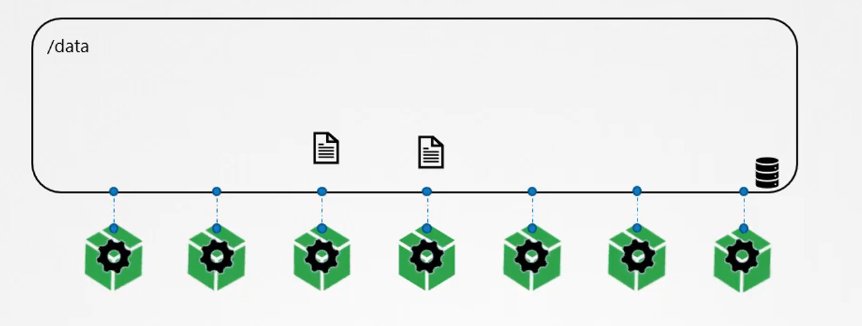
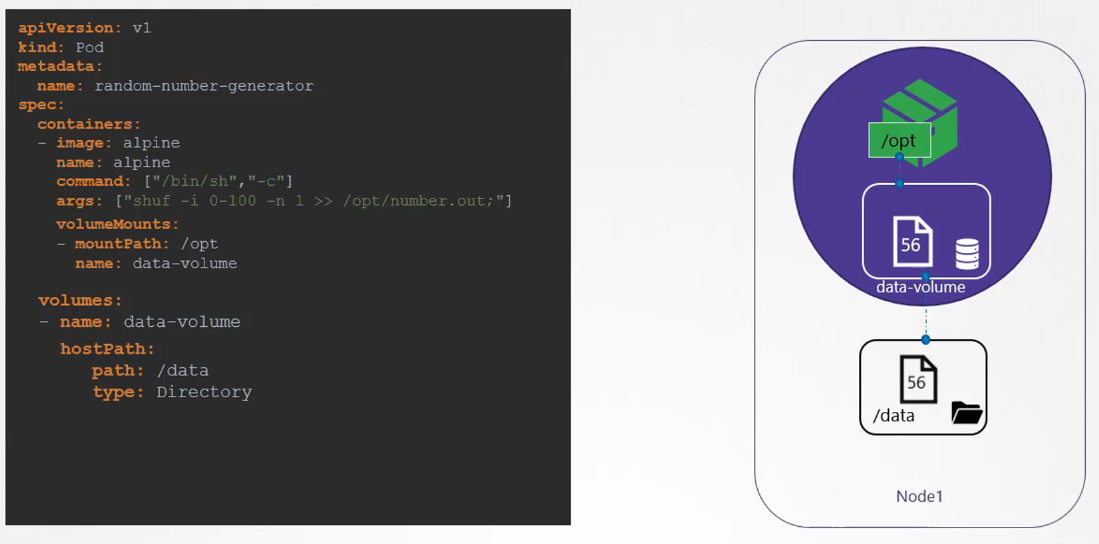
Let’s look at a simple implementation of volumes. Imagine we have a single-node Kubernetes cluster. We create a simple pod that generates a random number between 1 and 100 and writes it to a file at /opt/number.out. When the pod is deleted, the random number file is also deleted. To retain the number generated by the pod, we create a volume, which requires storage.
Creating and mapping volume
When you create a volume, you can choose different ways to configure its storage. For now, we’ll configure it to use a directory on the host. In this example, I specify the path /data on the host.
This way, any files created in the volume will be stored in the /data directory on my node. Once the volume is created, we mount it to a directory inside the container using the volumeMounts field. We mount the data volume to /opt within the container.
The random number will now be written to /opt inside the container, which is actually the data volume, mapped to the /data directory on the host. Even when the pod is deleted, the file containing the random number still exists on the host.
Volume Types
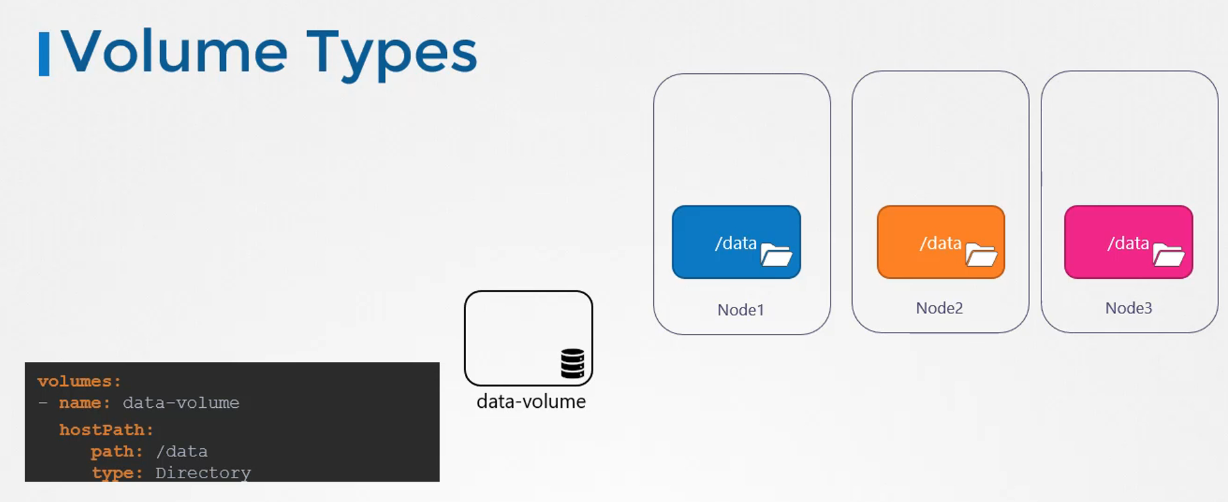
We used the hostPath option to configure the volume directly on the host. While this works well on a single node, it is not recommended for multi-node clusters.
This is because pods would access the /data directory on all nodes, expecting them to be identical, which they are not unless you configure some external, replicated storage solution.
Kubernetes supports several types of storage solutions, such as NFS, GlusterFS, Flocker, Fibre Channel, CephFS, ScaleIO, or public cloud solutions like AWS EBS, Azure Disk/File, or Google’s Persistent Disk. For example, to configure an AWS Elastic Block Store (EBS) volume as the storage option for the volume, we replace the hostPath field with the awsElasticBlockStore field, along with the volume ID and file system type. The volume storage will now be on AWS EBS.
Persistent volumes
We created volumes by configuring them directly within the pod definition file. This means that all the configuration information required for the storage goes into the pod definition file.
However, in a large environment with many users deploying numerous pods, each user would need to configure storage for each pod individually. Regardless of the storage solution used, users deploying pods would have to include the configuration details in every pod definition file.
If any changes are needed, users would have to update all their pods manually. This approach can be inefficient and time-consuming.
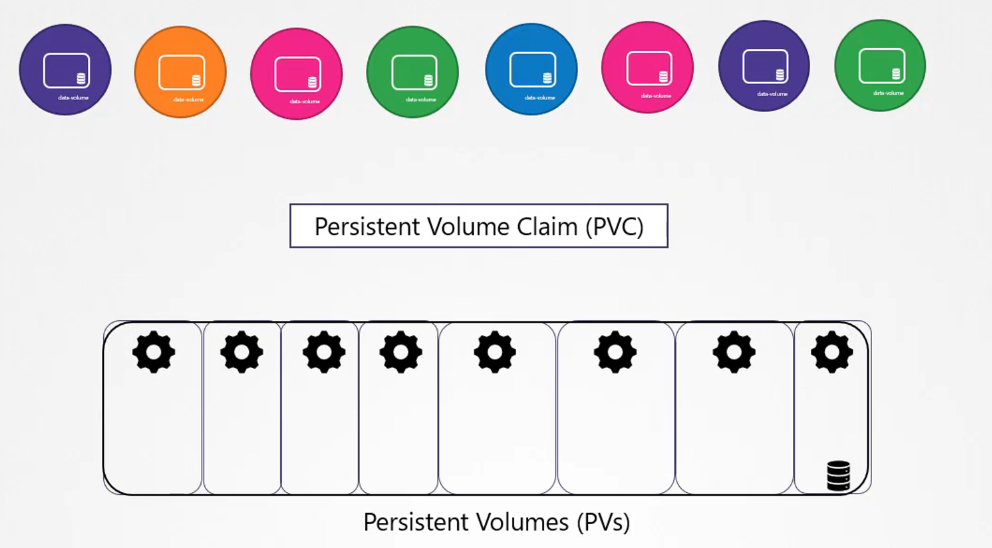
A more efficient way is to manage storage centrally, allowing an administrator to create a large pool of storage from which users can allocate pieces as needed. This is where Persistent Volumes (PVs) come in.
A Persistent Volume is a cluster-wide storage pool configured by an administrator. It can be used by users deploying applications on the cluster.
==Users can then request storage from this pool using Persistent Volume Claims (PVCs)==, making the process much simpler and centralized.
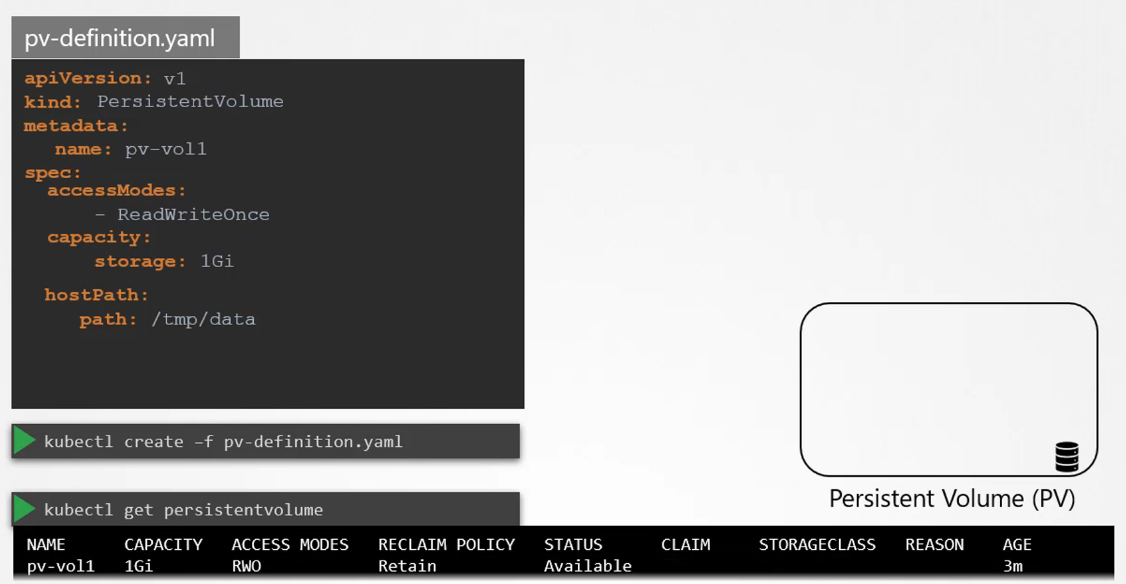
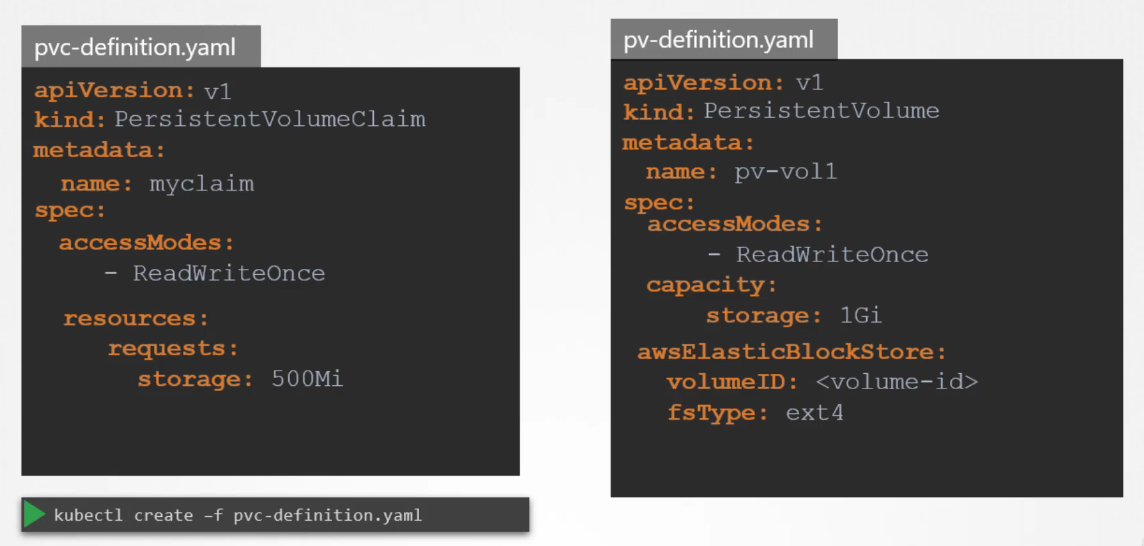
Example of a PV definition:
Q1
Configure a volume to store logs at /var/log/webapp on the host, for a below pod:
We created a Persistent Volume (PV). Now, we’ll create a Persistent Volume Claim (PVC) to allocate storage to a node.
In Kubernetes, PVs and PVCs are separate objects. Administrators create PVs, while users create PVCs to request storage.
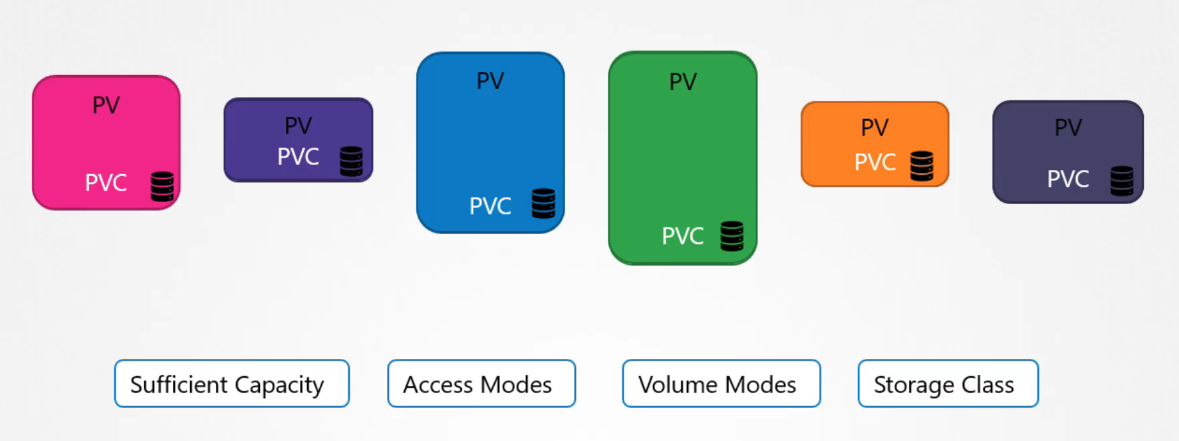
Once a PVC is created, Kubernetes binds it to an available PV based on the request and properties specified, such as capacity and access modes. Each PVC is bound to a single PV.
During the binding process, Kubernetes looks for a PV that matches the PVC’s requirements, such as sufficient capacity and the specified properties (e.g., access modes, volume modes, storage class).
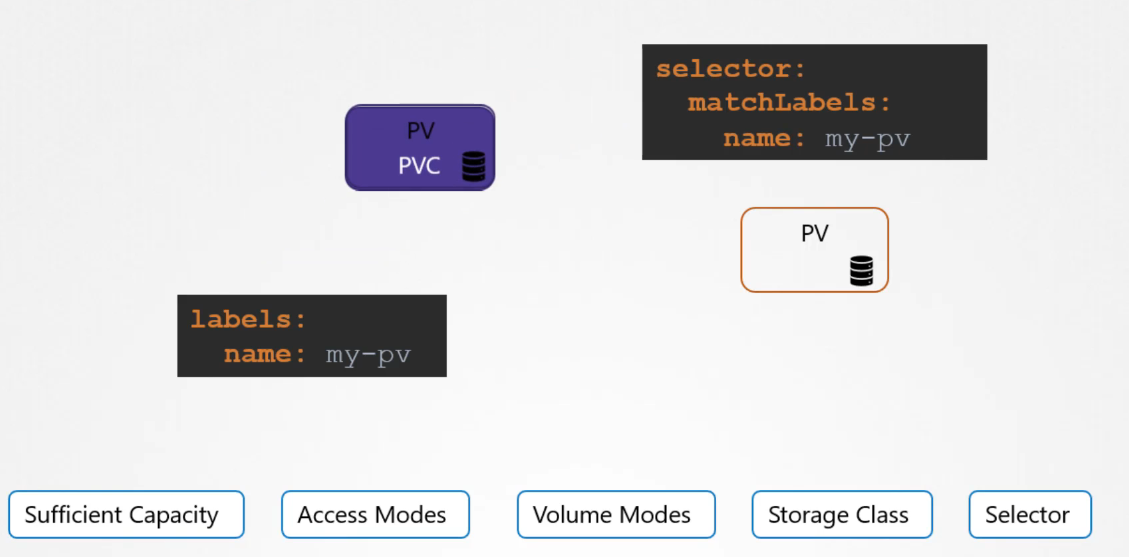
If multiple PVs match, you can use labels and selectors to target a specific volume. Note that a smaller claim may be bound to a larger volume if there are no other options that better match the criteria.
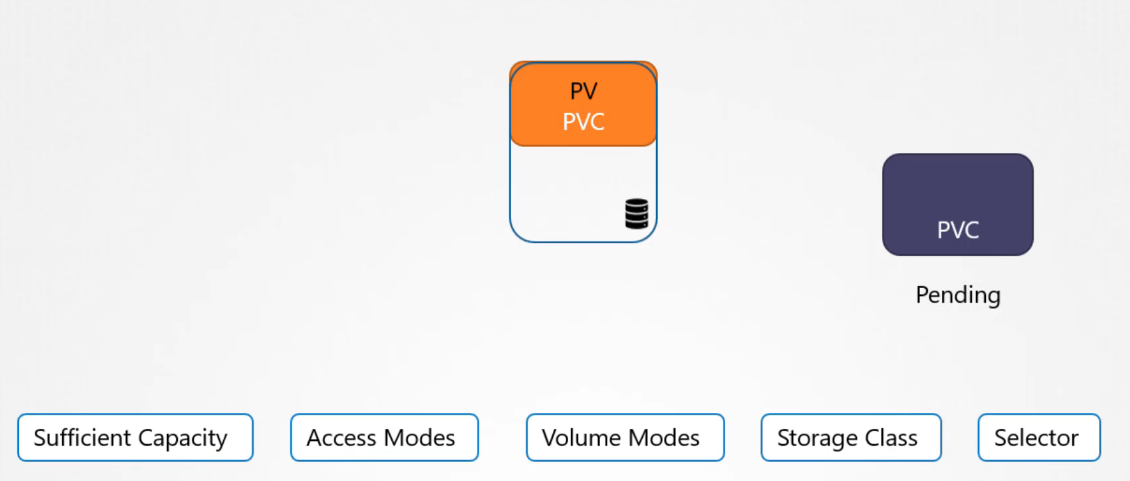
Because of the one-to-one relationship between PVCs and PVs, no other claims can use the remaining capacity in that volume. If no suitable volumes are available, the PVC remains in a pending state until new volumes are added, at which point it automatically binds to the newly available PV.
Relationship between PV and PVC
In Kubernetes, a Persistent Volume Claim (PVC) and a Persistent Volume (PV) typically have a one-to-one relationship. This means:
A single PVC is bound to a single PV.
Once a PVC is bound to a PV, it remains exclusively bound to that PV until either the PVC or the PV is deleted.
Here’s how it works:
Creating a PVC: When you create a PVC, it requests a specific amount of storage and storage characteristics (like access mode and storage class).
Binding Process: Kubernetes searches for an available PV that matches the PVC’s requirements. If a suitable PV is found, it binds the PVC to the PV, and the PV status changes to “Bound.”
Exclusive Relationship: After binding, the PVC and PV are linked exclusively. The PVC cannot bind to another PV, and the PV cannot be used by another PVC while it’s bound.
This one-to-one relationship ensures that storage is reserved and used specifically by the application that made the PVC, maintaining consistency and data integrity.
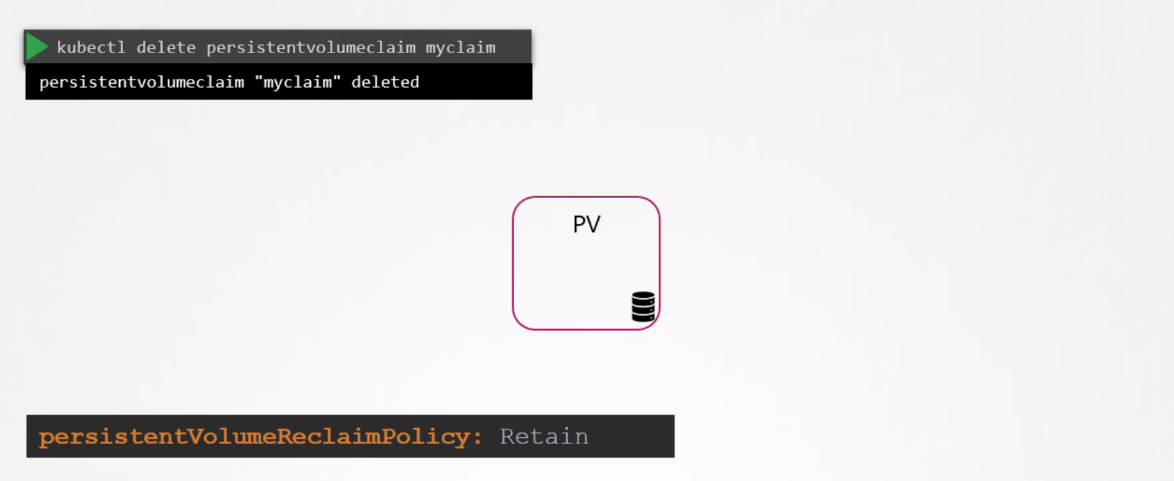
To delete a PVC, run the kubectl delete persistentvolumeclaim command. But what happens to the underlying PV when the claim is deleted?
The behaviour depends on the volume’s reclaimPolicy, which can be set to one of the following:
Retain: This is the default setting. The PV remains even after the PVC is deleted, and it must be manually deleted by an administrator. The volume is not available for reuse until this is done.
Delete: The PV and its underlying storage are automatically deleted when the PVC is removed, freeing up storage space immediately.
Recycle (Deprecated): The data on the PV is scrubbed, and the volume is made available for new claims.
Storage Classes
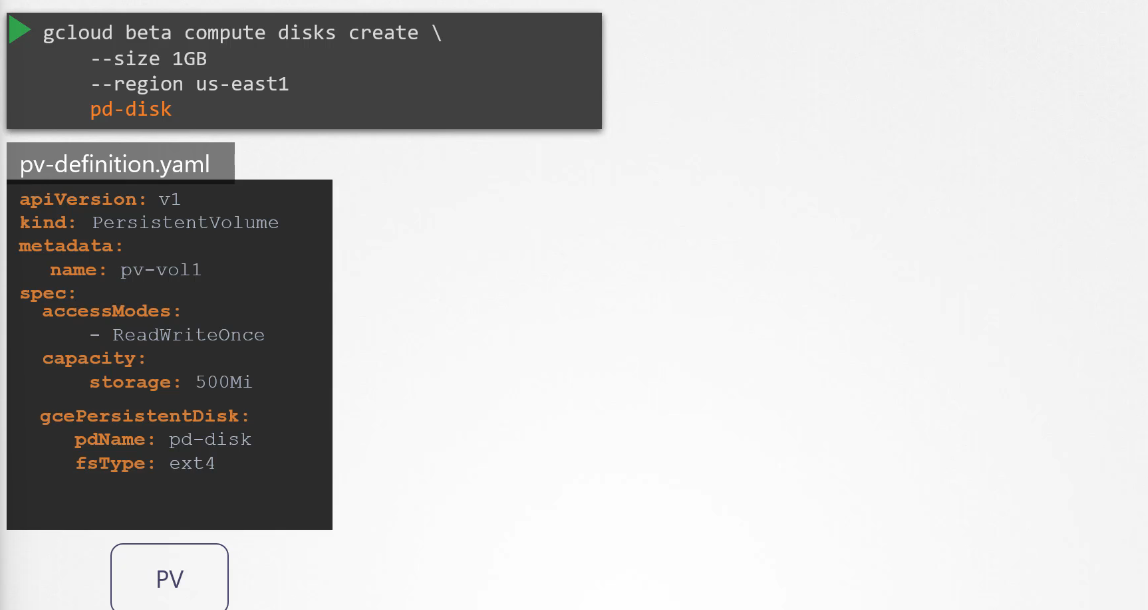
The problem is that before this PV is created, you must manually provision the disk on Google Cloud, and then manually create a persistent volume definition file using the disk’s name. This process is called static provisioning. Each time an application requires storage, you need to manually provision the disk and define the PV, which can be time-consuming.
(Below image is how we manually use gcloud cli to provision the disk(which is a hassle) and then create the PV to leverage the provisioned storage)
It would be much more efficient if the volume were provisioned automatically when needed by the application. That’s where storage classes come in. With storage classes, you can define a provisioner, such as Google Cloud Storage, that automatically provisions storage on Google Cloud and attaches it to pods when a claim is made. This process is known as dynamic provisioning.
Going back to our original scenario, where a pod uses a PVC for storage and the PVC is bound to a PV, with a storage class, you no longer need to manually define the PV. The storage class automatically provisions the PV and the required storage when a claim is made.
In order to leverage a StorageClass, specify the storage class name in the PVC definition. The next time a PVC is created, the associated storage class uses the defined provisioner to provision a new disk with the required size on Google Cloud Platform (GCP). It then creates a PV and binds the PVC to that volume.
So, remember that a PV is still created; you just don’t have to manually define it anymore—it’s automatically created by the storage class. In this example, we used the Google Compute Engine (GCE) provisioner to create a volume on GCP, but there are many other provisioners available, such as AWS EBS, Azure File, Azure Disk, CephFS, Portworx, ScaleIO, and others.
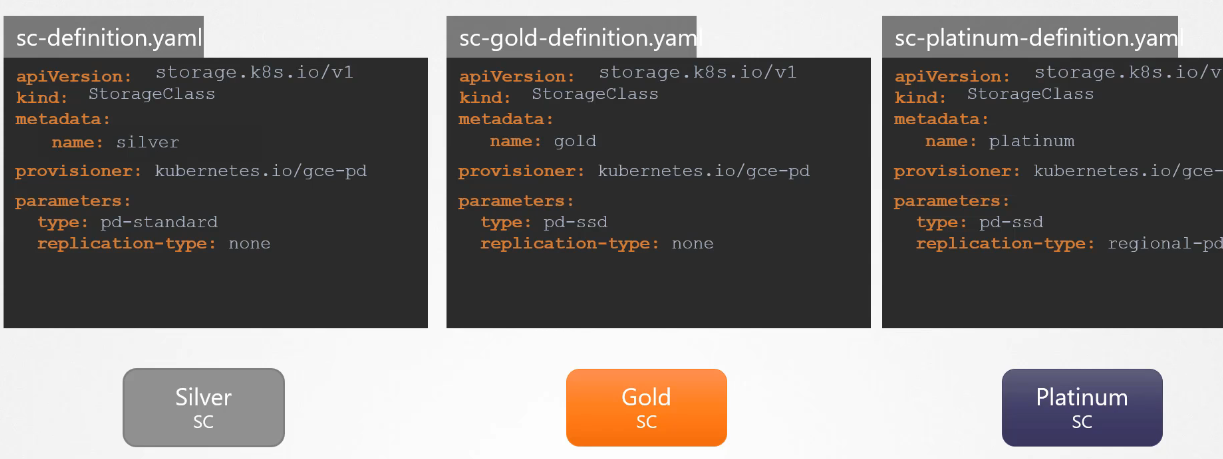
Each of these provisioners can have additional parameters, like the type of disk to provision or the replication type. These parameters are specific to the provisioner you’re using. For example, with Google persistent disks, you can specify the type of disk (Standard or SSD) and the replication mode (none or regional).
With storage classes, you can create different classes of service. For instance, you could create a “silver” storage class with standard disks, a “gold” class with SSD drives, and a “platinum” class with SSD drives and replication. This flexibility is why it’s called a storage class, as you can create different classes of service based on your needs. When you create a PVC, you simply specify the storage class you want for your volumes.
what does VolumeBindingMode: WaitForFirstConsumer means?
The Storage Class called local-storage makes use of VolumeBindingMode set to WaitForFirstConsumer. This will delay the binding and provisioning of a PersistentVolume until a Pod using the PersistentVolumeClaim is created.
 Kubernetes supports several types of storage solutions, such as NFS, GlusterFS, Flocker, Fibre Channel, CephFS, ScaleIO, or public cloud solutions like AWS EBS, Azure Disk/File, or Google’s Persistent Disk. For example, to configure an AWS Elastic Block Store (EBS) volume as the storage option for the volume, we replace the
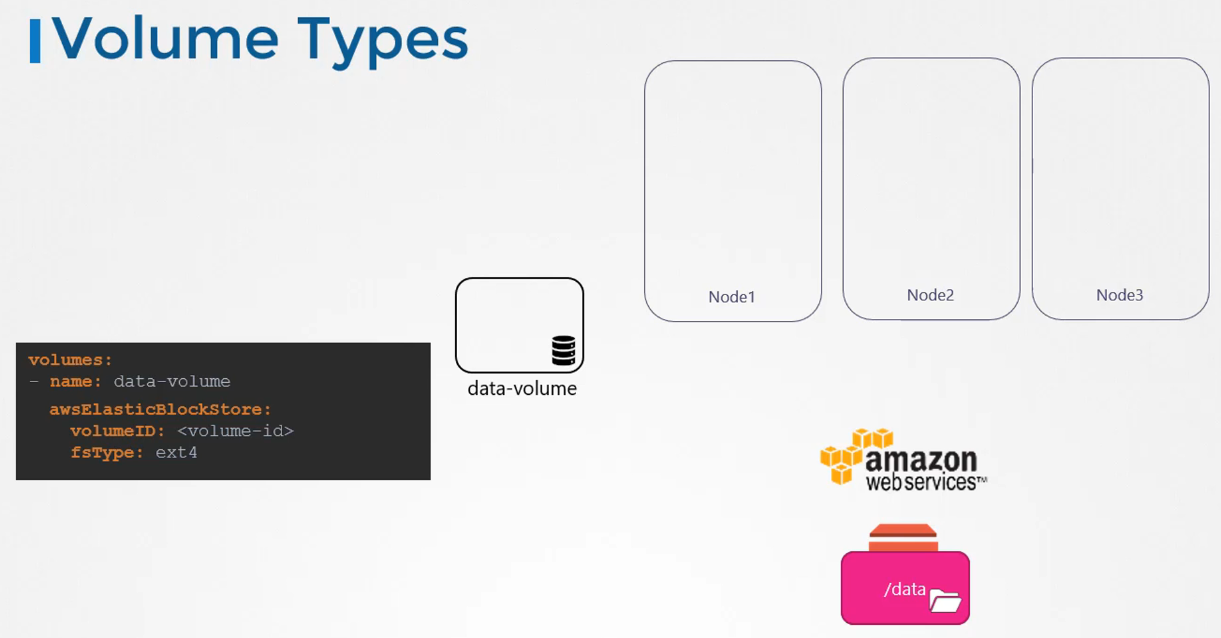
 A Persistent Volume is a cluster-wide storage pool configured by an administrator. It can be used by users deploying applications on the cluster.
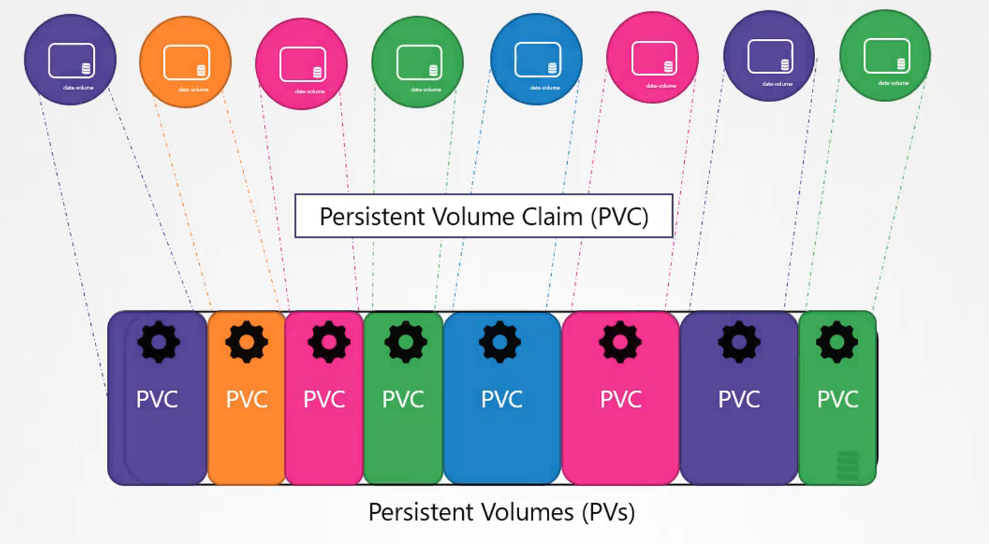
 If multiple PVs match, you can use labels and selectors to target a specific volume. Note that a smaller claim may be bound to a larger volume if there are no other options that better match the criteria.
 It would be much more efficient if the volume were provisioned automatically when needed by the application. That’s where storage classes come in. With storage classes, you can define a provisioner, such as Google Cloud Storage, that automatically provisions storage on Google Cloud and attaches it to pods when a claim is made. This process is known as dynamic provisioning.
 So, remember that a PV is still created; you just don’t have to manually define it anymore—it’s automatically created by the storage class. In this example, we used the Google Compute Engine (GCE) provisioner to create a volume on GCP, but there are many other provisioners available, such as AWS EBS, Azure File, Azure Disk, CephFS, Portworx, ScaleIO, and others.