Why having deployments?
Updates and rollbacks are best handled through deployments. Deployments allow us to perform updates and rollbacks without any downtime.
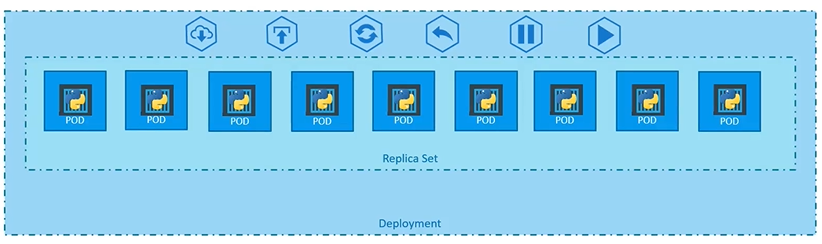
A Deployment is a Kubernetes object used to manage applications. It provides features that enhance scalability and reliability, such as:
- Deploying and updating replicas
- Upgrading applications from version v1 to v2
- Rolling deployments for smooth version transitions
- Rolling back to previous versions
- Allocating resources, with options to pause and resume
The Deployment is the standard way to run applications in Kubernetes, offering:
- Scalability: Easily scale the number of application instances
- Update Strategy: Perform zero-downtime updates
Always manage ReplicaSets through Deployments; do not handle them directly.
Deployments allow us to perform upgrades and rollbacks efficiently with ReplicaSets.
Basics of Deployments (CRUD)
apiVersion: apps/v1
kind: Deployment
metadata:
name: myapp-deployment
labels:
app: myapp
type: front-end
spec:
template:
metadata:
name: myapp-pod
labels:
app: myapp
type: front-end
spec:
containers:
- name: nginx-container
image: nginx
replicas: 3
selector:
matchLabels:
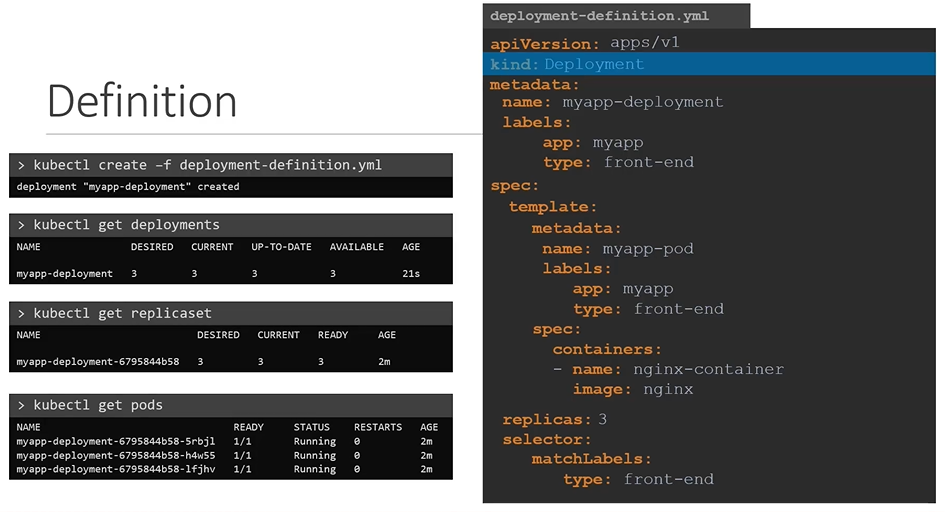
type: front-endOnce the file is ready, create the deployment using deployment definition file
$ kubectl create -f deployment-definition.yamlTo see the created deployment
$ kubectl get deploymentThe deployment automatically creates a ReplicaSet. To see the replicasets
$ kubectl get replicasetThe replicasets ultimately creates PODs. To see the PODs
$ kubectl get podsTo see the all objects at once
$ kubectl get all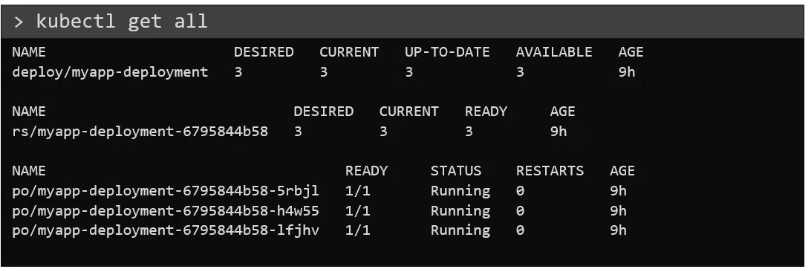
Manually Managing Scalability
Use kubectl to scale the number of currently running replicas. Alternatively, use kubectl edit deployment my-deployment to edit the number of replicas manually.
Notice that
kubectledit allows modification of a limited number of options only
What will happen if we delete replicaset that belongs to a deployment?
If we delete a replicaSet all the pods related to that replica set will be removed as well. However, because replicaset is managed by deployment, it will be re-created again.
Update Strategy
When you create a deployment, it starts a rollout, which generates a new deployment version, called Revision 1. When you later upgrade the application (for example, by updating the container version), a new rollout is triggered, creating Revision 2.
This system helps track deployment changes and makes it easy to roll back to a previous version if needed.
When a deployment changes, the pods are immediately updated according to the update strategy:
Recreate: All Pods are killed, and new Pods are created. This will lead to temporary unavailability. Useful if you cannot simultaneously run different versions of an application. below image shows how recreate turn the initial replica set to scale to 0 and then scales the second replicaSet
Rolling Update: Updates Pods one at a time to guarantee availability of the application. This is the preferred approach, and you can further tune its behavior
# this will show you, your deployement strategy
$ kubectl describe deployement myapp-deployment | grep -i strategyType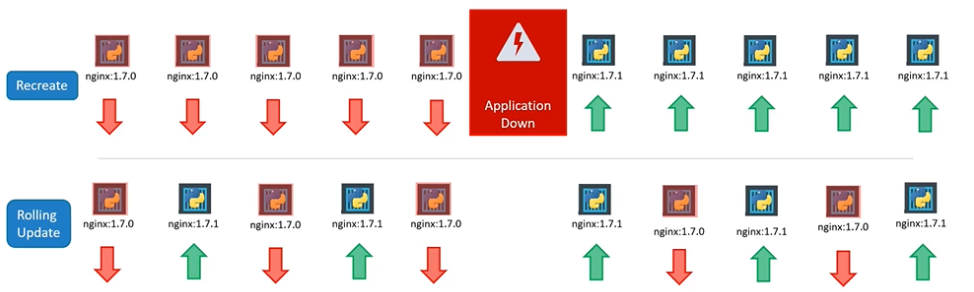
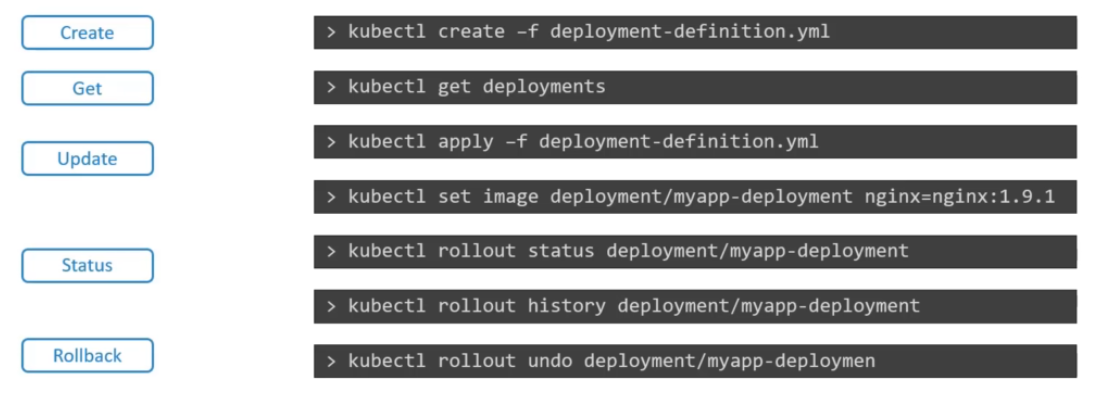
How to upgrade deployments
To update a deployment, edit the deployment and make necessary changes and save it. Then run the below command.
apiVersion: apps/v1
kind: Deployment
metadata:
  name: myapp-deployment
  labels:
    app: nginx
spec:
  template:
    metadata:
      name: myap-pod
      labels:
        app: myapp
        type: front-end
    spec:
      containers:
        - name: nginx-container
          image: nginx:1.7.1
  replicas: 3
  selector:
    matchLabels:
      type: front-end
$ kubectl apply -f deployment-definition.yamlAlternate way to update a deployment say for example for updating an image.
Updating through
set imageIf you upgrade the deployment using
kubectl set image, the deployment will update, but the YAML definition file could become outdated, as it won’t automatically reflect the changes made to the image. To keep the definition file accurate, you’ll need to manually update it to match the changes.
$ kubectl set image deployment/myapp-deployment nginx=nginx:1.9.1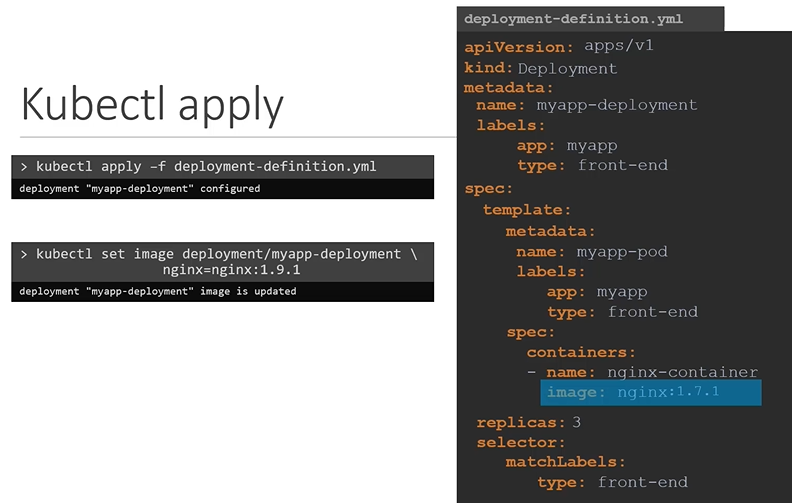
Recreate & Rolling-updates
Understanding recreate
The Recreate strategy is a deployment approach in Kubernetes where all existing Pods are terminated before new ones are created. Unlike the default RollingUpdate strategy, which gradually replaces old Pods with new ones, the Recreate strategy ensures that there is a complete shutdown of the application before the new version starts running.
- Causes downtime since all old Pods are removed before new ones are ready.
- Not ideal for high-availability applications that require continuous uptime.
Understanding rolling-updates
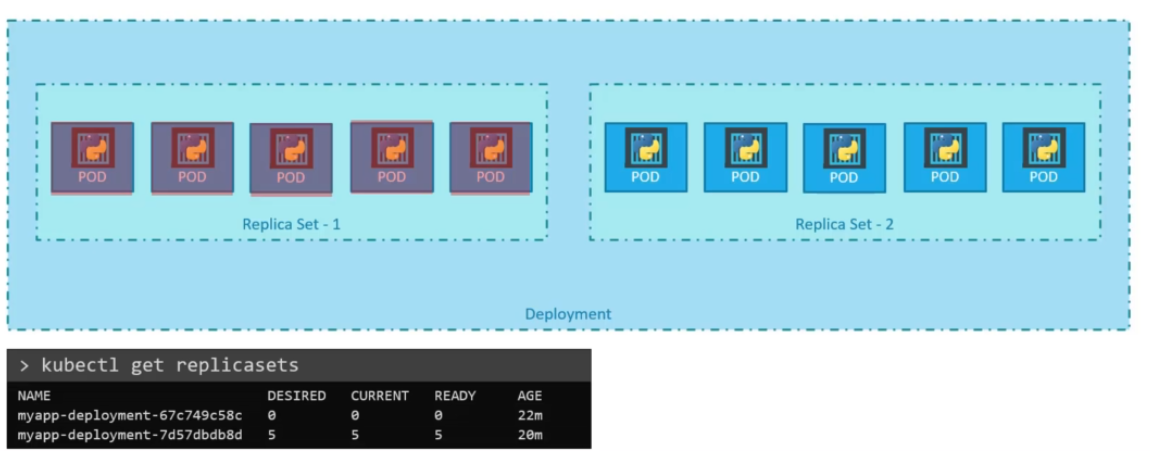
When you create a new deployment with five replicas, Kubernetes automatically creates a ReplicaSet, which then creates the required number of Pods.
When you upgrade your application, Kubernetes handles the process by creating a new ReplicaSet and gradually shifting traffic to the new Pods while shutting down the old ones. This follows a rolling update strategy.
- You can use
kubectl rollout historyto get details about recent transactions - Use
kubectl rollout undoto undo a previous change
Using RollingUpdate Options
In Kubernetes, the maxSurge and maxUnavailable properties are used to control the rolling updates of a deployment. These properties are defined in the spec.strategy.rollingUpdate section of a deployment manifest and play a crucial role in maintaining the availability of the application.
Max Surge It is an optional field that specifies the maximum number of Pods that can be created over the desired number of Pods. The maxSurge property controls the maximum number of additional pods that can be created during a rolling update. It specifies the number or percentage of pods above the desired replica count that can be temporarily created. During an update, Kubernetes creates new pods to replace the old ones, and the maxSurge property ensures that the total number of pods does not exceed a certain limit.
Max Unavailable: The maxUnavailable property determines the maximum number or percentage of pods that can be unavailable during a rolling update. It specifies the maximum number of pods that can be simultaneously removed from service during the update progresses. By default, Kubernetes terminates one pod at a time while creating new pods, ensuring that the desired replica count is maintained.
apiVersion: apps/v1
kind: Deployment
metadata:
  name: my-deployment
spec:
  replicas: 3
  strategy:
    type: RollingUpdate
    rollingUpdate:
      maxSurge: 1
      maxUnavailable: 1
  template:
    metadata:
      labels:
        app: my-app
    spec:
      containers:
        - name: my-container
          image: my-image:latest
          ports:
            - containerPort: 8080
The values for maxSurge and maxUnavailable can be specified in two formats: absolute numbers and percentages.
- Absolute Numbers: You can set a fixed number of pods as the value for
maxSurgeandmaxUnavailable. For example,maxSurge: 2means that a maximum of 2 additional pods can be created, andmaxUnavailable: 1indicates that a maximum of 1 pod can be unavailable at a time. - Percentages: You can specify the values as percentages of the desired replica count. For example,
maxSurge: 50%means that 50% of the desired replica count can be temporarily exceeded, andmaxUnavailable: 25%indicates that 25% of the desired replica count can be unavailable.
Let’s explore few scenarios.
Scenario 1: _maxSurge: 1_, _maxUnavailable: 0_
- Desired replica count: 3
- During the update, Kubernetes creates 1 additional pod at a time while keeping all existing pods running.
- No pods are removed before the new pods become ready.
Scenario 2: _maxSurge: 0_, _maxUnavailable: 1_
- Desired replica count: 3
- During the update, no additional pods are created (
maxSurge: 0), but one pod can be unavailable (maxUnavailable: 1). - Kubernetes terminates one pod at a time, ensuring that the desired replica count is maintained. So, at any given time, there will be 2 pods running and 1 pod unavailable.
Scenario 3: _maxSurge: 25%_, _maxUnavailable: 25%_
- Desired replica count: 4
- During the update, Kubernetes can create up to 25% of the desired replica count as additional pods (
maxSurge: 25%). In this case, it can create a maximum of 1 additional pod. - Similarly, up to 25% of the desired replica count can be unavailable (
maxUnavailable: 25%). In this case, it can have a maximum of 1 pod unavailable at a time. - This allows flexibility during the update process, ensuring that there is no significant impact on the availability of the application.
The actual behaviour of
maxSurgeandmaxUnavailablemay depend on various factors such as the Kubernetes version, configuration, and resource availability in the cluster. It is important to test and validate the deployment behaviour under different scenarios to ensure it meets your requirements.
$ kubectl get deploy bluelabel -o yaml
$ kubectl scale deploy bluelabel --replica 4
$ kubectl set env deploy bluelabel type=blended
$ kubectl get all --selector app=bluelabel
Deployment styles
Blue/Green
These deployment types are best implemented with service mesh Istio

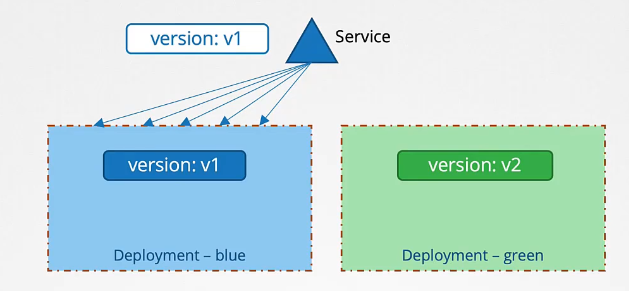
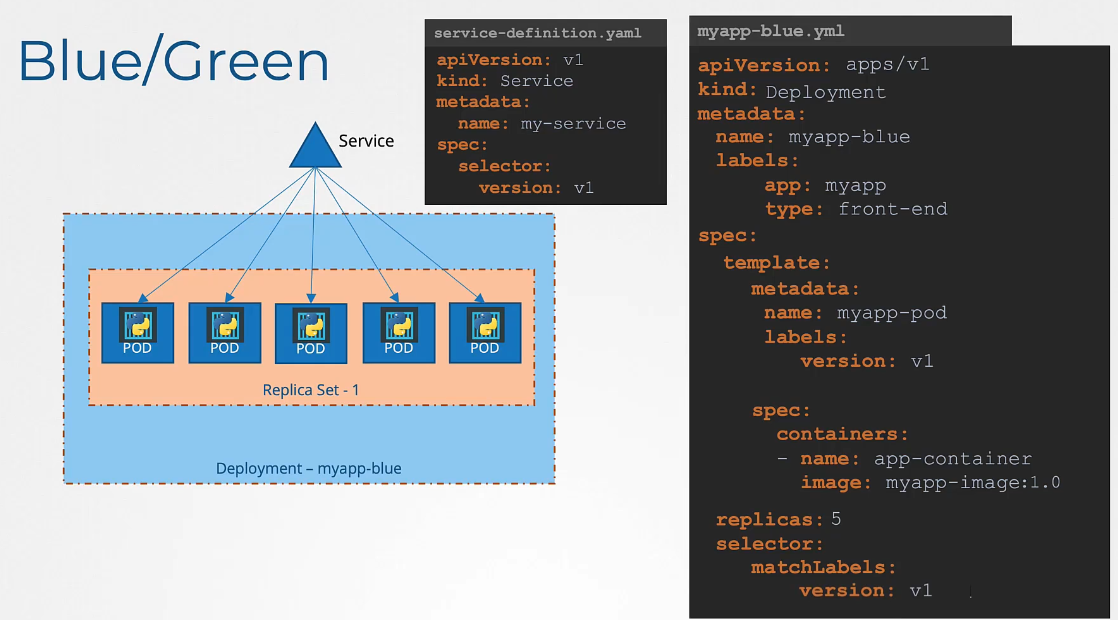
Blue/green Deployments are a strategy to accomplish zero downtime application upgrade. It also allows to test the new version of the application before taking it into production.
- The blue Deployment is the current application
- The green Deployment is the new application
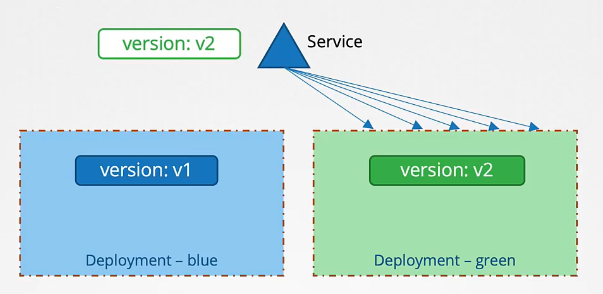
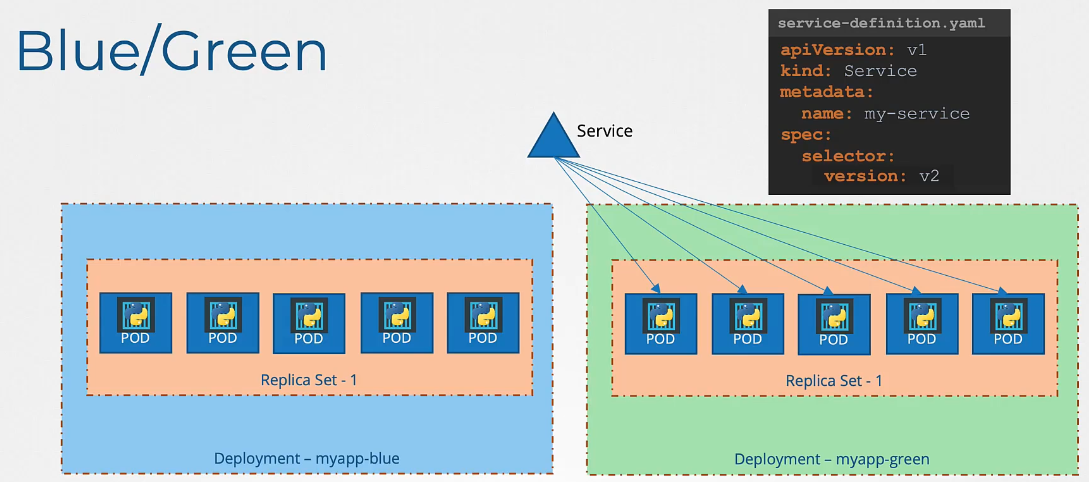
Once the green Deployment is tested and ready, traffic is re-routed to the new application version.
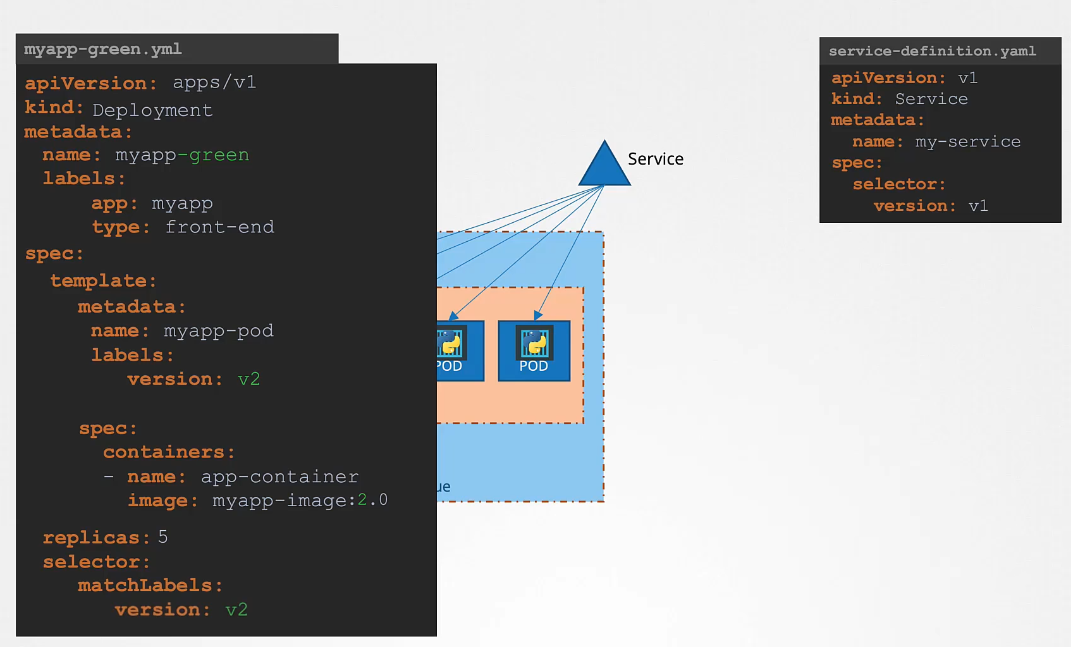
Start with the already running application. Create a new Deployment that is running the new version, and test with a temporary Service resource. If all tests pass, remove the temporary Service resource. Remove the old Service resource (pointing to the blue Deployment), and immediately create a new Service resource exposing the green Deployment.
After successful transition, remove the blue Deployment. It is essential to keep the Service name unchanged, so that front-end resources such as Ingress will automatically pick up the transition.
Canary
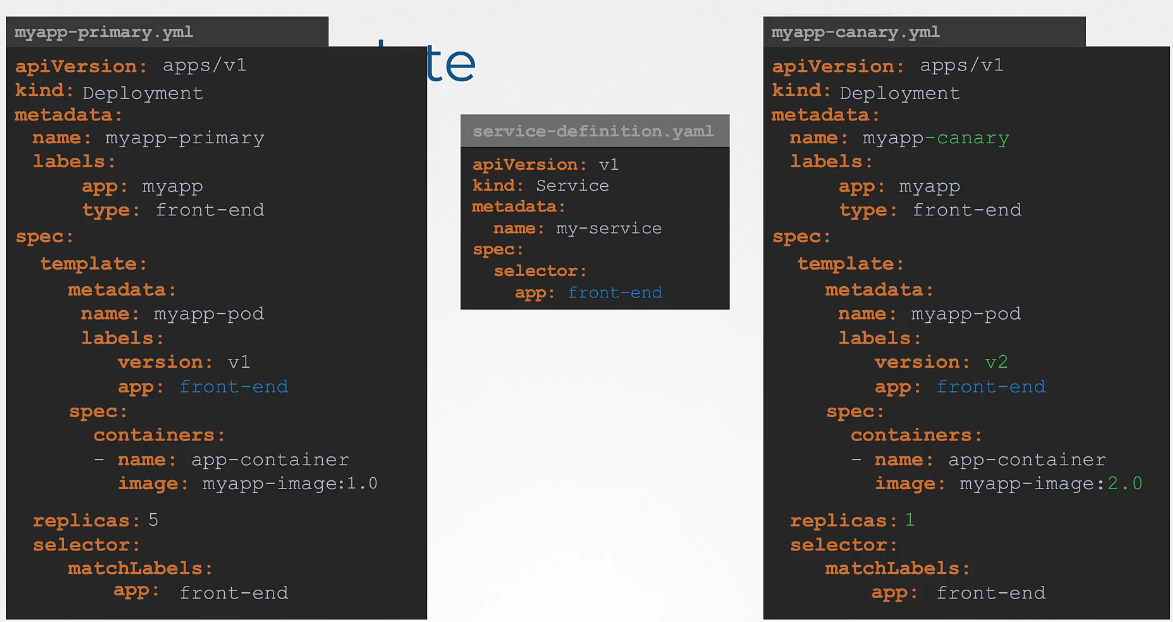 A canary Deployment is an update strategy where you first push the update at small scale to see if it works well. In terms of Kubernetes, you could imagine a Deployment that runs 4 replicas. Next, you add a new Deployment that uses the same label. Then you create a Service that uses the same selector label for all. As the Service is load balancing, only 1 out of 5 requests would be serviced by the newer version. if that doesn’t seem to be working, you can easily delete it.
Rollout
In this section, we will take a look at rolling updates and rollback in a deployment

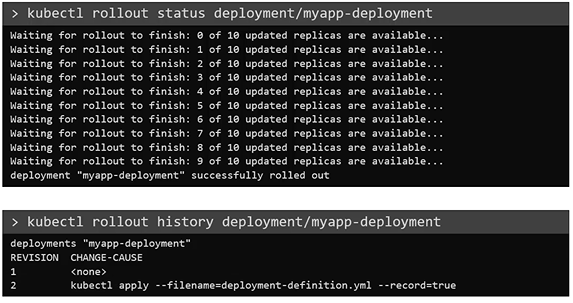
You can see the status of the rollout by the below command.
$ kubectl rollout status deployment/myapp-deployment
To see the history and revisions.
$ kubectl rollout history deployment/myapp-deployment
Rollback
Say for instance, once you upgrade your application, you realize something isn’t very right, Something’s wrong with the new version of build you use to upgrade. So you would like to roll back your update. Kubernetes deployments allow you to roll back to a previous revision. To undo a change, run the kubectl rollout undo command followed by the name of the deployment. The deployment will then destroy the PODs in the new replica set and bring the older ones up in the old replica set. And your application is back to its older format.
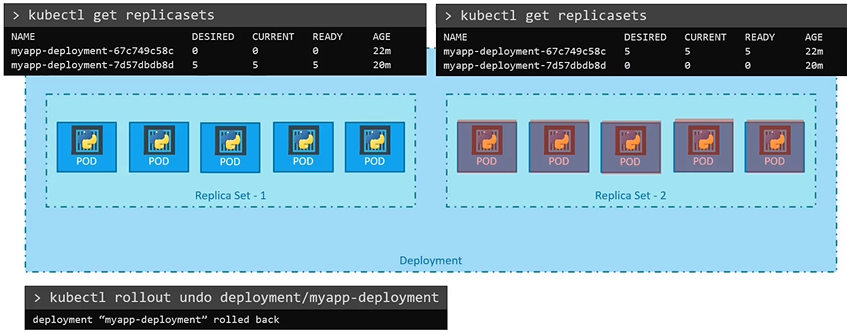
To undo a change:
$ kubectl rollout undo deployment/myapp-deployment
Summary