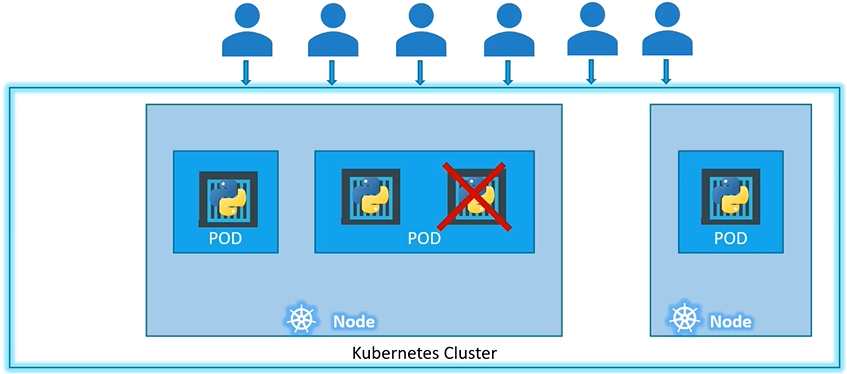
Kubernetes doesn’t deploy containers directly on the worker Nodes. Pod typically have a one-to-one relationship with containers running your application.
Important to note that pods are entities that carry IP addresses.
Containers in a pod share localhost, and can share volume
Create a new pod called custom-nginx using the nginx image and run it on container port 8080.
$ kubectl run custom-nginx --image=nginx --port=8080
Start a hazelcast pod and let the container expose port 5701
kubectl run hazelcast --image=hazelcast/hazelcast --port=5701
Create a pod called httpd using the image httpd:alpine in the default namespace. Next, create a service of > type ClusterIP by the same name (httpd). The target port for the service should be 80.
k run httpd --image=httpd:alpinek expose pod httpd --name=httpd --type='ClusterIP' --port=80kubectl run httpd --image=httpd:alpine --port=80 --expose
Naked(non managed) pods
Typically pods are only started through a Deployment. Because, naked pods are not rescheduled in case of node failure.
In CKAD you will have to deal with “NAKED” pods. Disadvantage of naked pods:
Rolling update don’t apply to naked pods; you can only bring it down and bring it up with the new settings
Naked pods cannot be scaled
Naked pods cannot be replaced automatically
A single pod can have multiple containers except for the fact that they are usually not multiple containers of the same kind.
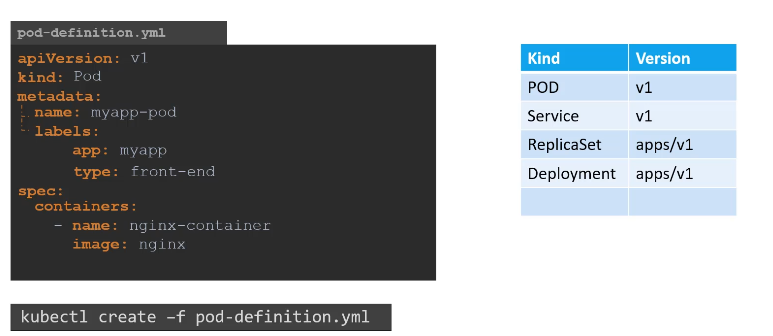
Pod YAML
Below is a sample Pod definition file that includes various configurations, such as volumes, resource limits, and environment variables.
apiVersion: Defines the API version being used (v1 for core Kubernetes objects).
kind: Specifies the resource type (Pod in this case).
metadata: Provides information about the Pod, including its name and labels.
spec: Describes the specifications of the Pod.
containers: Defines the container within the Pod. Each container has a name, image, port, resources (memory and CPU), and environment variables.
volumeMounts: Mounts a volume inside the container (in this case, from a ConfigMap).
volumes: Defines the volume used by the container (in this case, a ConfigMap).
This YAML file defines a Pod running a single container using the nginx image, exposing port 80, and mounting a ConfigMap volume at /etc/config:
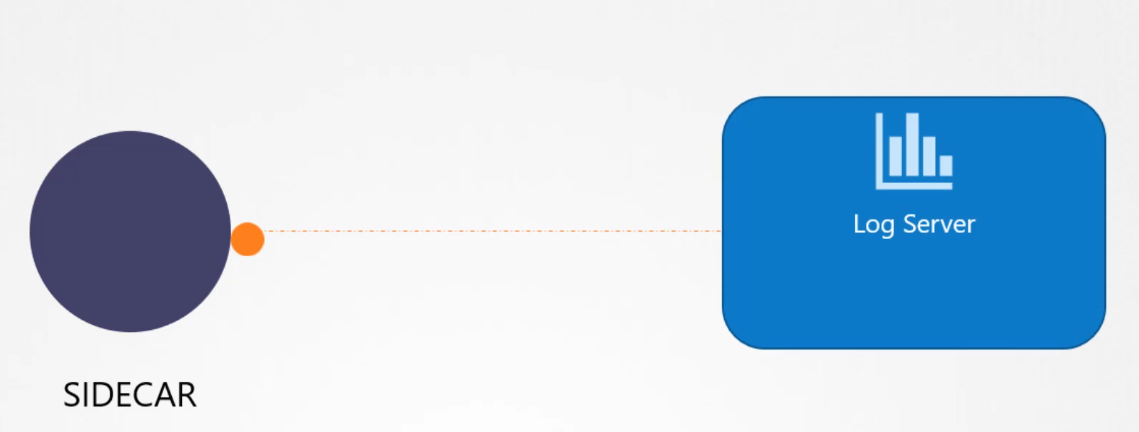
A good example of a sidecar container is deploying a logging agent alongside the application to collect logs and send them to a log server.
What are real world scenarios of Ambassador pattern?
The Sidecar pattern is a design pattern commonly used in microservices architecture. It involves deploying > helper components (sidecars) alongside the main service, within the same environment or pod, to extend functionality > without modifying the main service itself. This pattern is often seen in Kubernetes or containerized environments > where sidecars share the same lifecycle as the main service but provide additional features like networking, logging, > or security.
Here are two real-world scenarios where the Sidecar pattern can be effectively used:
1. Service Mesh for Observability and Networking (e.g., Istio)
In a service mesh architecture, a sidecar proxy is deployed alongside each service instance to handle aspects > like networking, security, and observability. The sidecar abstracts away the complexities of these concerns, > allowing the main service to focus on its business logic. The Sidecar pattern can handle:
Traffic routing and load balancing between services.
Monitoring and logging of service metrics (e.g., response times, request counts).
Security features, like mutual TLS for secure communication between services.
For example, with Istio, a popular service mesh, the Envoy proxy acts as a sidecar to manage all network traffic > for the service. It handles routing, retries, circuit breaking, and even telemetry without any code changes to the > service itself.
2. Centralized Logging and Metrics Collection
In distributed applications, collecting logs and metrics from multiple services can be challenging. Instead of > embedding logging and metrics functionality directly into each service, the Sidecar pattern allows you to:
Deploy a logging agent (e.g., Fluentd, Logstash) as a sidecar container that collects logs from the application > container and forwards them to a central logging system.
Attach a metrics collector (e.g., Prometheus sidecar) that gathers performance metrics from the application and > sends them to a monitoring system.
For instance, in a Kubernetes setup, a sidecar logging agent can be responsible for scraping application logs and > sending them to Elasticsearch or another logging backend, while the application remains focused solely on its core > functionality.
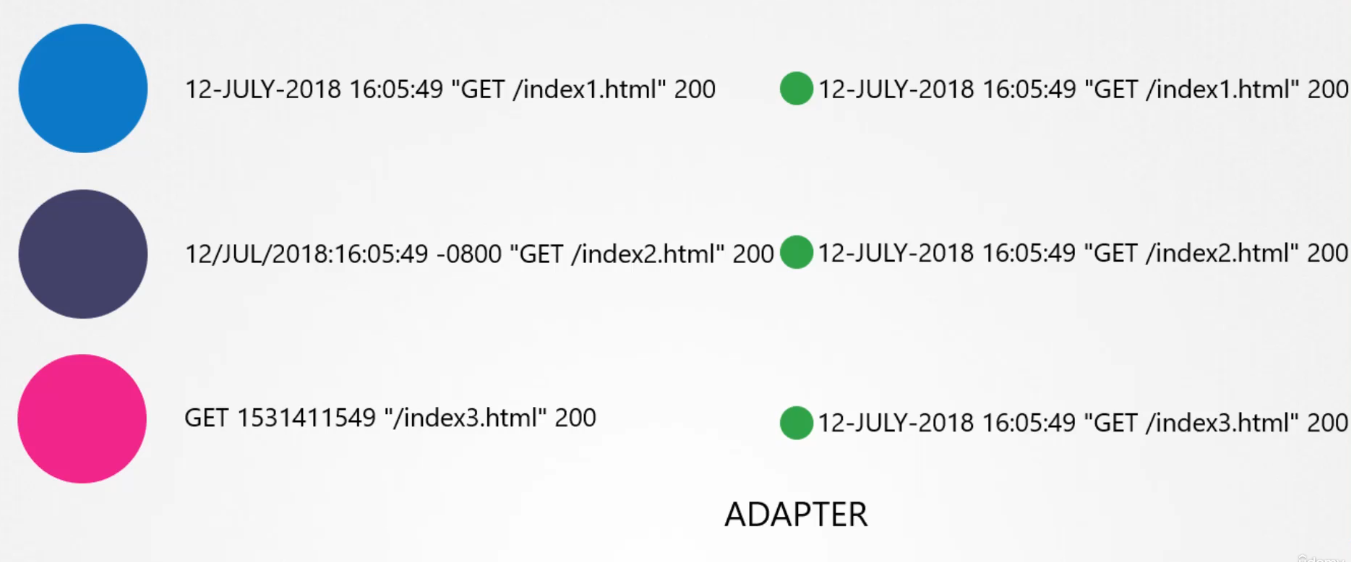
Adapter
Before sending logs to the centralized logging server, it’s useful to ensure that all logs follow the same format. An adapter container, used as part of a multi-container Pod, can perform this task by processing the logs before forwarding them to the server.
What are real world scenarios of Ambassador pattern?
The Adapter pattern is a structural design pattern that allows objects with incompatible interfaces to > collaborate by converting the interface of a class into another interface that a client expects. It acts as a bridge > between different components or systems that wouldn’t normally work together. Here are two real-world scenarios where > the Adapter pattern can be used:
1. Legacy System Integration with Modern APIs
In many organizations, legacy systems with outdated interfaces (SOAP, XML, etc.) need to interact with modern systems > that use REST APIs with JSON formats. Instead of rewriting the legacy system, you can use the Adapter pattern to:
Wrap the legacy system’s interface and translate it into the modern REST API format.
Convert SOAP/XML responses into JSON that modern services can easily consume.
Maintain compatibility between old and new systems without modifying either of them.
For example, if a modern frontend application communicates with a legacy SOAP-based system, an adapter can be used to > convert the SOAP responses into JSON, which the frontend can easily work with.
2. Integrating Different Payment Gateways
When building a payment system, different payment gateways (e.g., PayPal, Stripe, Square) often have different > interfaces for processing payments, handling refunds, and other operations. Using the Adapter pattern here allows you > to:
Create a unified interface that your payment processing module can interact with, while hiding the details of > each individual payment gateway.
Abstract away the specifics of each gateway, making it easier to swap out one gateway for another without > changing the business logic.
For example, an e-commerce platform might have an adapter for each payment provider (PayPalAdapter, StripeAdapter, > etc.), which implements a common processPayment() method that all of them can follow, despite their different > internal APIs.
Ambassador
An ambassador container acts as a proxy for the main container, representing it to the outside world.
What are real world scenarios of Ambassador pattern?
The Ambassador pattern is a structural design pattern used to handle calls to external services or components, especially when dealing with complex logic like retry mechanisms, logging, or security checks. It acts as a proxy or > intermediary, allowing you to add additional behaviors without modifying the core interaction logic. Here are two > real-world scenarios where the Ambassador pattern can be applied:
1. API Gateway for External Services (Microservices Architecture)
In a microservices architecture, services often need to communicate with external services like payment gateways, > third-party APIs, or even other internal microservices. Using the Ambassador pattern here allows you to:
Implement retries for external API calls in case of temporary failures.
Log each outgoing request for monitoring and debugging purposes.
Add authentication or security tokens to outgoing requests dynamically.
For example, a service that communicates with an external payment provider like Stripe could use an Ambassador to > handle retries, log all API requests and responses, and add any necessary authentication headers.
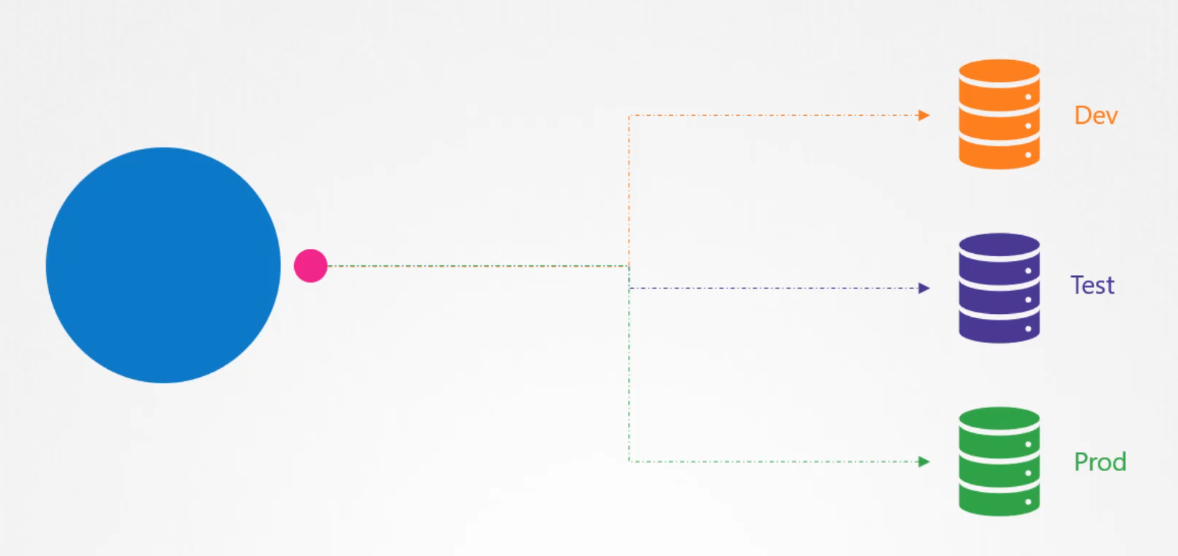
2. Database Access with Caching and Metrics
When a service interacts with a database or data store, the Ambassador pattern can be used to:
Introduce caching so that frequently requested data is served from cache, reducing load on the database.
Record metrics about the number of calls, the latency of each query, or the error rates.
Manage fallback mechanisms in case the database becomes temporarily unavailable (e.g., serving stale data from > the cache).
In this scenario, the Ambassador acts as an intermediary that handles all the additional concerns (caching, metrics) > while keeping the core database interaction logic simple.
Understanding Multi-Container Pods
There are several use cases where running multiple containers in a Pod makes sense:
Sidecar container: Enhances the primary application, such as logging.
Ambassador container: Represents the primary container to the outside world (e.g., a proxy).
Adapter container: Adapts traffic or data patterns to match those of other applications in the cluster.
Sidecar containers (logging, monitoring, etc.): Not defined by specific Pod properties; from a Kubernetes API resource perspective, it’s simply a multi-container Pod.
kubectl api-resources | less
Init Containers
An init container is an additional container that performs a task before the “regular” container starts.
The regular container will only start once the init container has completed its task.
If the init container doesn’t complete, the main container won’t start.
Init containers run to completion, no matter how long it takes.
If the main container and the init containers need to share data, using a shared volume is the best approach.
Apart from exploring a Pod externally, you can also connect to it and run commands on the primary container in a Pod:
$ kubectl exec -it nginx-xxx -- sh
From here, run any command to investigate, use exit to disconnect
Troubleshooting Failing Applications
Use kubectl describe to investigate the application state. First, look at the events, next have a look at the application state.
Check the last state, and in particular the application exit code:
If the exit code is 0, the application has completed successfully and no further investigation is needed
If the exit code is other than 0, there is a problem with the entrypoint application and you need to use kubectl logs to investigate the application logs
Each node has a set amount of CPU and memory resources. Every pod requires specific resources to run. For example, one pod might need two CPUs and one unit of memory.
When a pod is scheduled on a node, it uses the available resources of that node. The Kubernetes scheduler decides which node to place a pod on by considering the resources needed and the resources available on each node. If node two has enough resources, the scheduler will place the new pod there.
If a node lacks sufficient resources, the scheduler will avoid it and find another node that can accommodate the pod. If no nodes have enough resources, the pod will be in a pending state, and you can check the reason using the kubectl describe pod command, which might show “insufficient CPU.”
Resource Requirements for Pods
When creating a pod, you can specify the CPU and memory it needs, known as the resource request. For instance, you might set a request for one CPU and one GiB of memory. The scheduler uses these numbers to find a suitable node.
In the pod-definition file, add a resources section, including requests for memory and CPU. For example, you might request four GiB of memory and two CPUs. When the pod is scheduled, it will have a guaranteed amount of these resources.
Understanding CPU
How to ensure guaranteed amount of resource?
Always remember to set resource requests for your pods. This is the only way to guarantee that they receive the minimum required CPU resources. Without setting requests, there’s no guarantee a pod will get the necessary resources, and it might be starved by other pods.
You can specify CPU values as low as 0.1, which is expressed as 100m (milli). One CPU equals one vCPU in AWS or one core in GCP or Azure. You can request more CPUs if your nodes can handle it.
For memory, you can specify values like 256 MiB or use G for gigabytes. Remember, G is 1,000 MB, while Gi is 1,024 MiB.
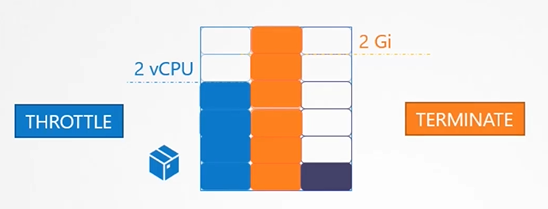
Container Resource Limits
By default, a container can use as much resource as it needs, potentially affecting other containers on the node. However, you can set limits on resource usage. For instance, if you limit a container to one vCPU, it cannot use more than that.
You can define these limits in the limits section of your pod-definition file. Each container can have its own request and limit settings.
What happens if a pod exceeds its resource limits? For CPU, it gets throttled and can’t exceed the limit. However, for memory, if a pod tries to use more than its limit, it will be terminated, resulting in an Out of Memory (OOM) error.
Default Resource Configuration
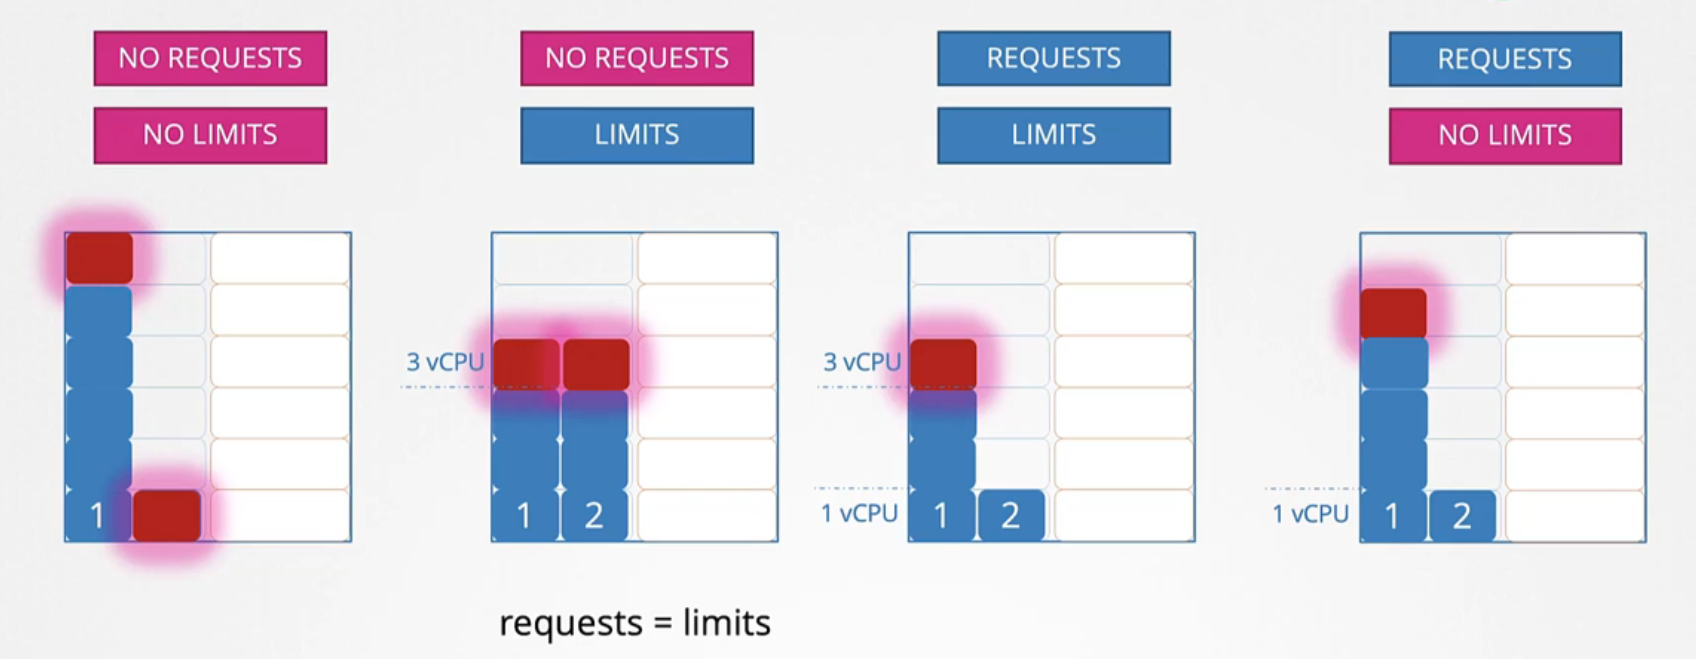
By default, Kubernetes doesn’t set any resource requests or limits. This means a pod can consume all available resources, which is not ideal.
If two pods compete for CPU resources without limits, one can monopolize the CPU, leaving the other with none. If no requests are specified but limits are, Kubernetes sets requests equal to limits.
In an ideal setup, you set requests without limits. This way, each pod is guaranteed its requested resources while also being able to use additional available resources if needed.
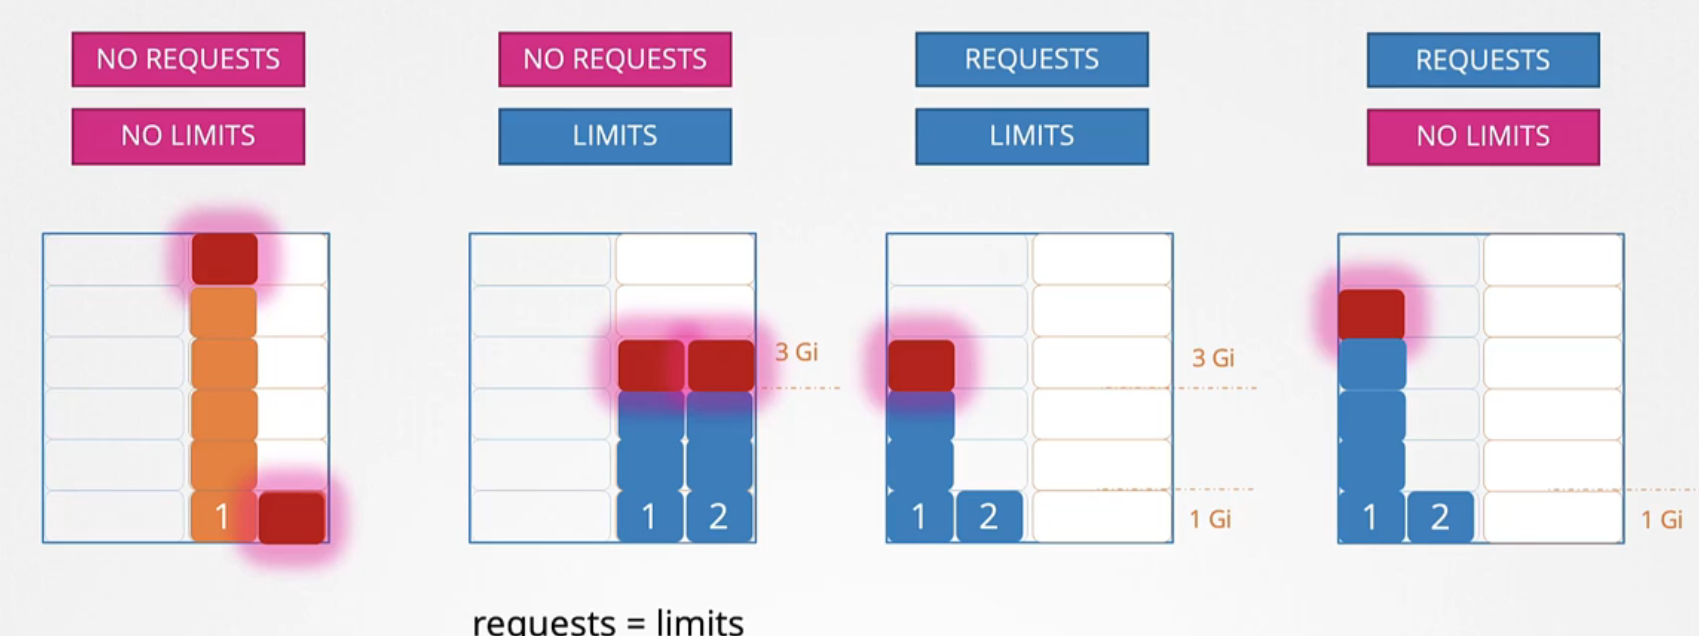
Memory Resource Management
Similar to CPU, if two pods compete for memory without requests or limits, one can consume all the available memory. If no requests are specified but limits are, the same logic applies: requests default to limits.
If requests are set but no limits, a pod is guaranteed its requested memory but can consume as much as is available. If it tries to use more memory than allowed, it will be killed.
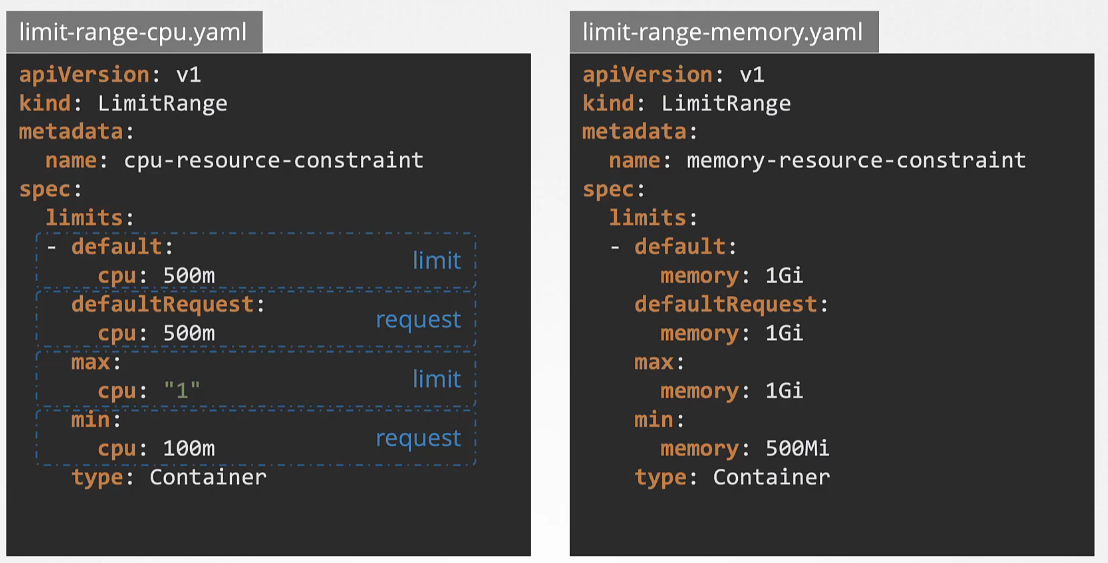
Setting Default Resource Values (Limit Range)
Important
Keep in mind that limits are enforced when a pod is created. If you create or update a limit range, it won’t affect existing pods. The changes will only apply to new pods created after the limit range is in place.
How can you ensure that pod has default resources?
To ensure every pod has default resource settings, you can use limit ranges. Limit ranges define default values for containers in pods that don’t specify requests or limits. This applies at the namespace level.
To create a limit range, define it in a YAML file with the apiVersion set to v1, kind as LimitRange, and provide a name (e.g., cpu-resource-constraint). Set defaults, maximums, and minimums for CPU and memory.
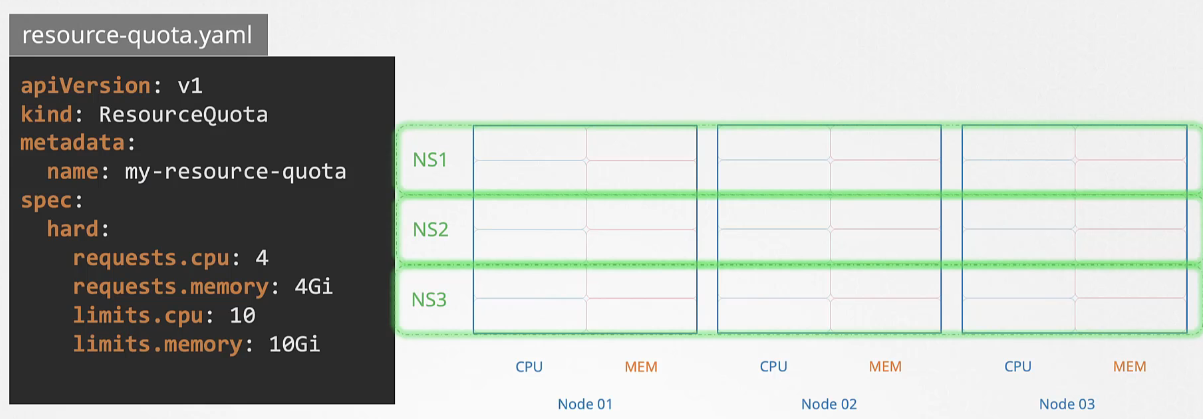
Resource Quotas
When several users or teams share a cluster with a fixed number of nodes, there is a concern that one team could use more than its fair share of resources.
Resource quotas are a tool for administrators to address this concern.
To restrict total resource consumption in a cluster, you can create resource quotas at the namespace level. This sets hard limits on resource requests and limits. For example, a resource quota can limit the total requested CPU to four and memory to four GiB.
A resource quota, defined by a ResourceQuota object, provides constraints that limit aggregate resource consumption per namespace
By default, a Pod will use as much CPU and memory as necessary to do its work. This can be managed by using Memory/CPU requests and limits in pod.spec.containers.resources.
Note: Remember Requests and Limits for resources are set per container in the pod.
CPU limits are measured in millicores (or millicpu), where 1 millicore is 1/1000th of a CPU core.
For example, 500 millicores is equal to 0.5 CPU.
The kube-scheduler ensures that the node running the Pods has enough resources to meet the requested limits.
If a Pod can’t be scheduled due to insufficient resources, its status will show as “Pending.”
Managing Resource Limitations
When using a deployment, you can change resource limits for running applications using kubectl set resources.
This command doesn’t work on individual Pods since Pods don’t support updates directly.
You can combine resource limits for Pods/deployments with namespace quotas to restrict resources within specific namespaces.
Managing namespace quotas is part of the Certified Kubernetes Administrator (CKA) exam.
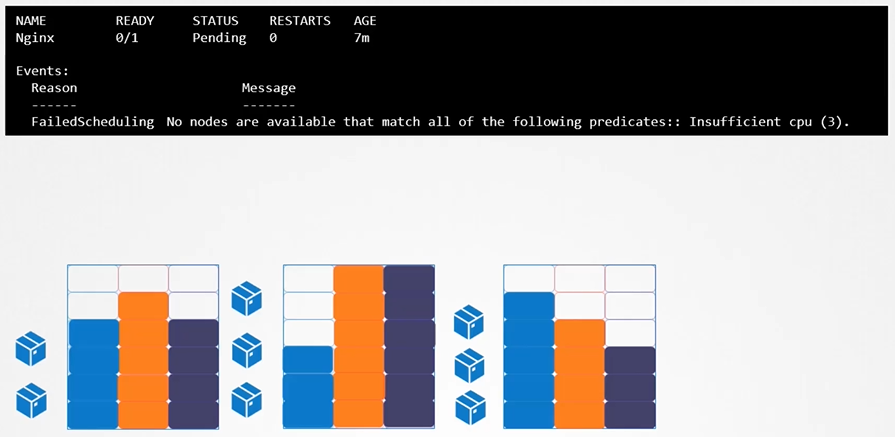
How scheduler acts when no resource left
In a 3-node Kubernetes cluster, each node has its own CPU, memory, and disk resources. If none of the nodes have enough available resources, Kubernetes will delay scheduling the Pod, leaving it in a “Pending” state. In the event logs, you’ll see the reason as “Insufficient CPU.”
Resource request
By default, Kubernetes assumes a Pod or its container needs 0.5 CPU and 256Mi of memory. This is called the Resource Request for a container. If your application needs more resources than these defaults, you’ll need to specify them in the Pod definition file.
If it uses more memory than allowed, it will trigger an Out of Memory (OOM) error, and the Pod will be killed.
If it requests more CPU or memory than what’s available on the node, you’ll see an insufficient resources error, and the Pod will stay in the Pending state.
Clean up
Resources are not automatically cleaned up after use.
Some resources offer automatic clean-up options when they’re no longer needed.
Manual clean-up may still be necessary from time to time.
If a Pod is managed by a deployment, you should remove the deployment, not the individual Pod.
Avoid forcing resource deletion, as this could leave resources in an unmanageable state (e.g., orphaned resources or errors).
$ kubectl delete all$ kubectl delete all --all$ kubectl delete all --all --force --grace-period=-1$ Don't do this: kubectl delete all --all -A --force --grace-period=-1
Pod Startup
After using kubectl create or kubectl run, the requested resources are saved in the etcd database. The scheduler then finds an eligible node to run the application. Once a node is selected, the Pod image is fetched, and the Pod container starts, running its entrypoint application. Depending on whether the entrypoint succeeds or fails, the Pod’s RestartPolicy determines the next steps.
Understanding Pod States
Pending: the Pod has been validated by the API server and an entry has been created in the etcd, but some prerequisite conditions have not been met
Running: the Pod currently is successfully running
Completed: the Pod has completed its work
Failed: the Pod has finished but something has gone wrong
CrashLoopbackOff: the Pod has failed, and the cluster has restarted it
Unknown: the Pod status could not be obtained
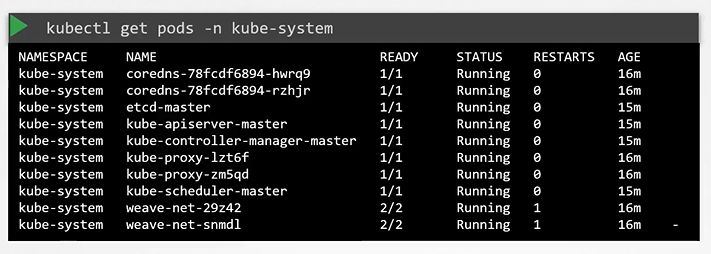
Current Pod status can be observed using kubectl get pods
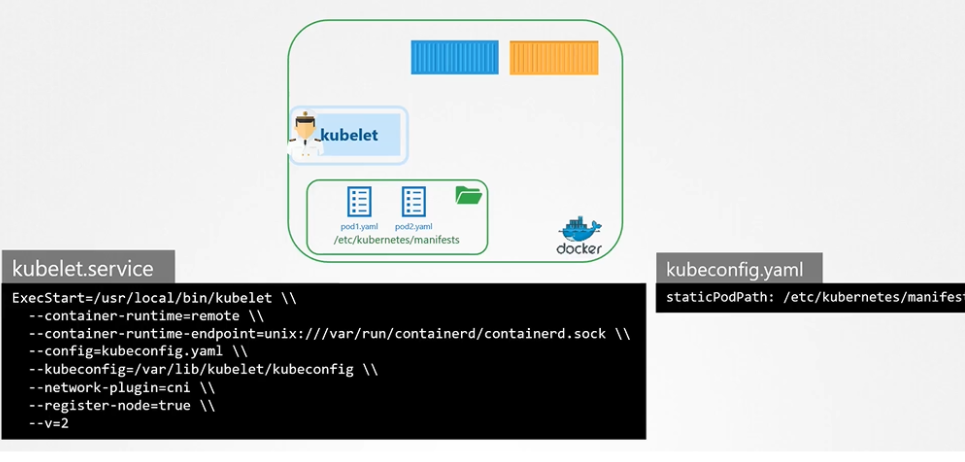
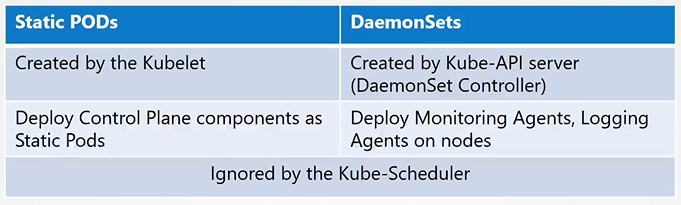
Static Pods
**How do you provide a pod definition file to the kubelet without a kube-apiserver? **
You can configure the kubelet to read the pod definition files from a directory on the server designated to store information about pods.
The designated directory can be any directory on the host and the location of that directory is passed in to the kubelet as an option while running the service.
The option is named as --pod-manifest-path.
Another way of configuring static pod
Instead of specifying the option directly in the kubelet.service file, you could provide a path to another config file using the config option, and define the directory path as staticPodPath in the file.
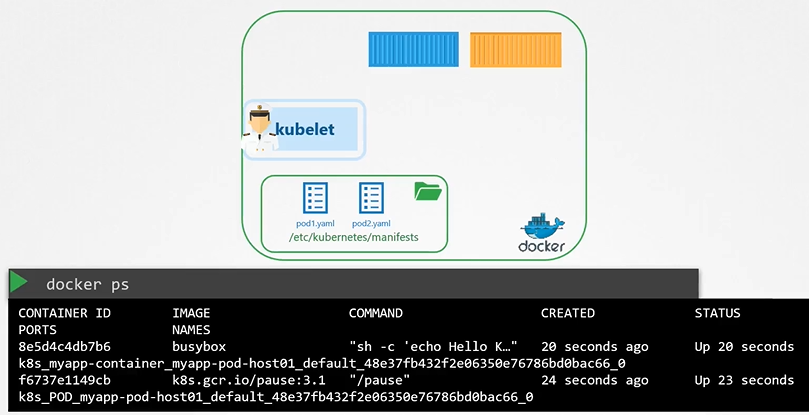
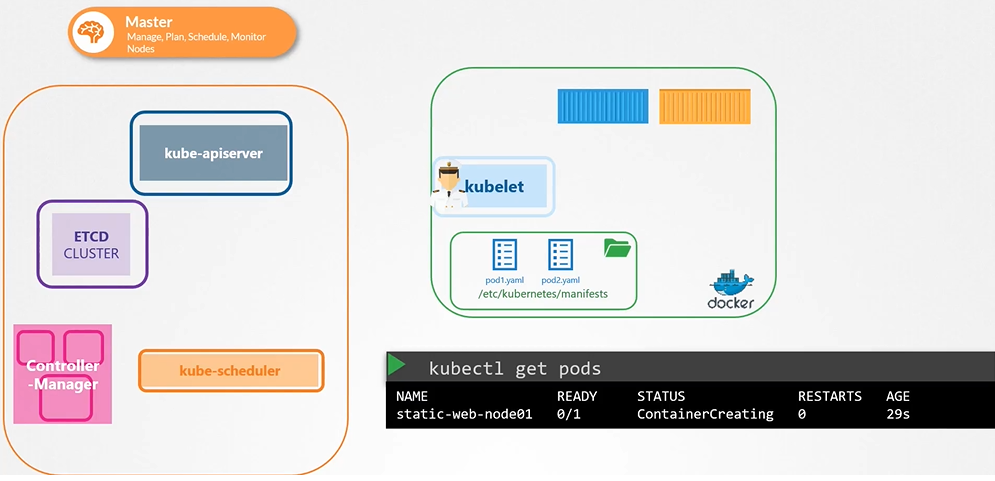
View static pods
The kubelet can create both kinds of pods - the static pods and the ones from the api server at the same time.
Use case
Static pod vs daemon sets
Container Logging
We can see the continer/pod logs by following commad:
kubectl logs -f event-simulator-pod
if in the pod there are multiple container we have to name the specific container:
kubectl logs -f event-simulator event-simulator
How to list api-resources
$ kubectl api-resources
Q1: How do you provide a pod definition file to the kubelet without a kube-apiserver?
You can run a static pod by placing its YAML definition in the /etc/kubernetes/manifests/ directory on the node where the kubelet is running. The kubelet will automatically create the pod without needing the API server.