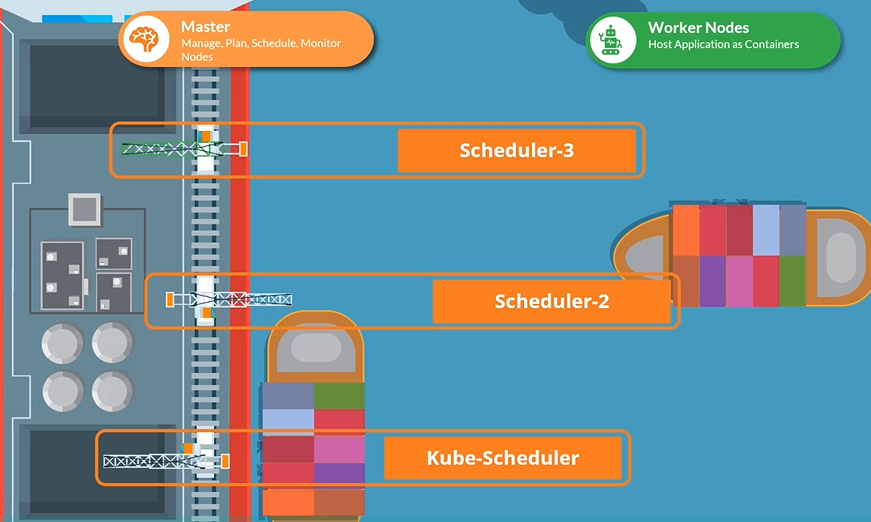
Kube Scheduler
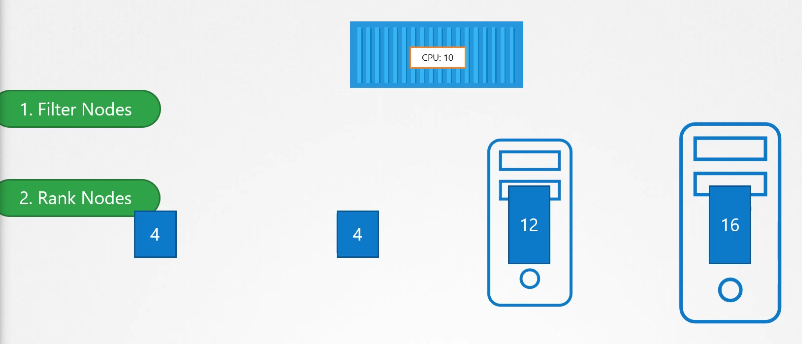
kube-scheduler is responsible for scheduling pods on nodes. The kube-scheduler is only responsible for deciding which pod goes on which node. It doesn’t actually place the pod on the nodes, that’s the job of the kubelet.
Kube scheduler helps with (this is why we need it):
- Filtering nodes
- Ranking nodes
[Manual] Install
Download the kubescheduler binary from the Kubernetes release pages kube-scheduler. For example: To download kube-scheduler v1.13.0, Run the below command. Extract it and run it as a service:
$ wget https://storage.googleapis.com/Kubernetes-release/release/v1.13.0/bin/linux/amd64/kube-scheduler && tar -xvf kube-scheduler && cd kube-schedulerkube-scheduler options
If you set it up with kubeadm tool, kubeadm tool will deploy the kube-scheduler as pod in kube-system namespace on master node.
$ kubectl get pods -n kube-systemYou can see the options for kube-scheduler in pod definition file that is located at /etc/Kubernetes/manifests/kube-scheduler.yaml
$ cat /etc/Kubernetes/manifests/kube-scheduler.yaml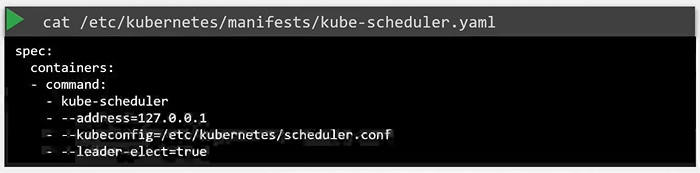
You can also see the running process and affective options by listing the process on master node and searching for kube-apiserver.
$ ps -aux | grep kube-scheduler
Scheduling
Manual Scheduling
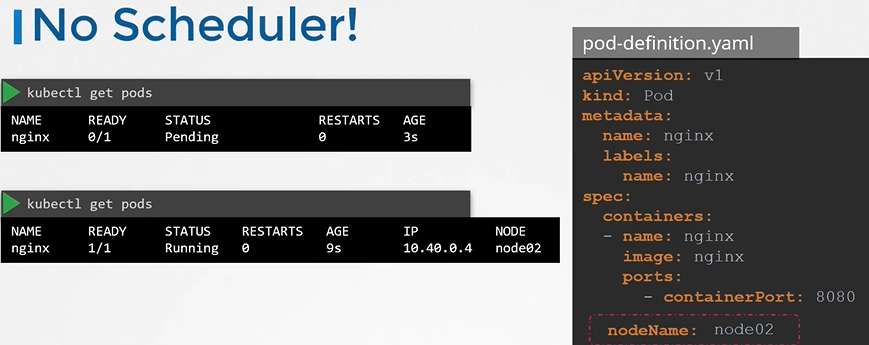
What do you do when you do not have a scheduler in your cluster?
Every POD has a field called Node Name that by default is not set. You don’t typically specify this field when you create the manifest file, Kubernetes adds it automatically. Once identified it schedules the POD on the node by setting the nodeName property to the name of the node by creating a binding object.
apiVersion: v1
kind: Pod
metadata:
 name: nginx
 labels:
  name: nginx
spec:
 containers:
 - name: nginx
   image: nginx
   ports:
   - containerPort: 8080
 nodeName: node02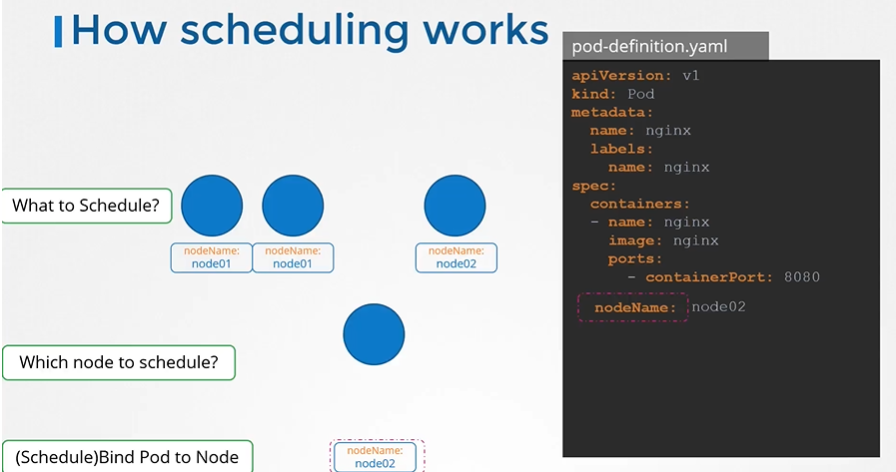
No scheduler
You can manually assign pods to node itself. Well without a scheduler, to schedule pod is to set nodeName property in your pod definition file while creating a pod.
apiVersion: v1
kind: Binding
metadata:
  name: nginx
target:
  apiVersion: v1
  kind: Node
name: node02apiVersion: v1
kind: Pod
metadata:
name: nginx
labels:
name: nginx
spec:
containers:
- name: nginx
image: nginx
ports:
- containerPort: 8080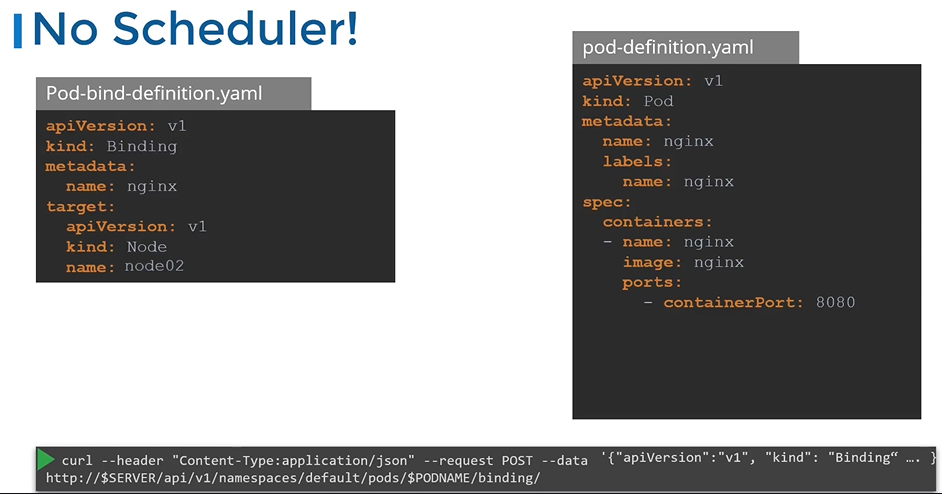
Taints and toleration
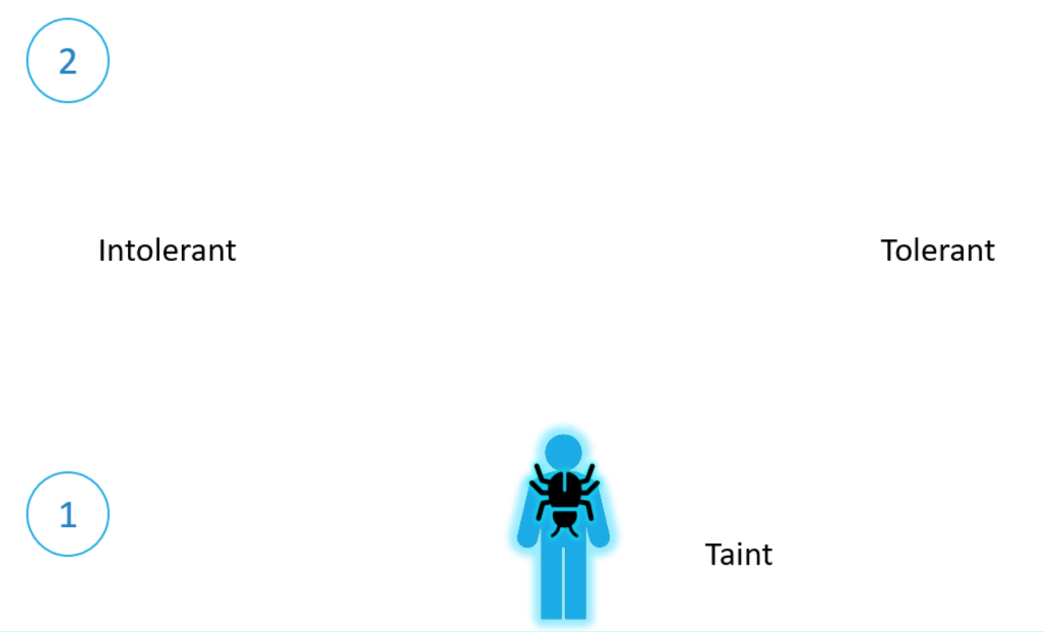
Imagine a bug trying to land on a person. To keep the bug away, we spray the person with repellent—this is the “taint” in our analogy. Some bugs can’t stand the smell, so they fly away, while others are unaffected and can still land. In Kubernetes terms, the person is a node, the bug is a pod, and taints and tolerations control which pods (bugs) can be scheduled on which nodes (people).
Note
So there are two things that decide if a bug can land on a person. First, the taint on the person, and second the bugs toleration level to that particular taint.
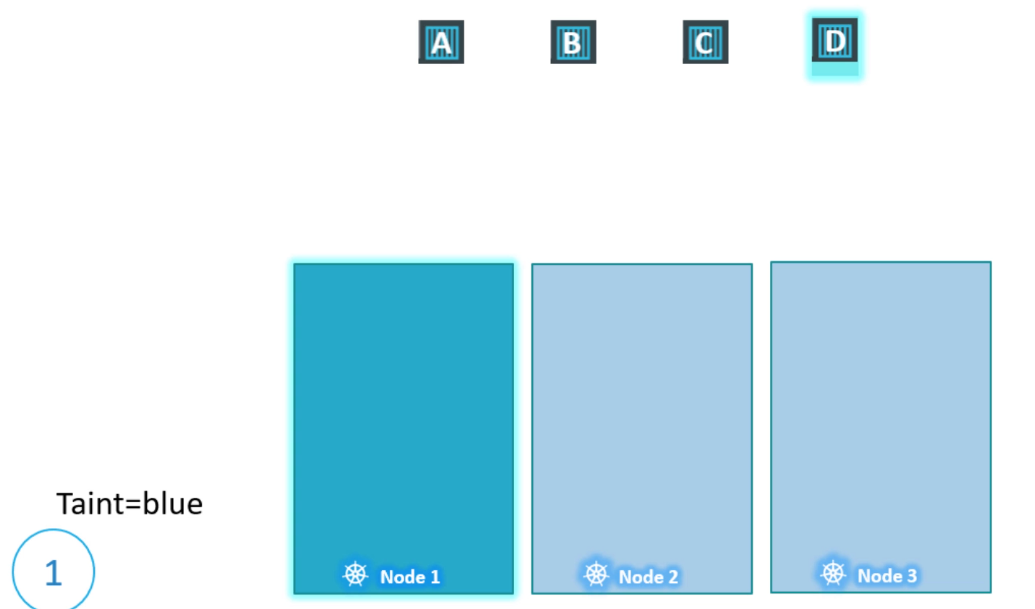
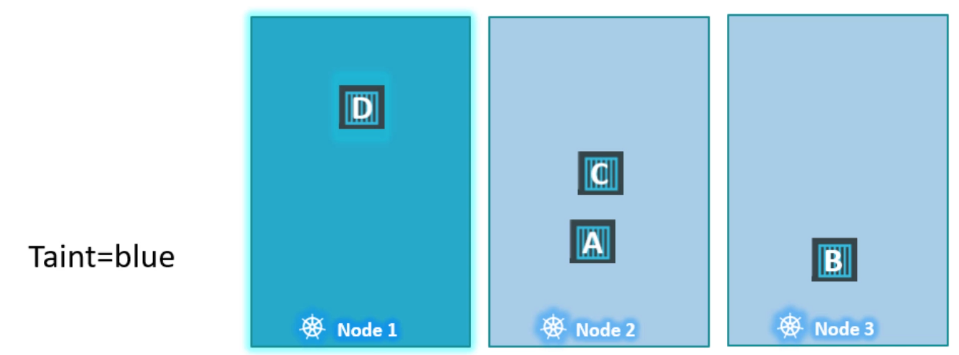
Now, let’s return to Kubernetes. Taints and tolerations have nothing to do with security—they’re just a way to control what pods can be scheduled on specific nodes. Imagine a cluster with three worker nodes (nodes one, two, and three) and four pods (A, B, C, and D). When these pods are created, the Kubernetes scheduler distributes them across the nodes without any restrictions to balance the load.
Now, say we want to dedicate node one for a specific application. First, we’ll prevent any pod from being placed on node one by applying a taint, which we’ll call “blue.” By default, no pods have tolerations, so without them, none of the pods can be placed on node one. This solves the first part of our problem—no unwanted pods will be scheduled on this node.
Next, we’ll allow pod D to run on node one by adding a toleration for the “blue” taint to that pod. Now, pod D can be scheduled on node one, while the other pods (A, B, and C) will be placed on nodes two and three. The scheduler attempts to place each pod, but pods without tolerations will be “thrown off” node one due to the taint.
To summarize: taints are applied to nodes, and tolerations are applied to pods. Here’s how you apply a taint using the kubectl taint nodes command. You specify the node and provide a key-value pair to define the taint. For example, if you want to dedicate node one to pods in the “blue” application, the key-value pair would be app=blue.
Taints are set on nodes and tolerations on pods. Like a person and a bug. Tolerations are applied to pods, and allow (but do not require) the pods to schedule onto nodes with matching taints.
Taints and tolerations work together to ensure that pods are not scheduled onto inappropriate nodes. One or more taints are applied to a node; this marks that the node should not accept any pods that do not tolerate the taints.
Important
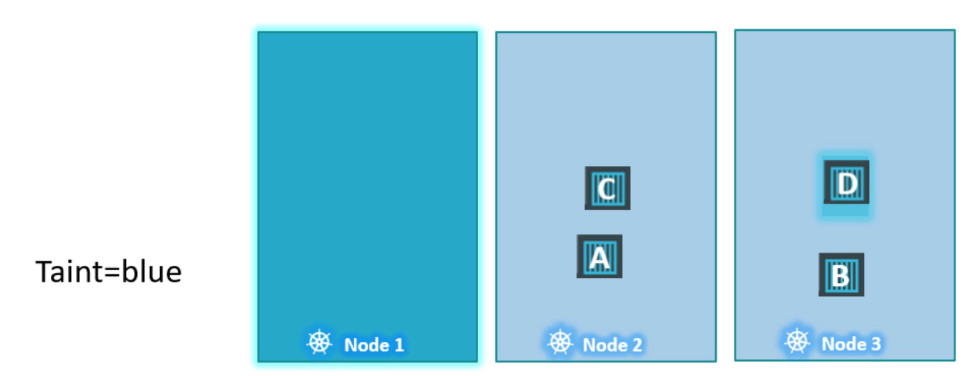
Taints and Toleration does not tell a pod go to which node. It’s rather a mechanism for a node to accept a defined pod. Taints and Tolerations are for nodes mainly. For example pod D still can end up on node 3. But we are sure that node 1 never accepts pod A,B,C (looking from pod perspective)
Taint
Use kubectl taint nodes command to taint a node.
$ kubectl taint nodes <node-name> key=value:taint-effectExample:
$ kubectl taint nodes node1 app=blue:NoSchedule

$ kubectl taint nodes node1 key1=value1:NoSchedule
$ kubectl taint nodes node1 key1=value1:NoExecute
$ kubectl taint nodes node1 key2=value2:NoSchedule
Taint effect
The taint effect defines what would happen to the pods if they do not tolerate the taint.
- There are 3 taint effects
NoSchedule: Pods will not be scheduled on that nodePreferNoSchedule: System will “try” to not put no pod on that node but it is “not guaranteed”NoExecute: New pods will not be scheduled on that node and if any of the existing node are not tolerate to the taint “will be evicted”
 When you add a taint to a node in Kubernetes, the behaviour regarding the pods already running on that node depends on the taint effect you specify:
- NoSchedule:
- Effect on existing pods: Pods that are already running on the node will not be affected. They will continue to run normally. However, any new pods that do not tolerate the taint will not be scheduled on that node.
- PreferNoSchedule:
- Effect on existing pods: Similar to NoSchedule, existing pods will remain unaffected. The scheduler will try to avoid placing new pods on this node unless they tolerate the taint.
- NoExecute:
- Effect on existing pods: This is where it gets interesting. When you apply a taint with the NoExecute effect to a node, any existing pods that do not tolerate the taint will be evicted from the node. In this case, the pods are killed and will need to be rescheduled on another node if they can tolerate the taint.
Example Scenario
- If you have a node with pods A, B, and C, and you apply a taint with the effect
NoExecute:- If pod A and pod B do not tolerate the taint, they will be evicted immediately.
- Pod C will continue to run if it has a toleration for the taint.
This behaviour allows you to manage workloads effectively when the requirements for resource usage change.
Tolerance
Tolerations are added to pods by adding a tolerations. Section in pod definition.
apiVersion: v1
kind: Pod
metadata:
  name: myapp-pod
spec:
  containers:
    - name: nginx-container
      image: nginx
  tolerations:
    - key: "app"
      operator: "Equal"
      value: "blue"
      effect: "NoSchedule"
Taints and Tolerations do not tell the pod to go to a particular node. Instead, they tell the node to only accept pods with certain tolerations.
Master node
A taint is added to master node so that make sure that no pod is scheduled for master node. To see this taint, run the below command:
$ kubectl describe node kubemaster | grep Taint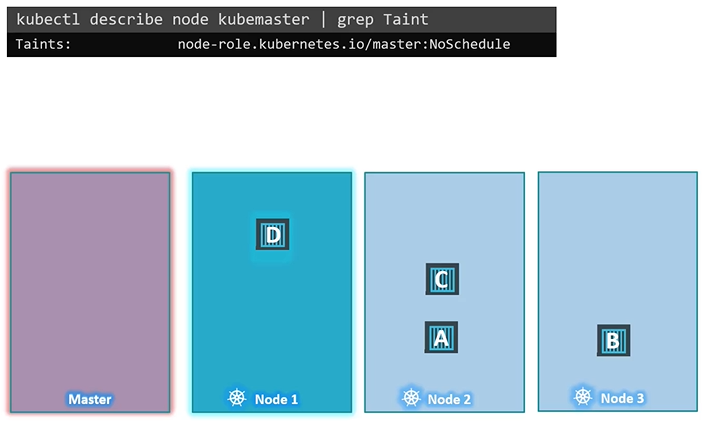
Node Selectors
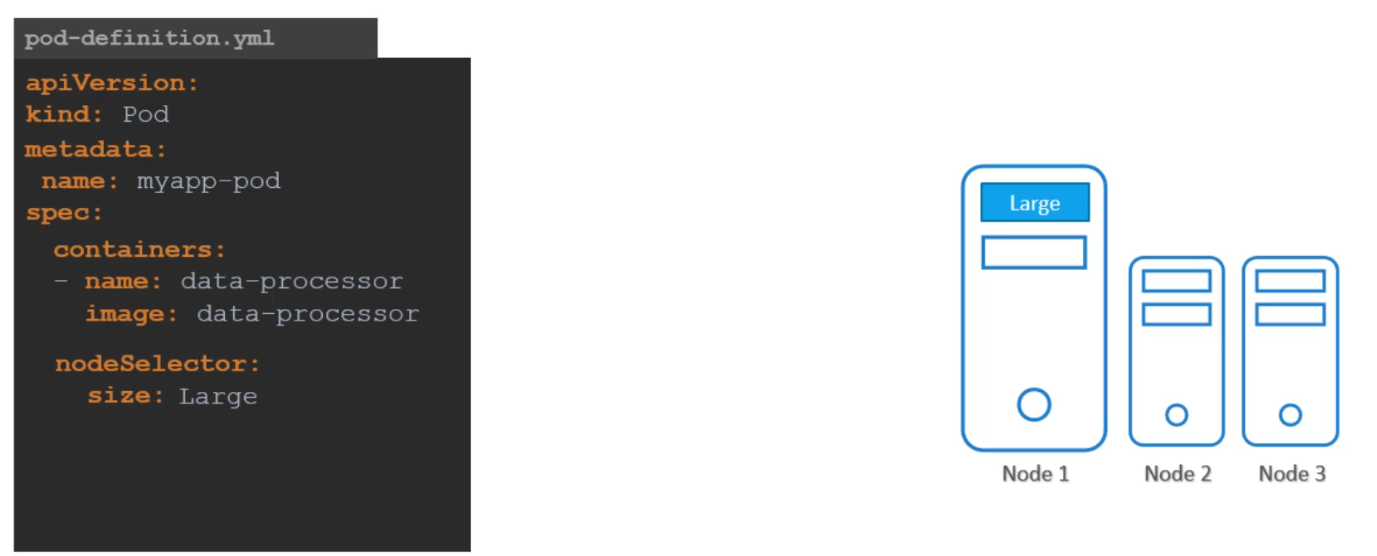
You can constrain a Pod so that it is restricted to run on particular node(s), or to prefer to run on particular nodes using labels.
We add new property called Node Selector to the spec section and specify the label. The scheduler uses these labels to match and identify the right node to place the pods on.
We can label a node, and then tell scheduler to select a node with the
nodeSelectorlabel for that pod.
apiVersion: v1
kind: Pod
metadata:
  name: myapp-pod
spec:
  containers:
    - name: data-processor
      image: data-processor
  nodeSelector:
    size: Large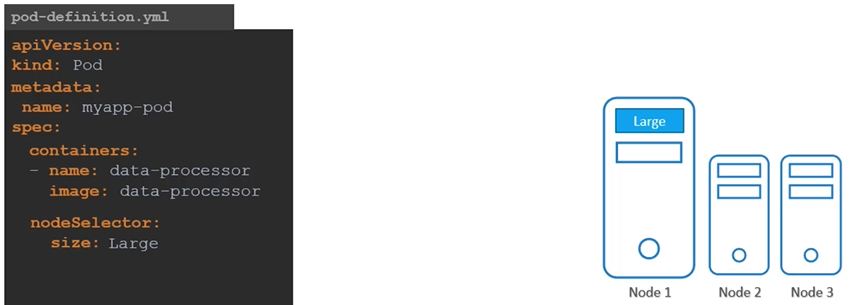
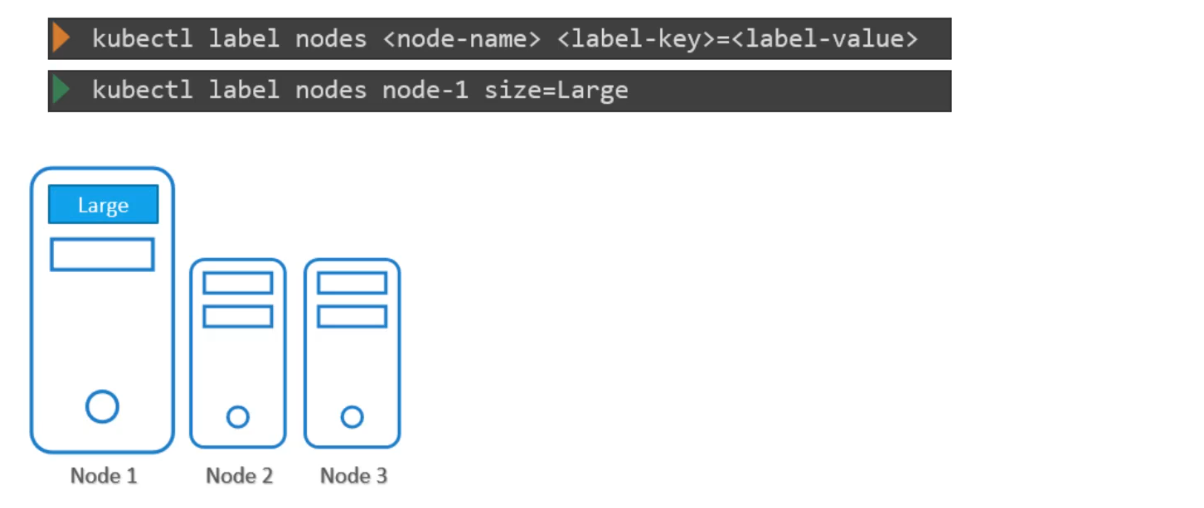
Syntax to label nodes:
$ kubectl label nodes <node-name> <label-key>=<label-value>Example
$ kubectl label nodes node-1 size=Large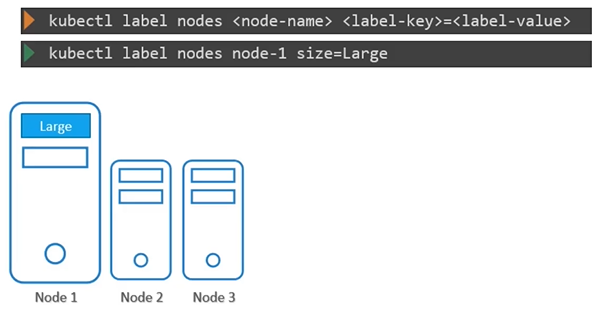
To create a pod definition:
apiVersion: v1
kind: Pod
metadata:
 name: myapp-pod
spec:
 containers:
 - name: data-processor
   image: data-processor
 nodeSelector:
  size: Large
$ kubectl create -f pod-definition.ymlLimitations of Node Selector
Scenario:
If your requirement is to restrict a pod to certain nodes, it is achieved through another concept called as node affinity
how to label a node
We used a single label and selector to achieve our goal here. But what if our requirement is much more complex.
- For this we have
Node Affinity and AntiAffinity
Node Affinity
Scenario:
If your requirement is to restrict a pod to certain nodes, it is achieved through another concept called as node affinity
Node affinity is a property of Pods that attracts them to a set of nodes (either as a preference or a hard requirement). Taints are the opposite — they allow a node to repel a set of pods.
The primary feature of Node Affinity is to ensure that the pods are hosted or attracted on particular nodes.
- With
Node Selectorswe cannot provide the advance expressions.
apiVersion: v1
kind: Pod
metadata:
name: myapp-pod
spec:
containers:
- name: data-processor
image: data-processor
affinity:
nodeAffinity:
requiredDuringSchedulingIgnoredDuringExecution:
nodeSelectorTerms:
- matchExpressions:
- key: size
operator: In
values:
- Large
- Medium
################ OR ################
requiredDuringSchedulingIgnoredDuringExecution:
nodeSelectorTerms:
- matchExpressions:
- key: size
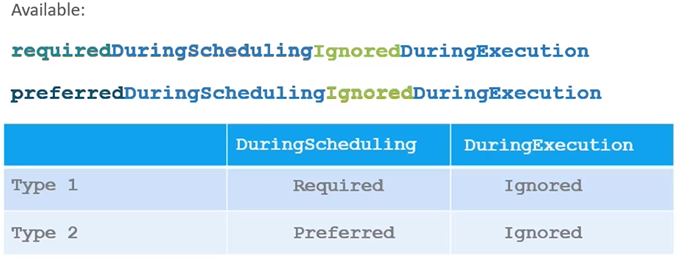
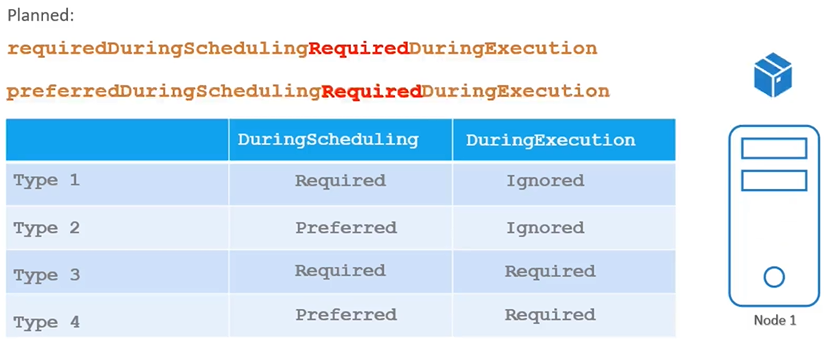
operator: ExistsNode Affinity Types
What if someone changes the label on the node a future point in time, will the pod continue to stay on the node? All of this is answered by the long sentence like property under node affinity, which happens to be the type of node affinity.
During Scheduling:
- The scheduling phase is when a Pod is created for the first time. The scheduler considers the specified affinity rules to place the Pod on the appropriate nodes.
- If nodes with matching labels are unavailable (for example, if we forget to label a node as “large”), the type of node affinity used becomes crucial.
- Required Affinity: If this type is selected, the scheduler mandates that the Pod must be placed on a node that meets the affinity rules. If no such node exists, the Pod will not be scheduled. This is used when the Pod’s placement is critical.
- Preferred Affinity: If the placement is less critical, this option allows the scheduler to ignore the affinity rules if a matching node isn’t found. It will place the Pod on any available node instead, signaling the scheduler to “try to place it on a matching node, but if not, just place it anywhere.”
During Execution:
- The execution phase refers to when a Pod is already running. Changes in the environment, such as modifications to node labels, can affect node affinity.
- For example, if an administrator removes the label “size=large” from a node, what happens to the Pods running on that node?
- Currently, the two types of node affinity allow Pods to continue running, even if changes in node affinity occur after scheduling (this is set to “ignored”).
- New Type (Future): An expected new option called “required during execution” will evict any Pods running on nodes that no longer meet the affinity rules. For instance, if a Pod running on a previously labelled “large” node has that label removed, it will be evicted.
Taints and Tolerations vs Node Affinity
Taints and tolerations are meant to restrict node to accept certain pods. It’s the node accepting or rejecting particular pods.
Taints and Tolerations do not guarantee that the pods will only prefer these nodes; in this case, the red pods may end up on one of the other nodes that do not have a taint or toleration set.
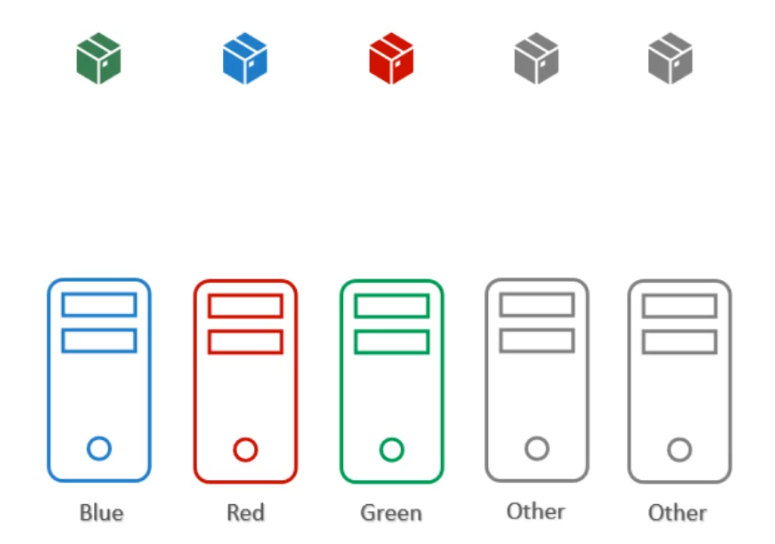
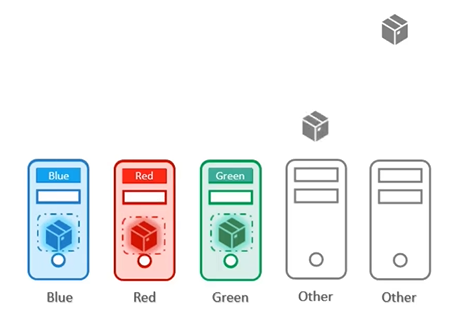
Problem statement: Suppose we have the following scenario:
- Nodes: 5 nodes available in the cluster.
- Pods: 5 coloured Pods (each with a specific colour that corresponds to a particular node) and 2 additional Pods that can be scheduled on any available nodes. Objective:
- Ensure that each coloured Pod is placed on its respective node.
- The remaining 2 Pods should be scheduled onto any of the other nodes that do not have colour-specific requirements.
If we only use taints and tolerations, each node will accept only Pods that have the matching tolerations. However, this does not guarantee that the Pod won’t be placed on other nodes. Taints and tolerations only ensure that the right Pod can be accepted by certain nodes, but there’s still a chance that Pods like red, blue, or green could be scheduled on nodes without any taints.
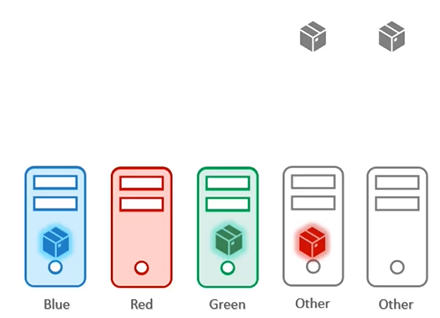
If we only use node affinity, there’s a chance that other Pods could still be placed on the labelled nodes. This is because node affinity attracts Pods to specific nodes but does not prevent other Pods from being scheduled on those nodes.
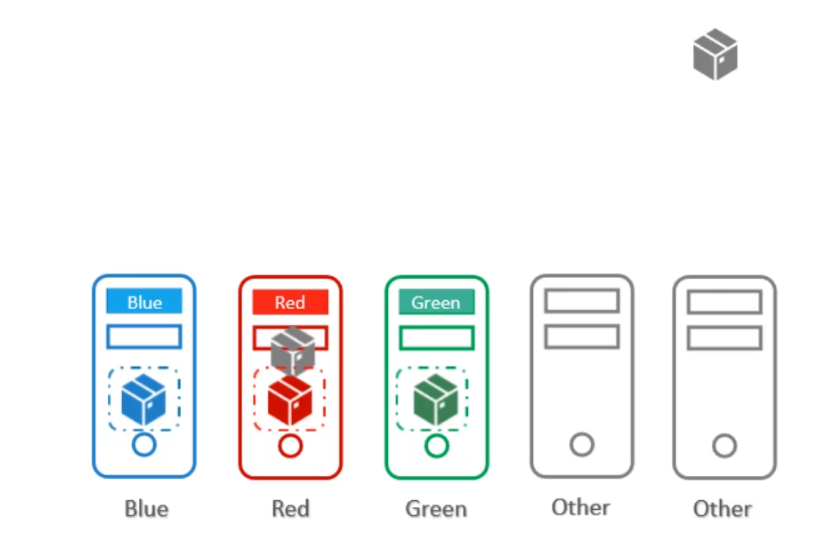
Therefore, a combination of taints and tolerations and node affinity rules can be used together to completely dedicate nodes for specific parts.
Deploy additional scheduler
Your Kubernetes cluster can schedule multiple schedulers at the same time.
Download the binary
$ wget https://storage.googleapis.com/Kubernetes-release/release/v1.12.0/bin/linux/amd64/kube-scheduler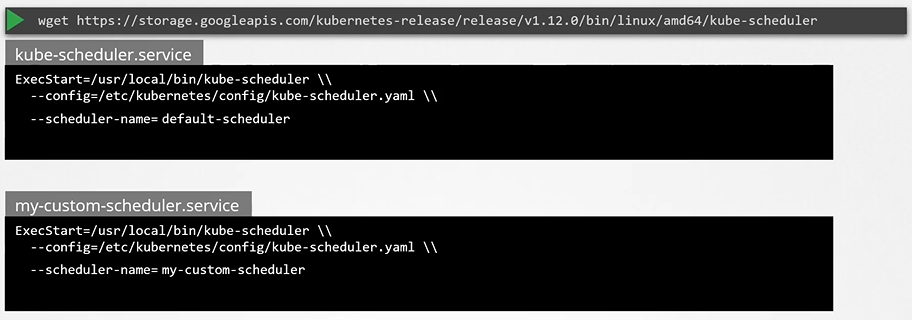
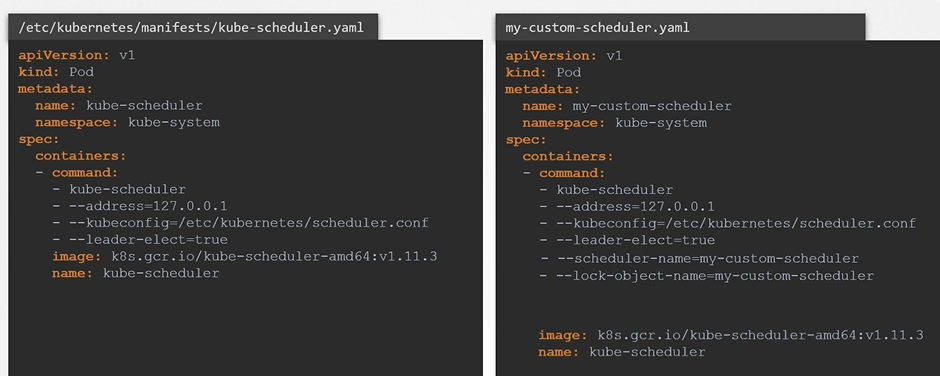
To create a scheduler pod
$ kubectl create -f my-custom-scheduler.yamlView Schedulers
To list the scheduler pods
$ kubectl get pods -n kube-systemUse the Custom Scheduler
Create a pod definition file and add new section called schedulerName and specify the name of the new scheduler
apiVersion: v1
kind: Pod
metadata:
  name: nginx
spec:
  containers:
    - image: nginx
      name: nginx
  schedulerName: my-custom-scheduler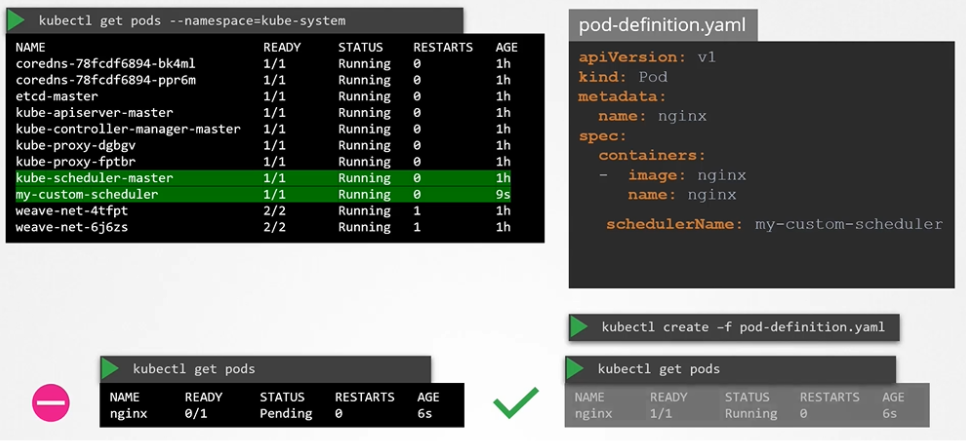
To create a pod definition
$ kubectl create -f pod-definition.yamlTo list pods
$ kubectl get podsView events
$ kubectl get events
View Scheduler Logs
To view scheduler logs
$ kubectl logs my-custom-scheduler -n kube-system