Docker Security
Kubernetes SecurityContext
-
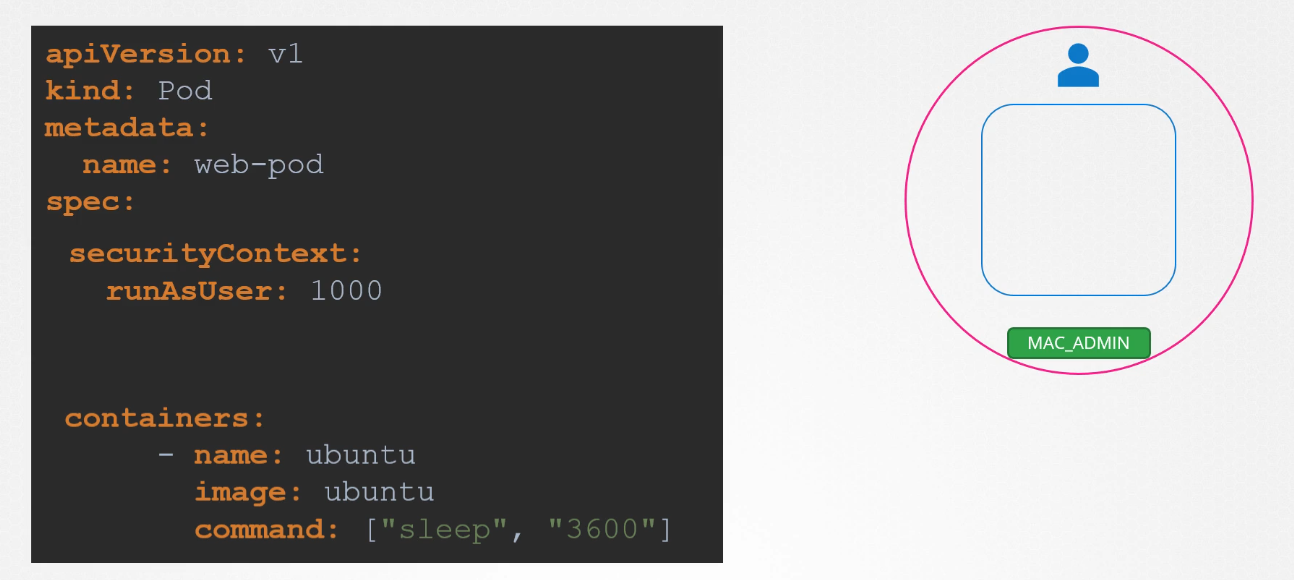
Pod-Level Security Settings: If we set the security settings at the pod level, they will be applied to all the containers in that pod.
-
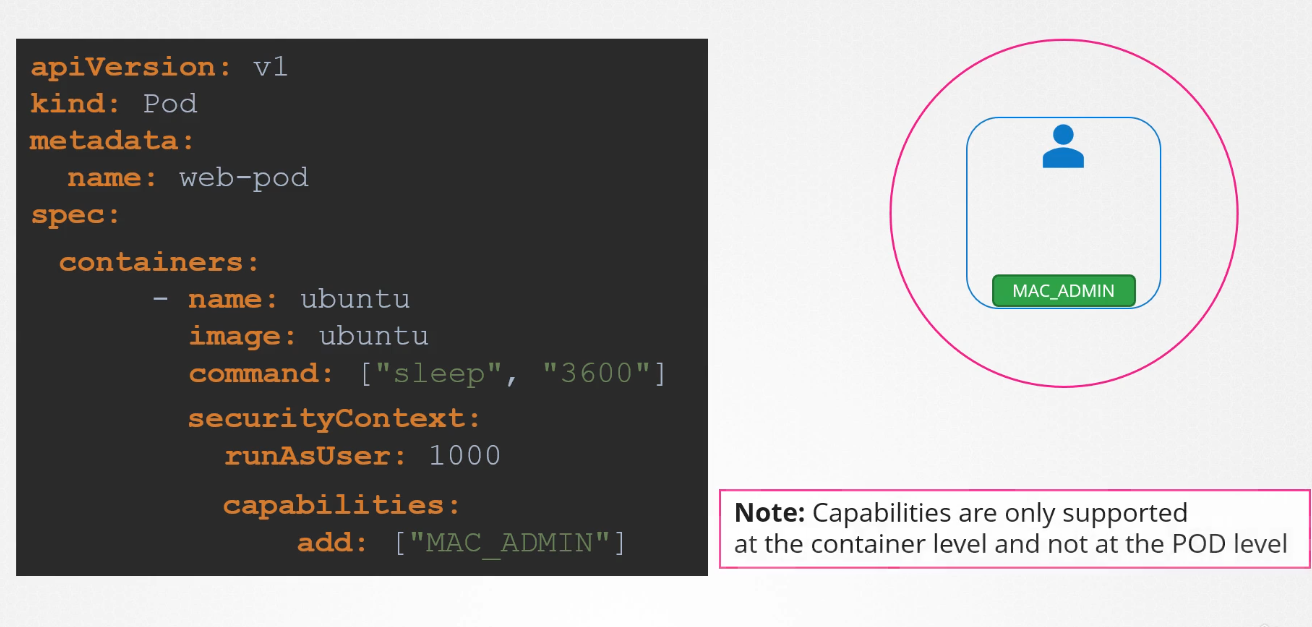
Container-Level Security Settings: If we apply the security settings to a container, they will only apply to that specific container.
-
Pod and Container-Level Security Settings: If we apply security settings to both the pod and the container, the container’s security configuration will override the pod’s security configuration.
Configure at Pod Level
Configure at Container Level
$ kubectl explain pod.spec.securityContext | lessapiVersion: v1
kind: Pod
metadata:
name: security-context-demo
spec:
securityContext:
runAsUser: 1000
runAsGroup: 3000
fsGroup: 2000
volumes:
- name: sec-ctx-vol
emptyDir: {}
containers:
- name: sec-ctx-demo
image: busybox:1.28
command: ["sh", "-c", "sleep 1h"]
volumeMounts:
- name: sec-ctx-vol
mountPath: /data/demo
securityContext:
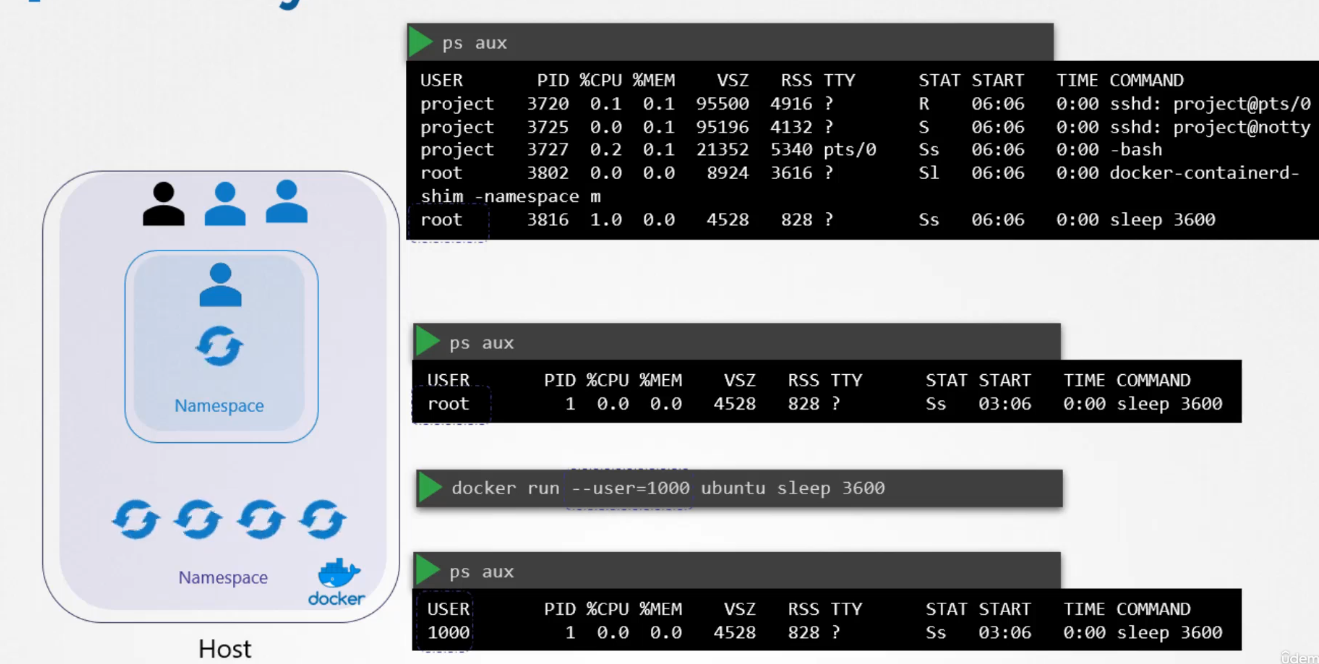
allowPrivilegeEscalation: falseProcess Isolation
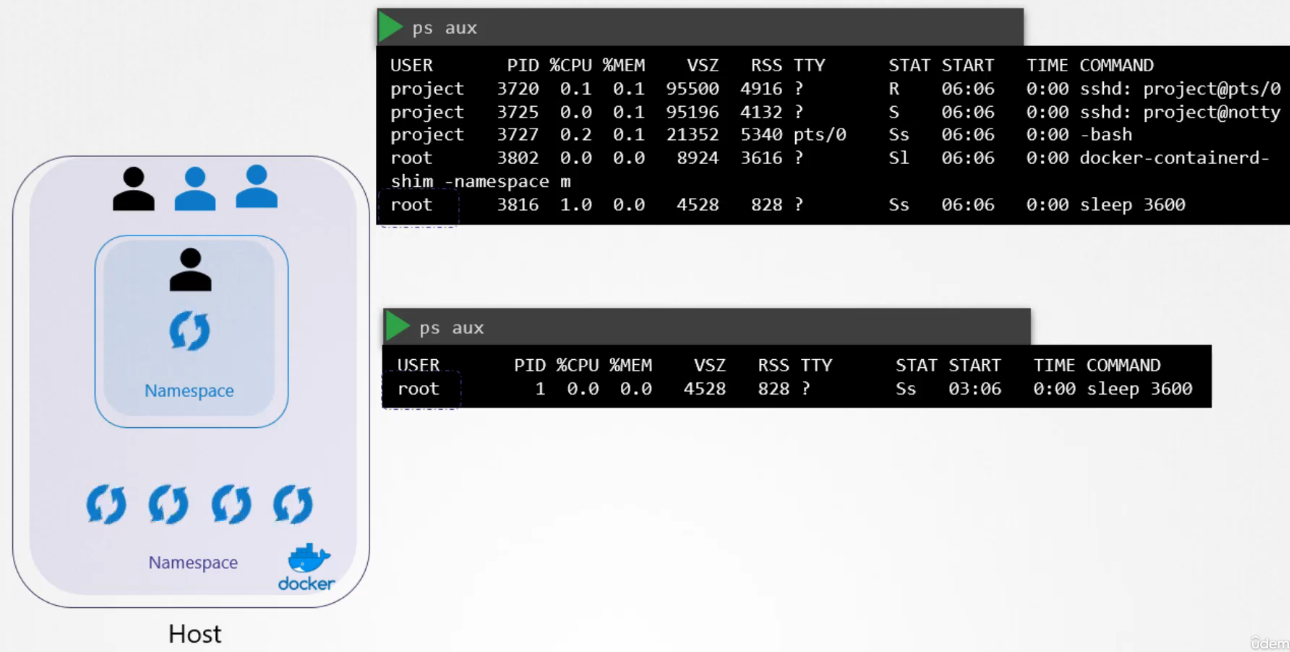
Docker uses Linux namespace security isolation. It can only see its own processes. However, the host can see the child processes and its container processes (with different PIDs though).
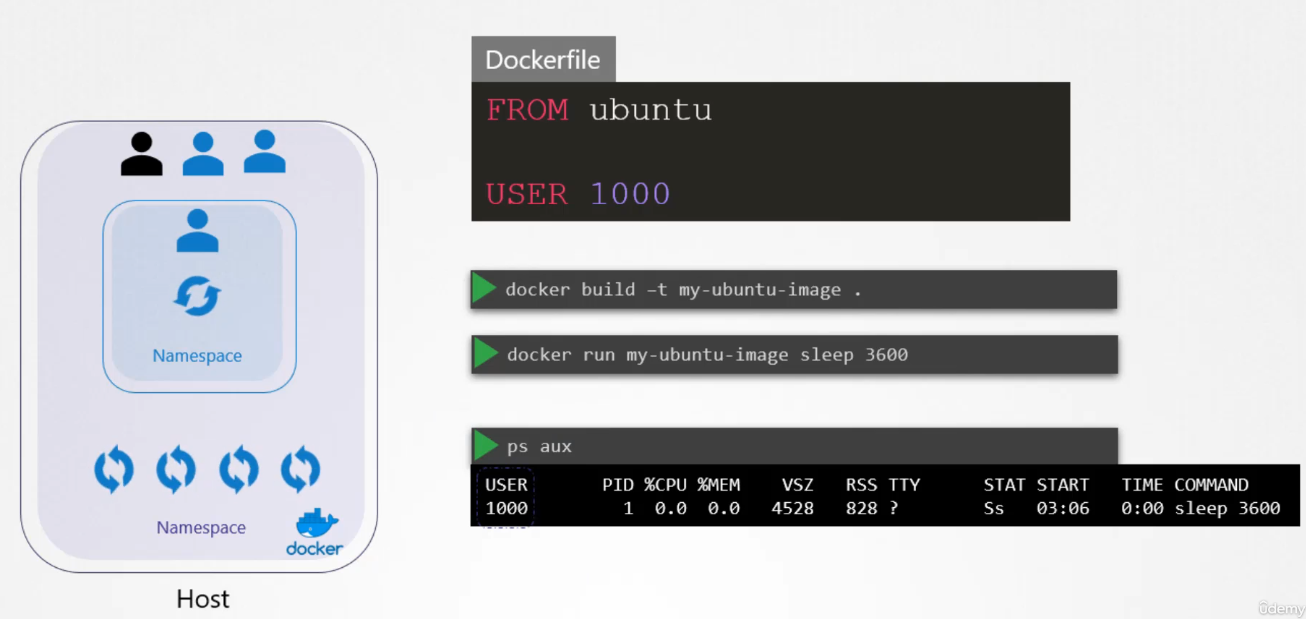
User Security
When running containers as the root user, several questions arise about the implications of root privileges in relation to the host system:
Is the root user inside the container the same as the root user on the host?
No, the root user inside a container is not identical to the root user on the host system, but it still holds significant power. While the user IDs may be the same (UID 0), Docker implements various security mechanisms to limit the root user’s capabilities within a container, thereby reducing the potential risks.
Can processes inside the container do anything the root user can do on the host?
By default, processes inside a container running as root do not have the same level of control as the root user on the host system. Docker uses a combination of Linux namespaces and cgroups to isolate containers and control the resources they can access. Additionally, Docker restricts the container’s root user by reducing its available capabilities, limiting its power compared to the host’s root user.
Is running as root within the container dangerous?
Yes, running containers as root can be risky. Although Docker limits the power of the root user inside the container, if the container were to break out of its isolation or exploit vulnerabilities, it could potentially gain control over the host system. This is why security practices recommend avoiding running containers as root unless absolutely necessary.
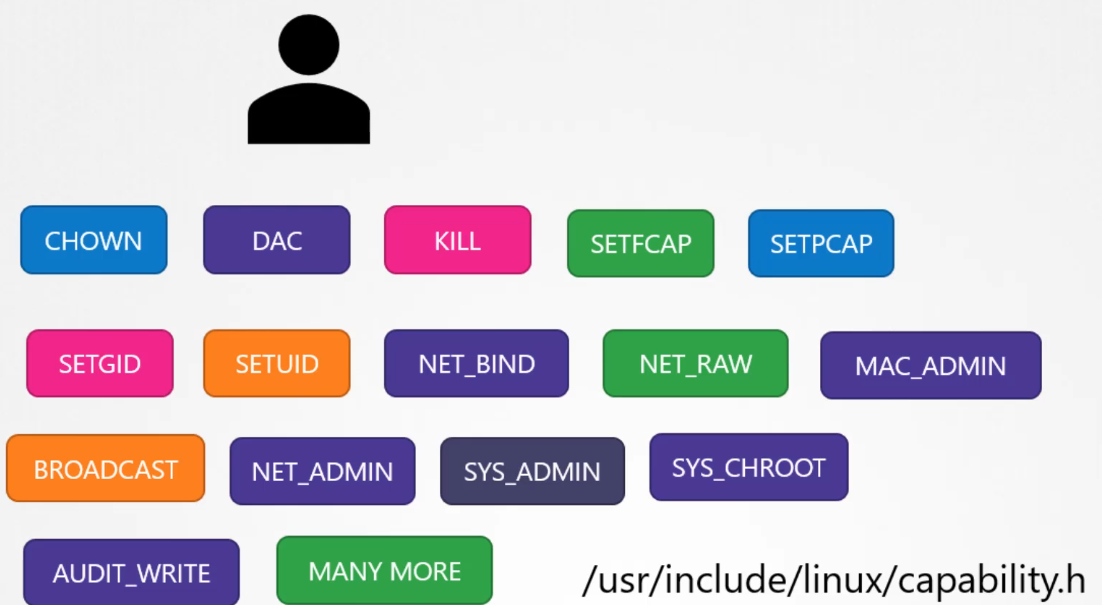
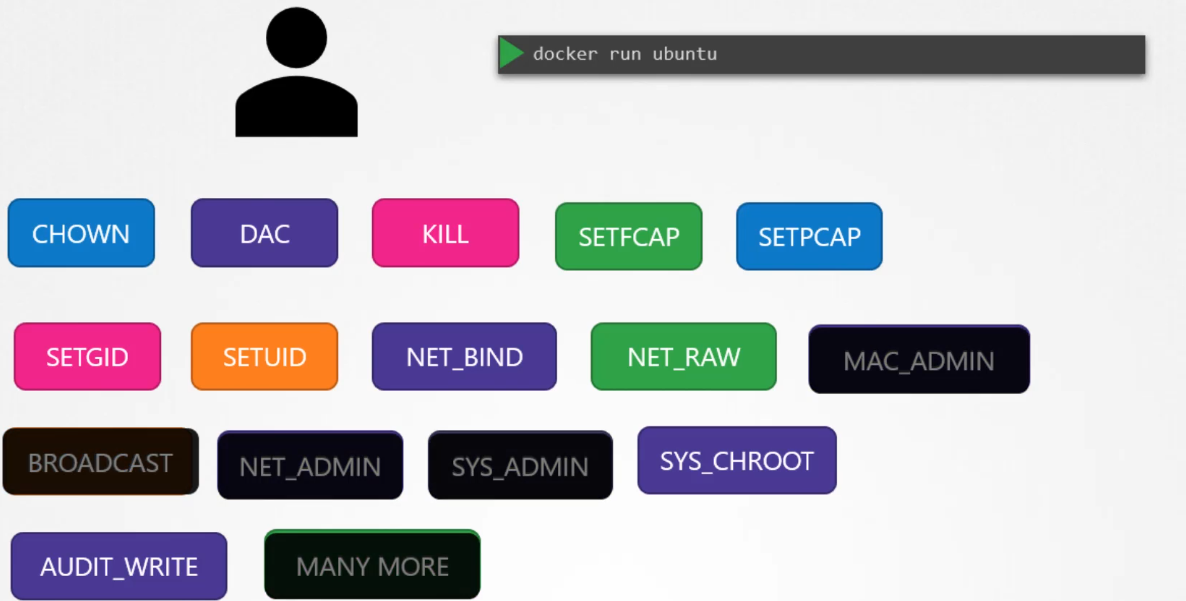
How does Docker handle root privileges within containers?
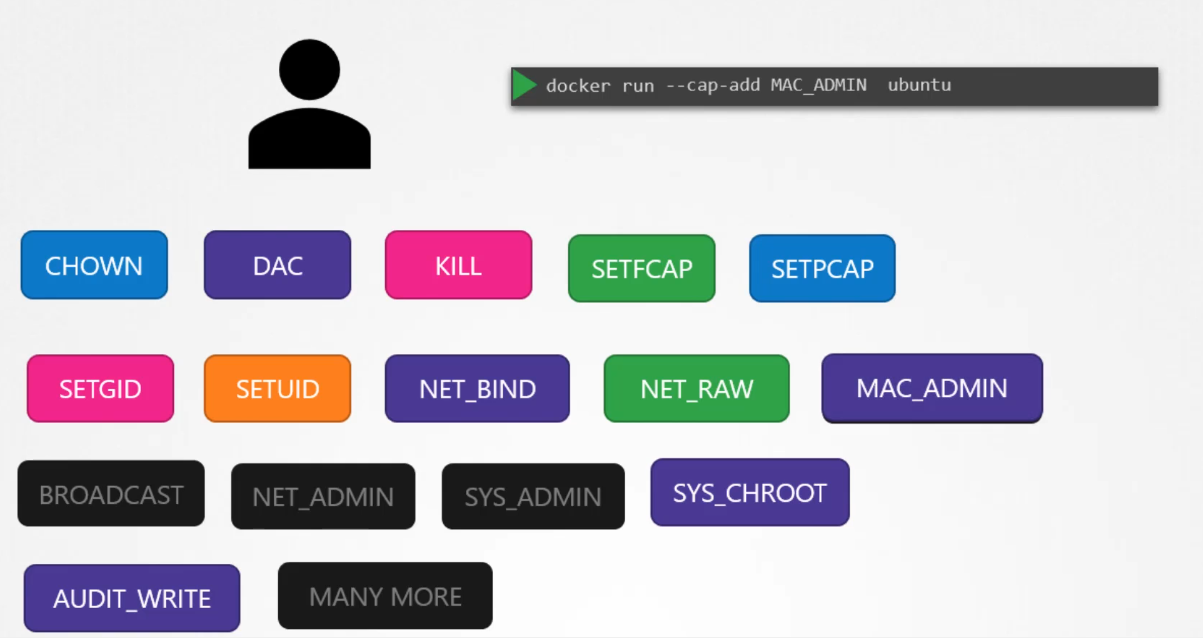
Docker uses Linux capabilities to limit the actions that the root user can perform inside a container. In Linux, capabilities are fine-grained access controls that divide root privileges into specific units. Docker reduces the container’s root user privileges to only what is necessary for most operations. For example, by default, containers cannot:
- Reboot the host.
- Manipulate the network configuration of the host.
- Modify kernel parameters.
How to manage container privileges:
-
Adding capabilities: If you need to grant additional privileges to the container’s root user, you can use the
--cap-addoption in the Dockerruncommand to add specific capabilities. -
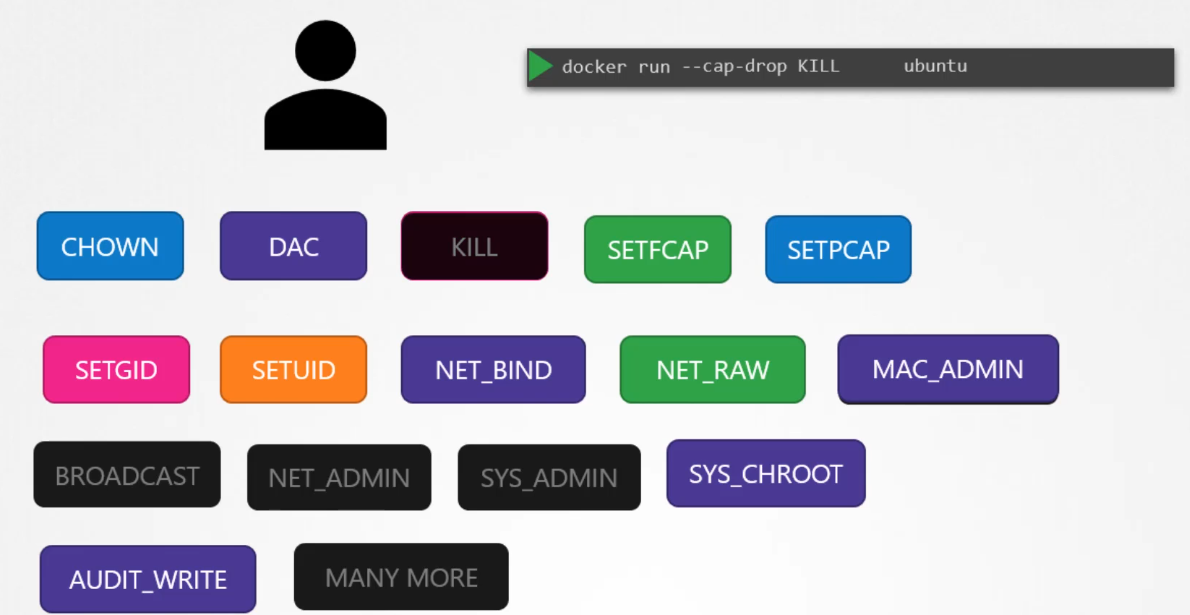
Dropping capabilities: You can also further reduce privileges by using the
--cap-dropoption, which removes specific capabilities from the container, making it even more restricted. -
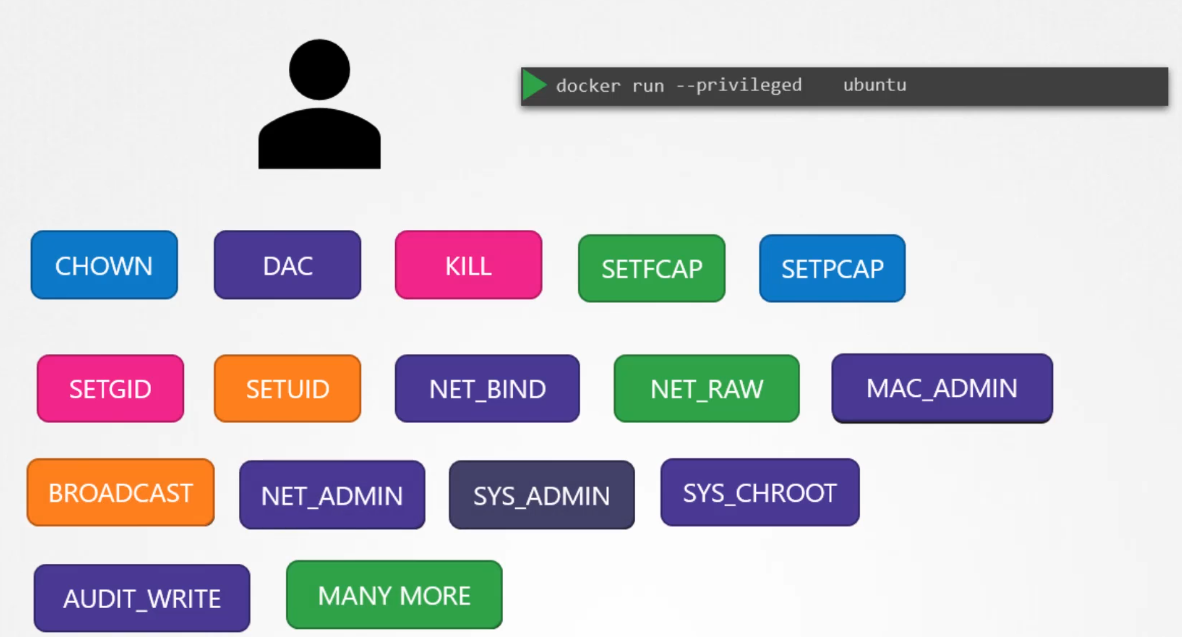
Privileged containers: If you want the container to have full root privileges, similar to running as root on the host, you can use the
--privilegedflag. However, this is highly discouraged for security reasons, as it grants the container nearly unrestricted access to the host system.
In conclusion, Docker limits the root user inside a container to mitigate the risks of running as root. However, best practices suggest avoiding root unless necessary, and always controlling which capabilities the container requires to perform its tasks safely.
Host Root User
Container Root User
Add Capability to Container Root User
Drop Capability from Container Root User
Container Root with All Privileges
Kube Config
Client uses the certificate file and key to query the Kubernetes Rest API for a list of pods using curl. You can specify the same using kubectl:
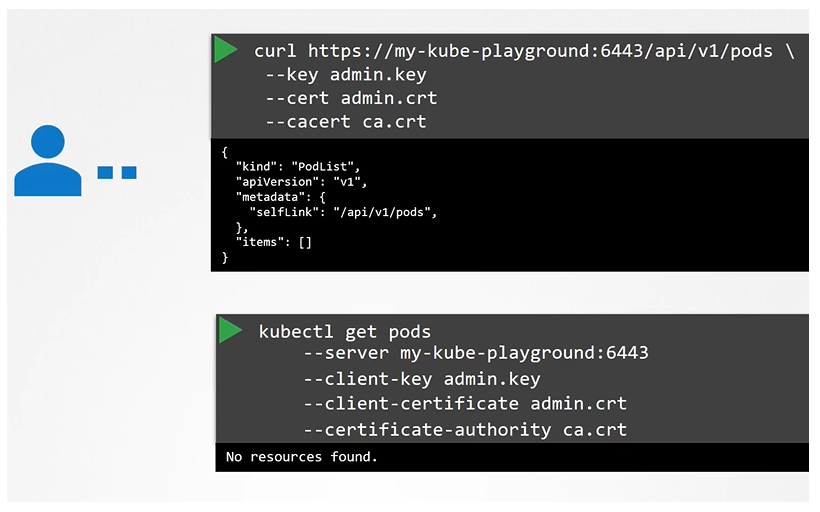
We can move these information to a configuration file called kubeconfig. And the specify this file as the kubeconfig option in the command.
$ kubectl get pods --kubeconfig config
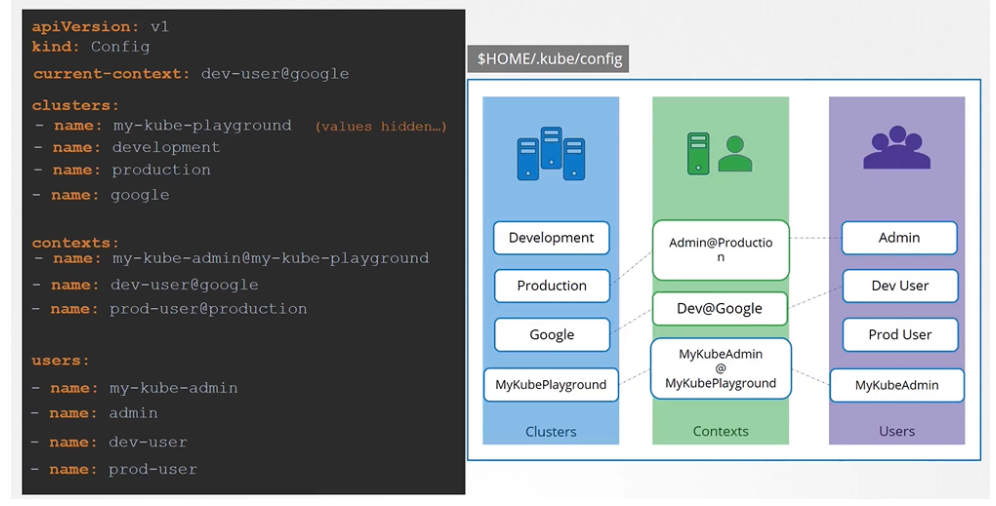
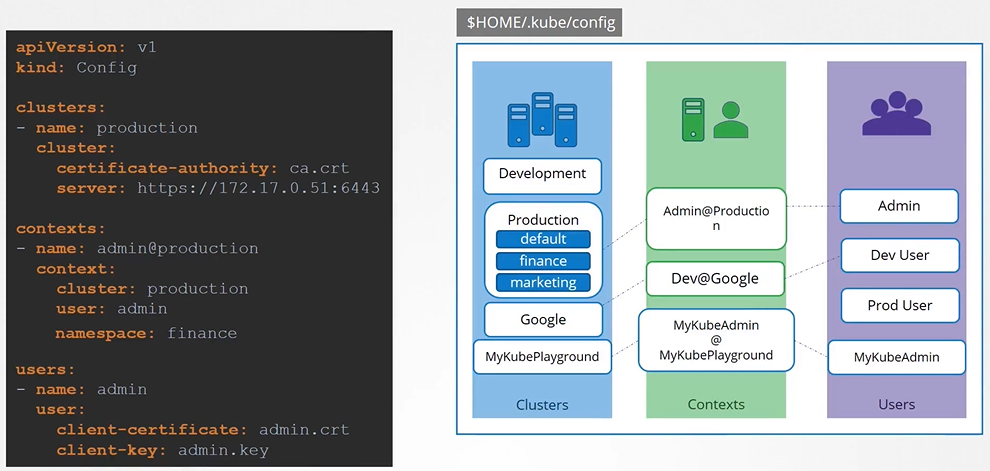
Kubeconfig file
The kubeconfig file has 3 sections:
- Clusters
- Contexts
- Users
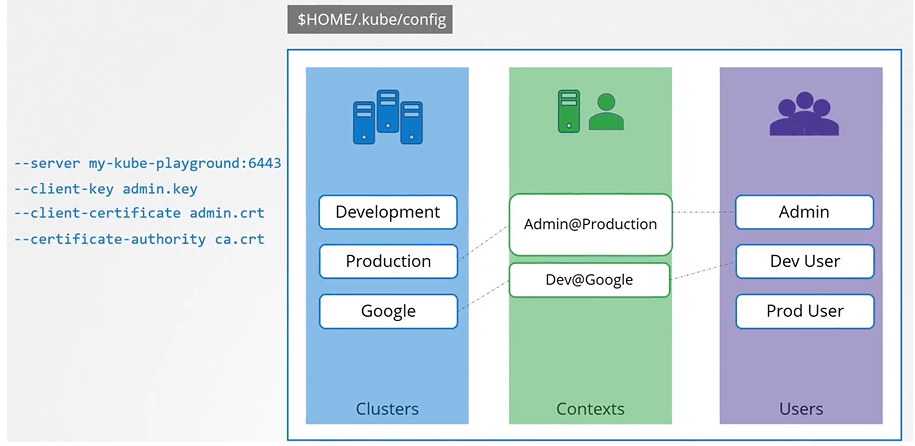

How to say which context to use as a default one? we set the current-context to the default one.
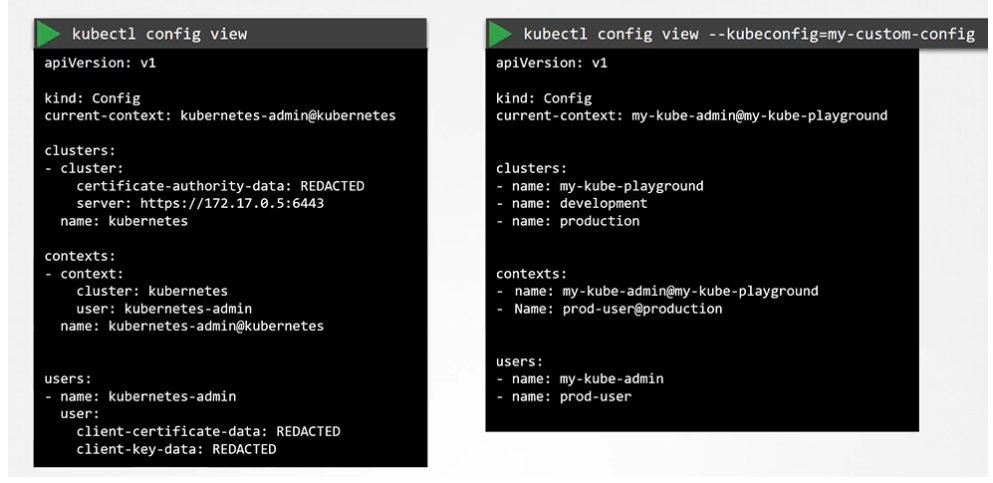
To view the current file being used
$ kubectl config view
You can specify the kubeconfig file with kubectl config view with “—kubeconfig” flag
$ kubectl config veiw --kubeconfig=my-custom-config
How do you update your current context? Or change the current context
$ kubectl config view --kubeconfig=my-custom-config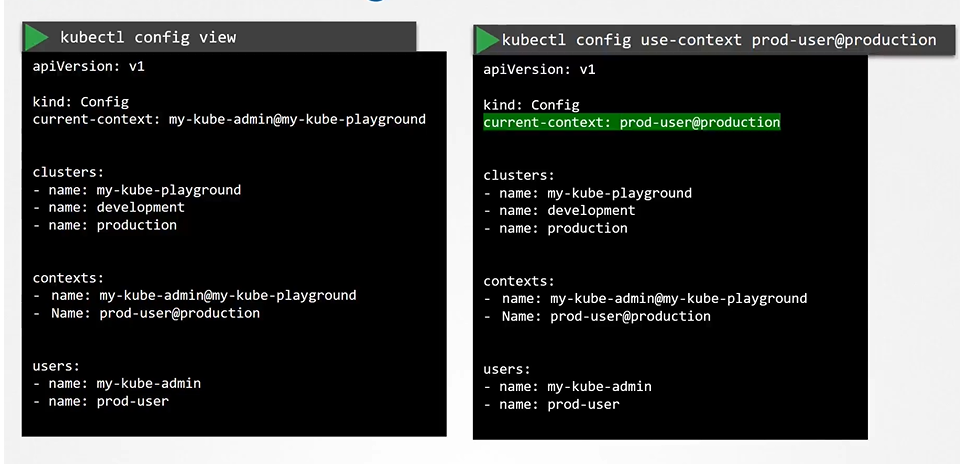
kubectl config help
$ kubectl config -h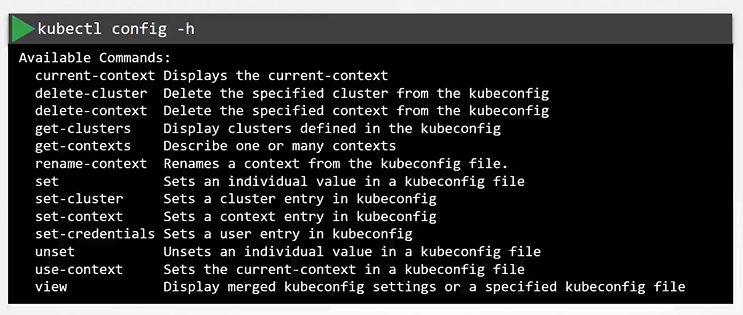
Namespaces
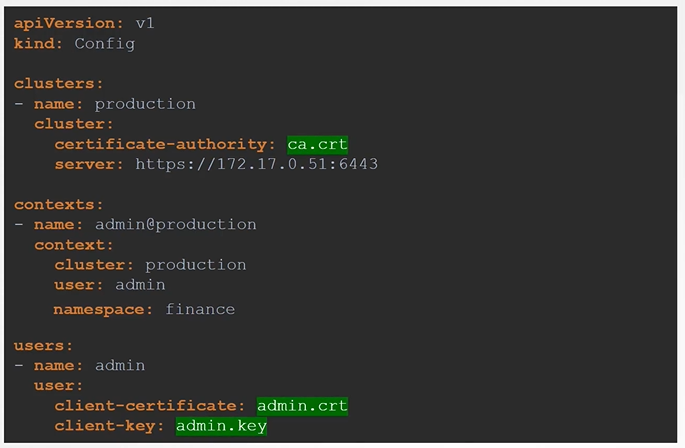
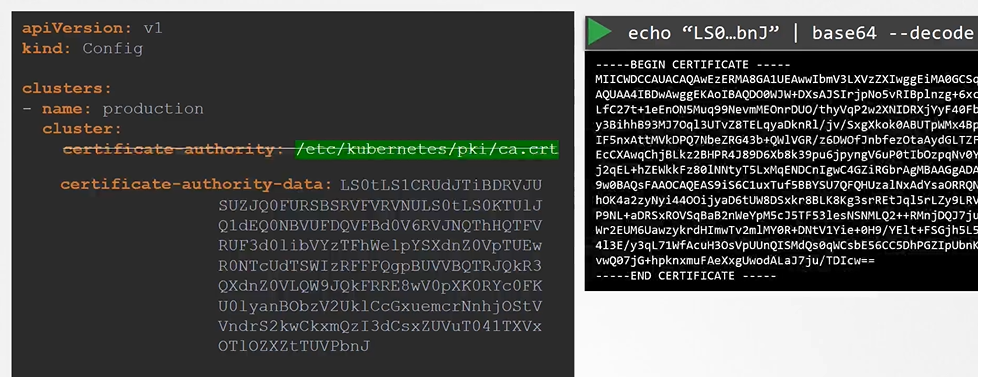
Certificates in Kube config
We have two different way of providing the certs for config.
- Give the address of where the cert is located at
- Paste the cert data directly into the config
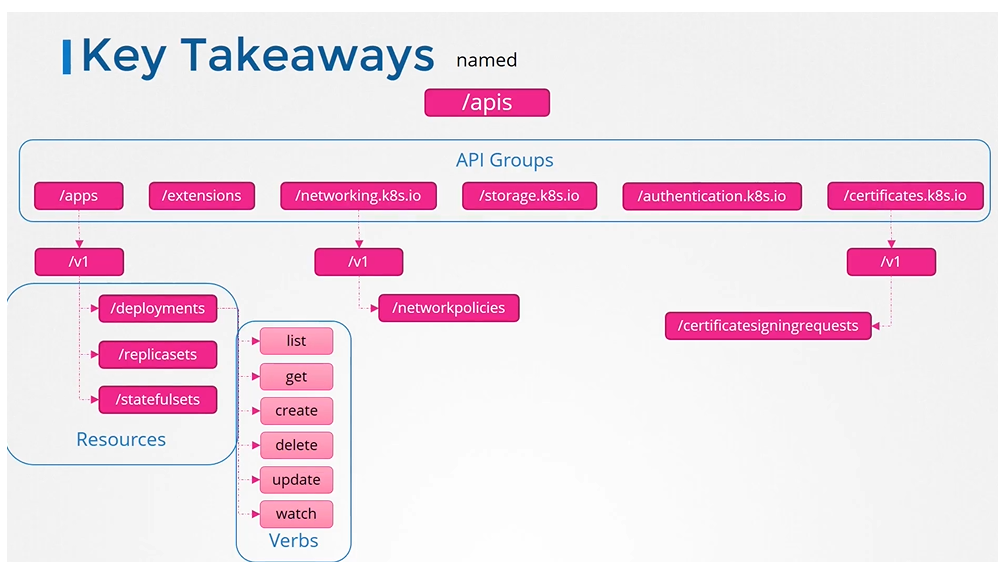
API Groups
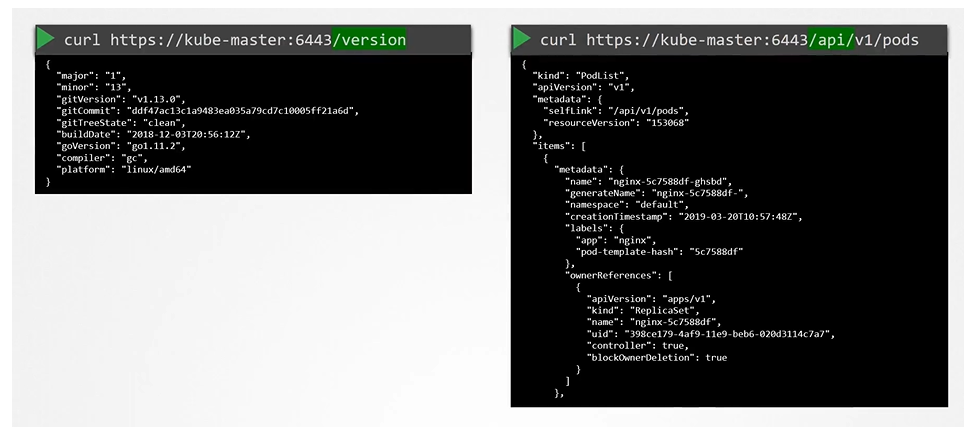
The Kubernetes API is grouped into multiple such groups based on their purpose. Such as one for APIs, one for healthz, metrics and logs etc.

API and APIs
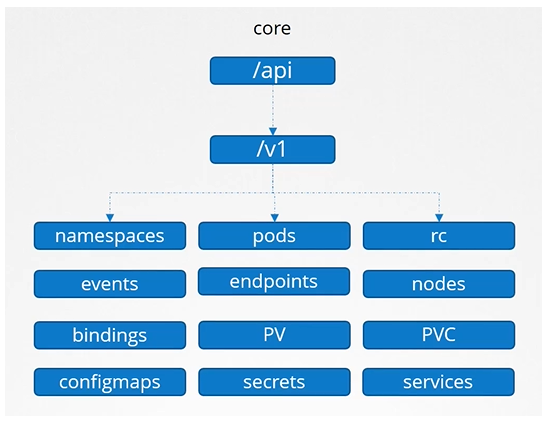
Core
The core group is where all the functionality exists
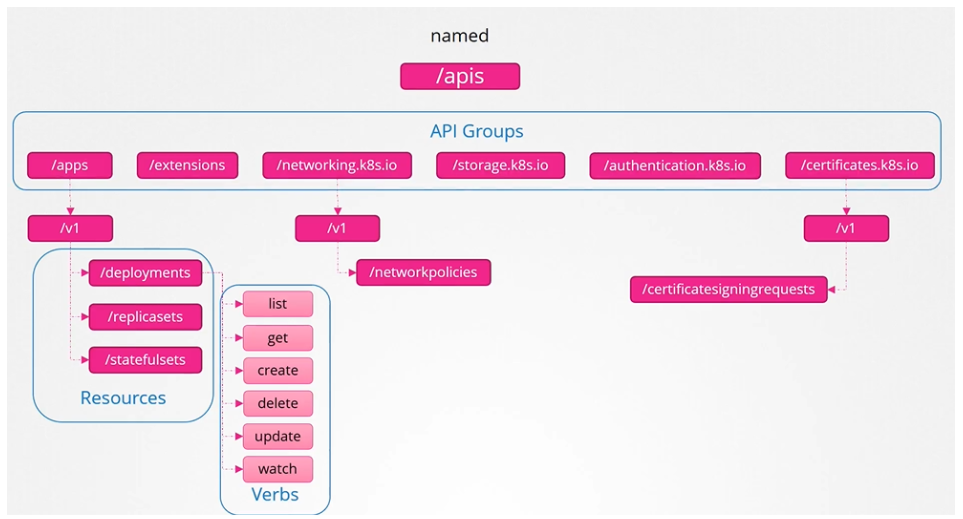
Named group
More organized and going forward all the newer features are going to be made available to these named groups.
To list all the api groups:
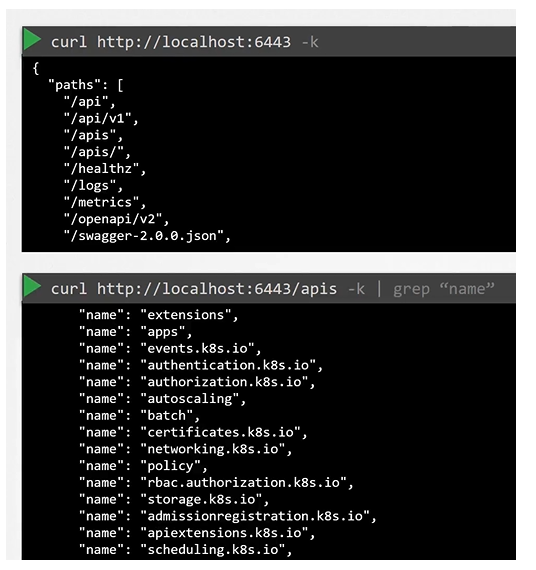
Note on accessing the kube-apiserver
You have to authenticate by passing the certificate files.
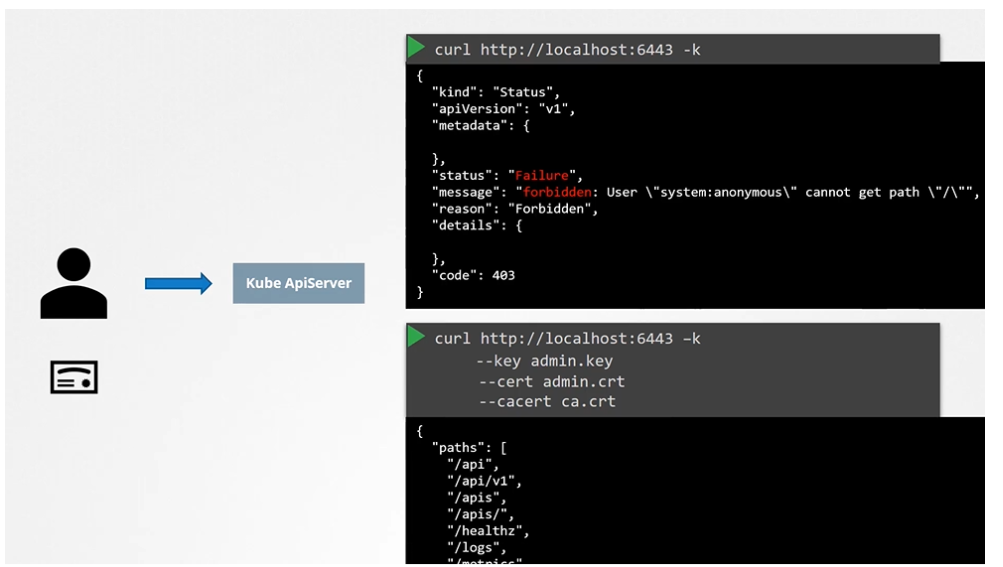
An alternate is to start a kubeproxy client so that you don’t have to provide the cert all the time.
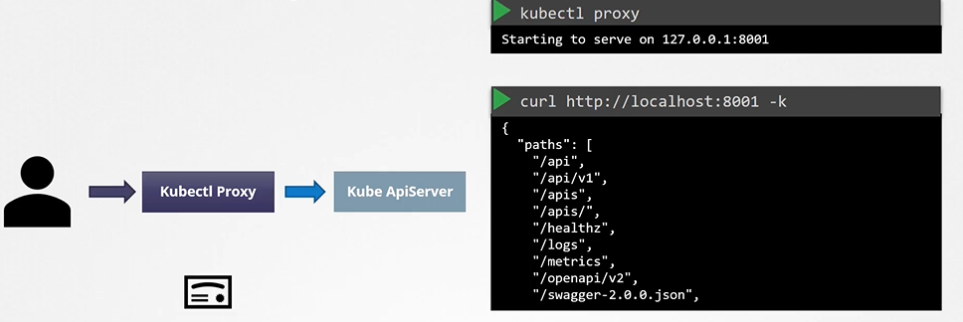
Warning
Kube proxy !== KubeCTL proxy
Authentication & Authorization
Secure host for auth and authz
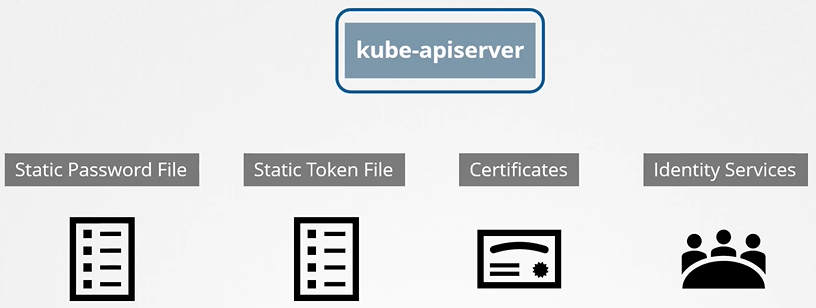
We need to make two types of decisions.
- Who can access? (authentication mechanism)
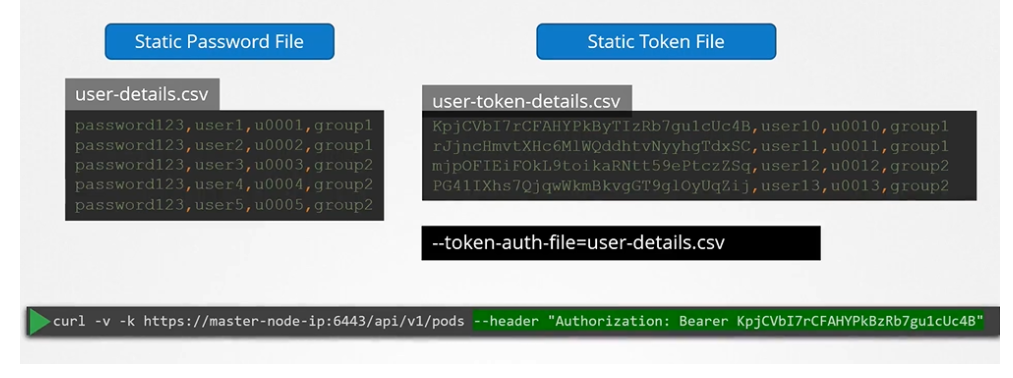
- Files - username and password
- Files - username and tokens
- Certificates
- External authentication providers - LDAP
- Service Accounts
- What can they do? (authorization)
- RBAC authorization
- ABAC authorization
- Node authorization
- Webhook Mode
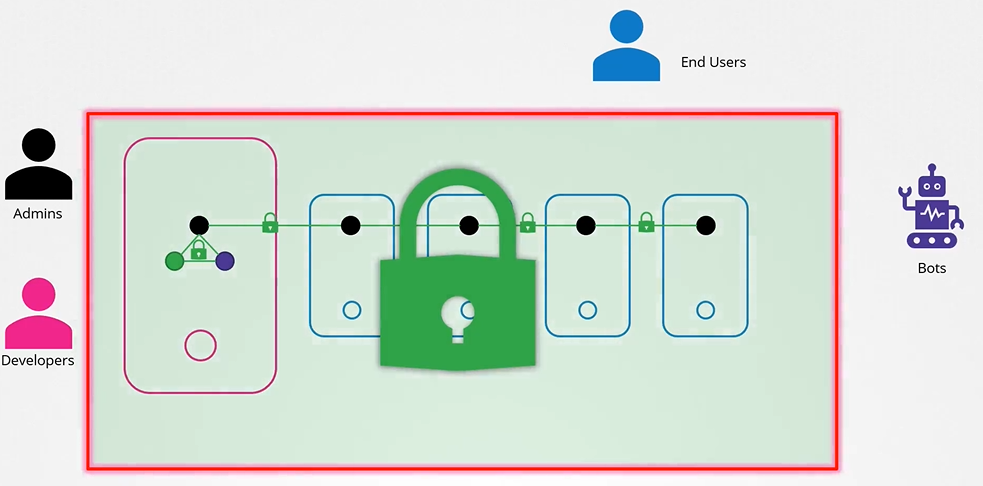
End users are being protected by the application itself. So, we left with 2 types of users:
- Humans, such as the Administrators and Developers
- Robots such as other processes/services or applications that require access to the cluster.
hint
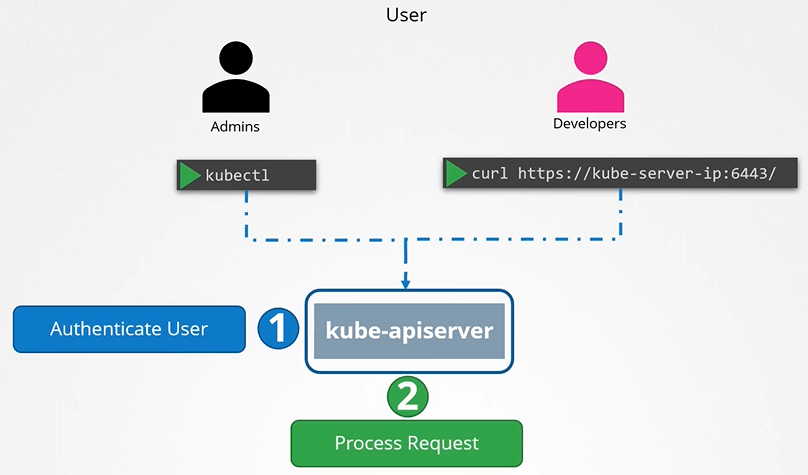
K8s does not manage the user authentication itself, it leverages LDAP or uses certificates. API server integrates with it to check if user is authenticated.

All user access is managed by apiserver and all of the requests goes through apiserver.
Authentication is about where Kubernetes users come from. By default, a local Kubernetes admin account is used, and authentication is not required.
In more advanced setups, you can create your own user accounts (covered in CKA).
- The
kubectlconfig specifies which cluster to authenticate. - Use
kubectl config viewto see current settings. - The config is read from
~/.kube/config.
Basics of Authorization
Authorization defines what users can do. Role-Based Access Control (RBAC) manages the different options for authorization.
# Example: Check if the current user can get pods
$ kubectl auth can-i get pods
Understanding RBAC
RBAC is used to provide access to API resources. In RBAC, three elements are used:
- The Role defines access permissions to specific resources.
- The User or ServiceAccount is an entity in Kubernetes that interacts with the API.
- The RoleBinding connects a user or ServiceAccount to a specific Role.
# Example: Check if the specified user can get pods
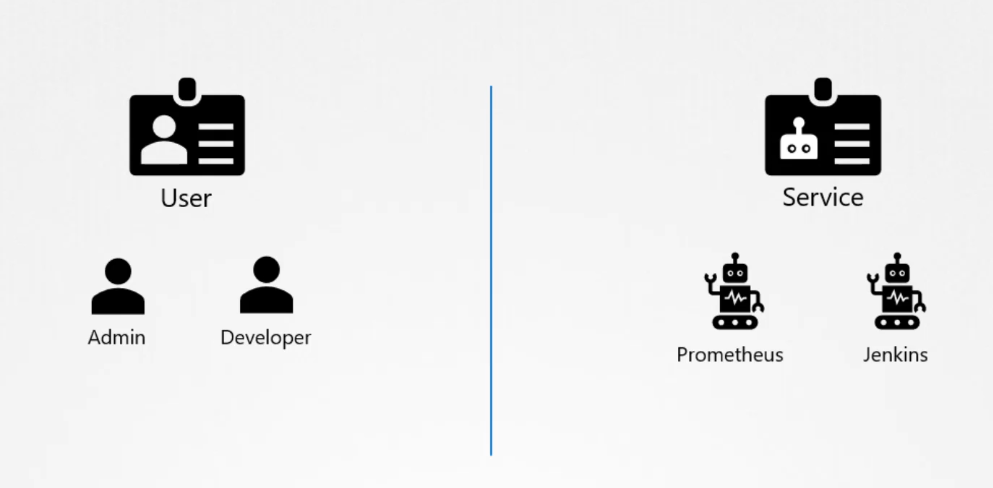
$ kubectl auth can-i get pods --as bob@example.comService Accounts
While user accounts are meant for human users (like developers or administrators), service accounts are used by applications and automated tools like Prometheus or Jenkins to communicate with the Kubernetes cluster(machine to machine).
Types of Accounts in Kubernetes:
- User accounts: Used by humans, like developers deploying applications or administrators managing the cluster.
- Service accounts: Used by applications to interact with the Kubernetes API (e.g., monitoring apps like Prometheus or build tools like Jenkins).
- RBAC is used to connect a ServiceAccount to a specific Role.
- Every Pod uses the
defaultServiceAccount to contact the API server. - This
defaultServiceAccount allows a resource to get information from the API server but not much else. - Each
ServiceAccountuses a secret to automount API credentials.
Example of Using a Service Account:
- To access the Kubernetes API, an application needs to be authenticated using a service account. For example, a custom Kubernetes dashboard application built in Python can list all the pods in the cluster by sending requests to the Kubernetes API.
- To create a service account for this, you would run:
kubectl create serviceaccount dashboard-sa
This command creates:
- A service account object
- Generates a token
- Stores that token inside a secret object (e.g.,
dashboard-sa-token-kbbdm).
This token is used by external applications to authenticate.
Viewing and Using Service Account Tokens:
To view the created service accounts, you can use:
kubectl get serviceaccountThe service account’s token is stored as a secret object, and you can view it by describing the secret using:
kubectl describe secret <secret-name>- This token is then used as a bearer token when making REST API calls to the Kubernetes API (e.g., using
cURL), or it can be copied into an application’s authentication configuration.
Automatically Mounting Service Account Tokens:
The default service account’s token is automatically mounted to pods as volume, if no other service account is specified.
If the application (like Prometheus) is hosted within the Kubernetes cluster itself, the token can be automatically mounted as a volume inside the pod. This is done automatically by Kubernetes when the pod is created, making it easier for the application to access the token without manual intervention.
The Default Service Account:
Every Kubernetes namespace comes with a default service account that is automatically created. Whenever a pod is created, the default service account token is mounted to the pod as a volume under /var/run/secrets/kubernetes.io/serviceaccount.
The default service account has limited permissions, typically restricted to basic API queries.
Customizing Service Accounts:
If you’d like to use a different service account, you can modify the pod’s definition file by specifying the desired service account in the serviceAccount field.
apiVersion: v1
kind: Pod
metadata:
  name: example-pod
spec:
  serviceAccountName: custom-service-account
  containers:
  - name: nginx-container
    image: nginx:latest
    ports:
    - containerPort: 80
You cannot change the service account for an already running pod; the pod needs to be deleted and recreated.
For deployments, changing the service account in the pod definition will automatically trigger a new rollout with updated service accounts. Because the deployment manages the pods
Key Kubernetes Changes in Versions 1.22 and 1.24:
Version 1.22 – TokenRequestAPI:
- Bound Service Account Tokens were introduced via the TokenRequestAPI (as part of Kubernetes Enhancement Proposal 1205).
- Previously, service account tokens (JWTs) had no expiry date and weren’t audience-bound, creating security risks. The TokenRequestAPI addresses these issues by generating tokens that are:
- Time-bound (with a defined expiry date).
- Audience-bound (specific to the requesting API).
- Object-bound (specific to the service account).
- These tokens are mounted as a projected volume when the pod is created, replacing the older method of mounting tokens via secret objects.
- The TokenRequestAPI allows tokens to be generated for each pod dynamically when pod is created. 1
Version 1.24 – Secret-Based Token Management:
- Before Kubernetes 1.24, service account creation would automatically generate a secret containing a non-expiring token. Starting with version 1.24, secret-based token generation was removed. Now, if you need a token for a service account, you must manually generate it using:
kubectl create token <service-account-name> - These tokens have an expiry time, which is one hour by default unless specified otherwise. This approach provides better security by ensuring that tokens expire and are not valid indefinitely.
- Non-expiring tokens can still be created manually, but this is discouraged. To create one, you must define a secret object with the type
kubernetes.io/service-account-token, and specify the service account name in the metadata section. However, the Kubernetes documentation advises against using non-expiring tokens unless absolutely necessary due to security risks.
Managing Service Account Tokens in Pods:
By default, Kubernetes automatically mounts the service account token for a pod unless specified otherwise. To prevent this, you can set the field automountServiceAccountToken: false in the pod’s specification.
 In this example:
- The
automountServiceAccountToken: falsefield underspecensures that Kubernetes does not automatically mount the service account token in the Pod. - The Pod is running an
nginxcontainer, but without the service account token being mounted by default.
apiVersion: v1
kind: Pod
metadata:
  name: example-pod
spec:
  automountServiceAccountToken: false
  containers:
  - name: nginx-container
    image: nginx:latest
    ports:
    - containerPort: 80
If you need a secure, temporary token for your application inside the pod, use the TokenRequestAPI to provision such tokens instead of relying on non-expiring secrets.
Example:
serviceAccountName: custom-service-account: Specifies the service account that will be used.- The TokenRequestAPI is utilized via the
serviceAccountTokenprojection in thevolumessection:expirationSeconds: 3600: Configures the token to expire after 1 hour (you can adjust the duration).audience: your-audience: Specifies the audience for the token.
- The container reads the token from the projected path (
/var/run/secrets/tokens/temp-token).
apiVersion: v1
kind: Pod
metadata:
  name: example-pod
spec:
  serviceAccountName: custom-service-account
  containers:
  - name: app-container
    image: your-application:latest
    command: ["/bin/sh", "-c", "your-application --token $(cat /var/run/secrets/tokens/temp-token)"]
    volumeMounts:
    - name: token-volume
      mountPath: /var/run/secrets/tokens
      readOnly: true
  volumes:
  - name: token-volume
    projected:
      sources:
      - serviceAccountToken:
          path: temp-token
          expirationSeconds: 3600 # Token expires after 1 hour
          audience: your-audience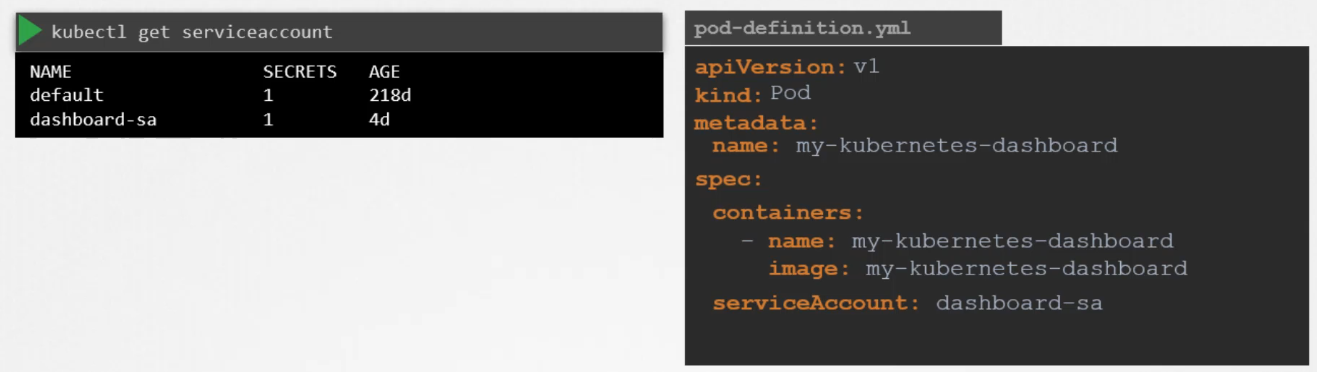
Security Considerations:
- The older token system with non-expiring tokens posed security risks, as tokens remained valid as long as the service account existed. The new system introduced in Kubernetes 1.22 and 1.24 improves security by making tokens time-bound and audience-specific.
- Avoid creating non-expiring tokens unless you absolutely cannot use the TokenRequestAPI. The API-generated tokens provide a safer and more scalable way to authenticate applications running in the Kubernetes environment.
Summary of Commands:
- Create a service account:
kubectl create serviceaccount <account-name> - View service accounts:
kubectl get serviceaccount - View the token of a service account:
kubectl describe secret <secret-name> - Create a new token for a service account:
kubectl create token <service-account-name>
If a pod is controlled by a deployment and it gets updated for its service account, it will update the deployment and trigger a new rollout.
Understanding Service Account Permissions
- A Cluster Administrator can use RBAC (Role-Based Access Control) to control what a ServiceAccount can access.
- Custom ServiceAccounts can be created and given extra permissions to allow Pods more access to cluster resources.
- Permissions can be set at the namespace or cluster level using Roles and RoleBindings.
- Role: Specifies the permissions for accessing API resources.
- RoleBinding: Links the ServiceAccount to a specific Role.
Troubleshooting Authentication Problems
- RBAC configurations are not a part of CKAD.
- Access to the cluster is configured through a
~/.kube/configfile. - This file is copied from the control node in the cluster, where it is stored as
/etc/kubernetes/admin.conf. - Use
kubectl config viewto check the contents of this file. - For additional authorization-based problems, use
kubectl auth can-i:$ kubectl auth can-i create pods - Troubleshooting RBAC-based access is covered in Certified Kubernetes Security (CKS).
How kube-apiserver authenticates requests
How kube-apiserver does the authentication? Below is a list of authentication mechanism that api-server supports.
Basic auth
We can update the list of users have access to the cluster via kube-api-server via a file. Once we update this file we need to restart the kube-api-server so that it is aware of the latest updates.
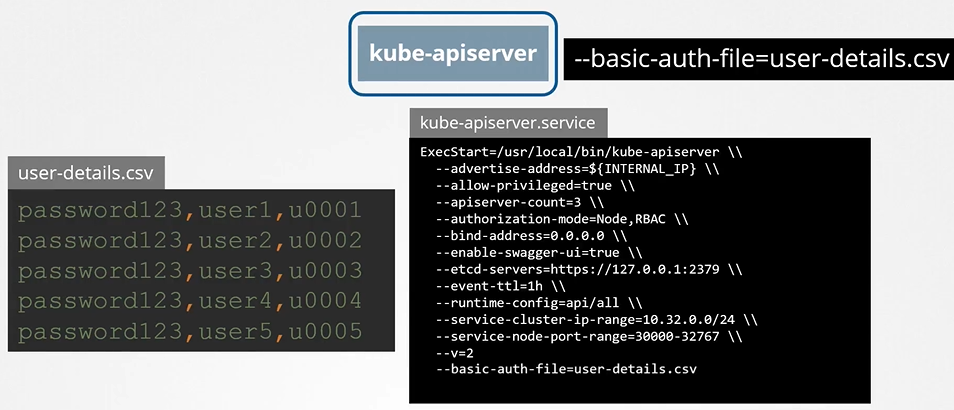
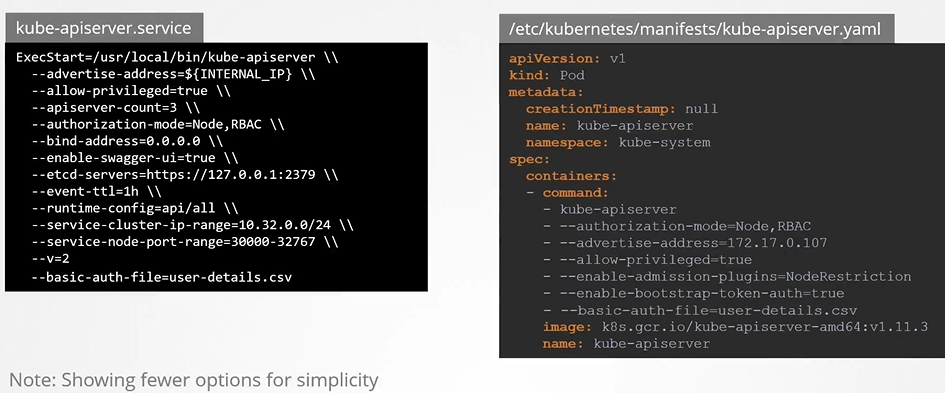
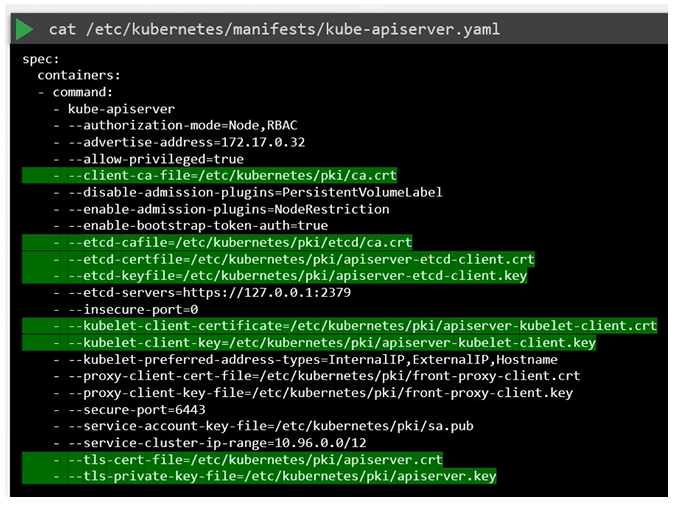
If you set up via kubeadm then update kube-apiserver.yaml manifest file with the option.
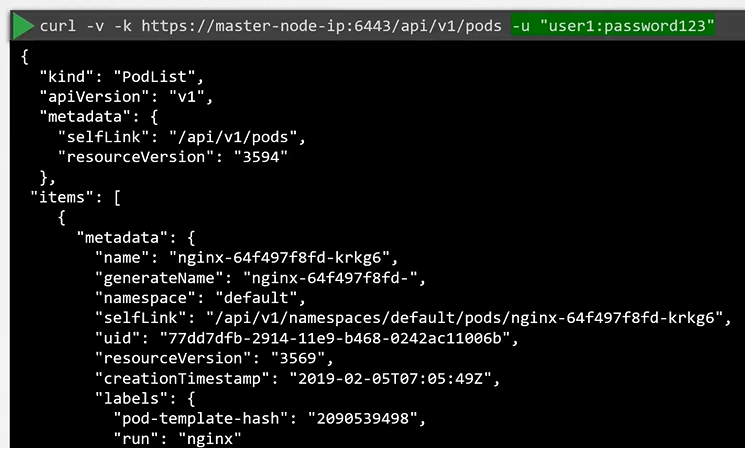
Authenticate user
To authenticate using the basic credentials while accessing the API server specify the username and password in a curl command.
We can have additional column in the user-details.csv file to assign users to specific groups.
Danger
this is not a recommended authentication mechanism. Consider volume mount while providing the auth file in a kubeadm setup. Setup role based authorization for the new users.
Here are your corrected notes with improved spelling, grammar, code blocks, headings, and hierarchy:
TLS Certificates

All communication with the cluster, between the various components such as the ETCD Cluster, kube-controller-manager, scheduler, API server, as well as those running on the working nodes such as the kubelet and kubeproxy, is secured using TLS encryption.
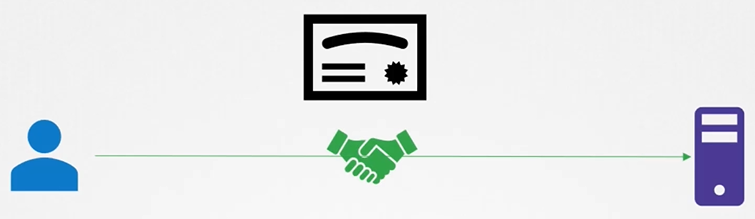
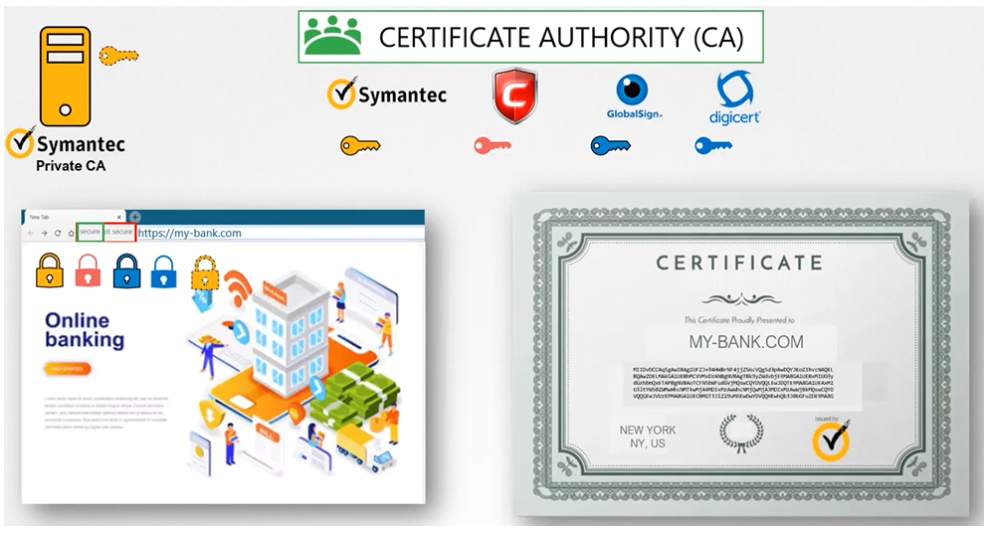
A certificate is used to guarantee trust between two parties during a transaction. For example, when a user tries to access a web server, TLS certificates ensure that the communication between them is encrypted.
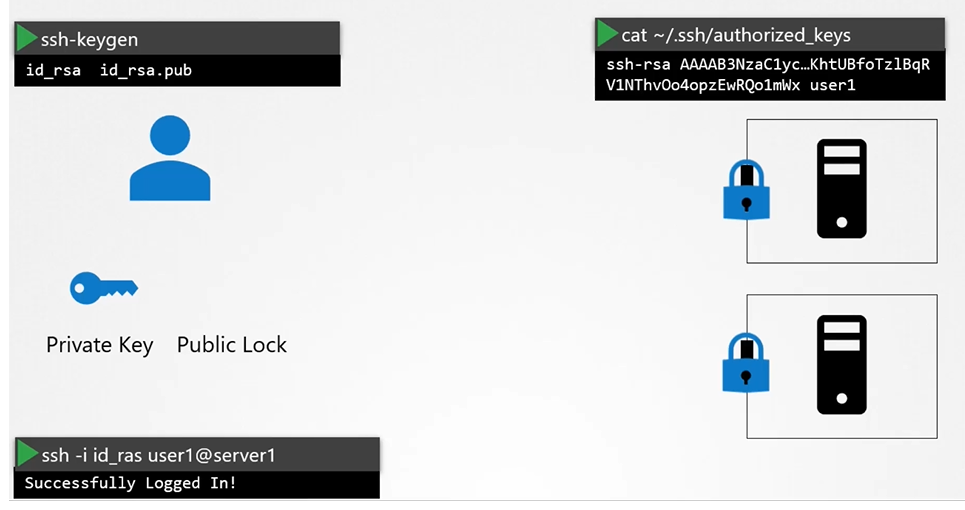
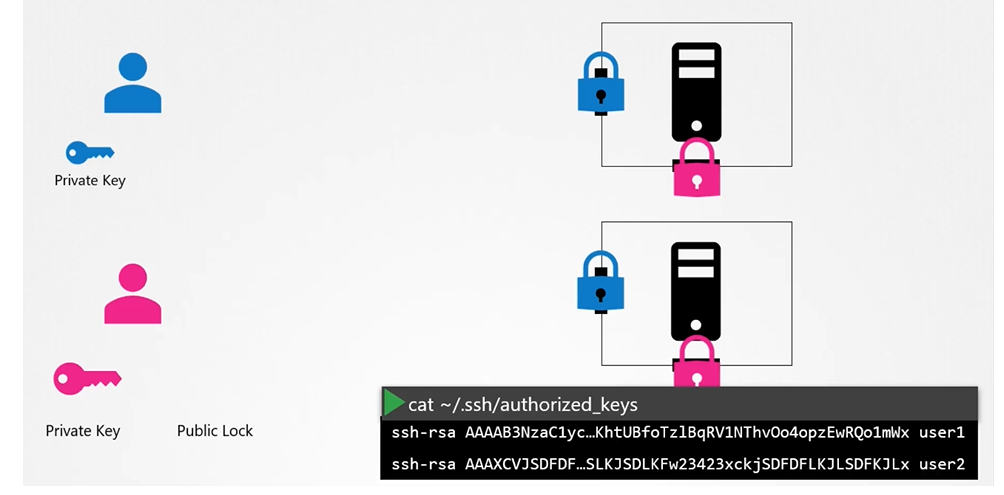
Asymmetric Encryption
Instead of using a single key to encrypt and decrypt data, asymmetric encryption uses a pair of keys: a private key and a public key.
Legitimate Certificates
- Who signed and issued the certificate?
- If you generate the certificate yourself, you will have to sign it yourself; that is known as a self-signed certificate.
How do you generate a legitimate certificate? How do you get your certificates signed by someone with authority?
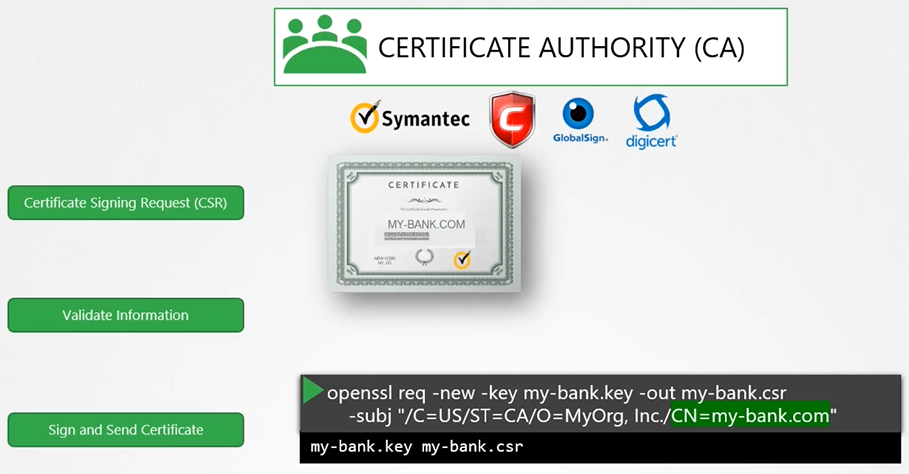
Public Key Infrastructure

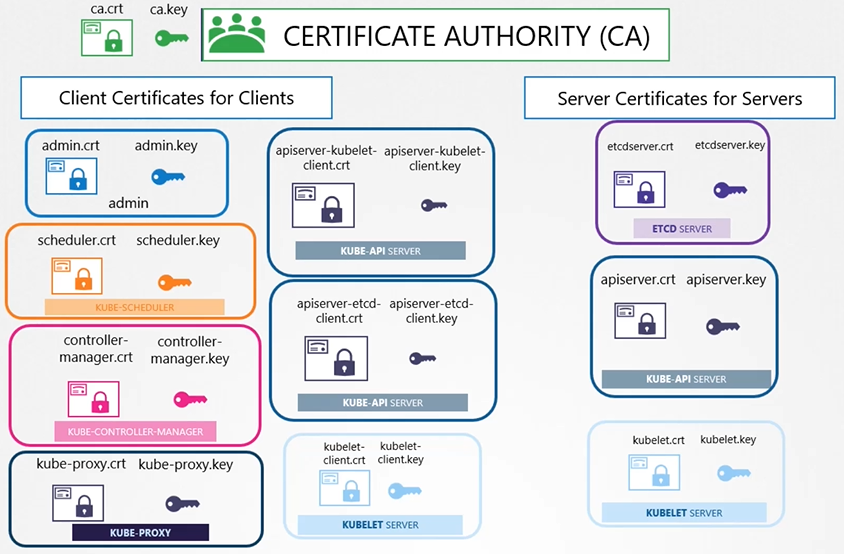
Certificates Naming Convention
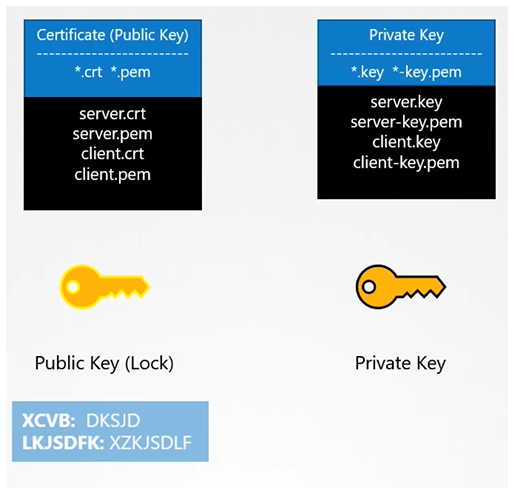
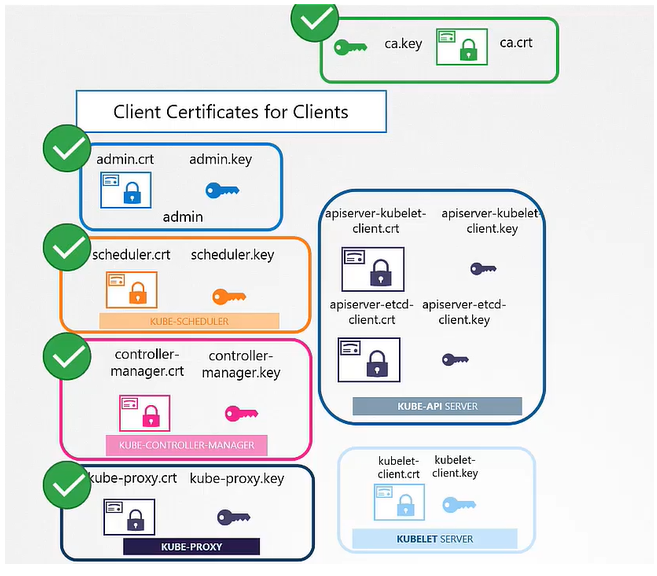
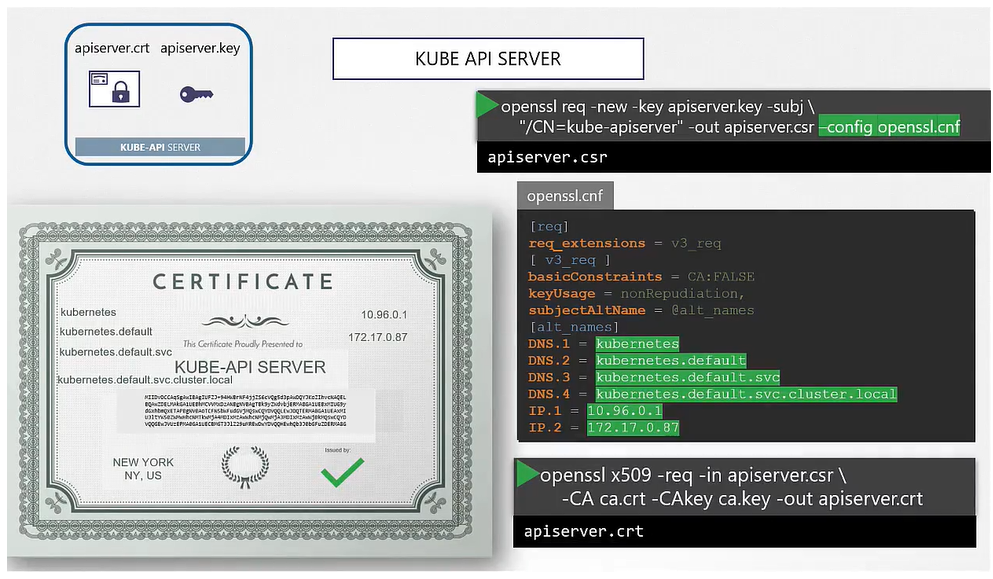
The two primary requirements are to have all the various services within the cluster use server certificates and all clients use client certificates to verify they are who they say they are.
- Server Certificates for Servers
- Client Certificates for Clients
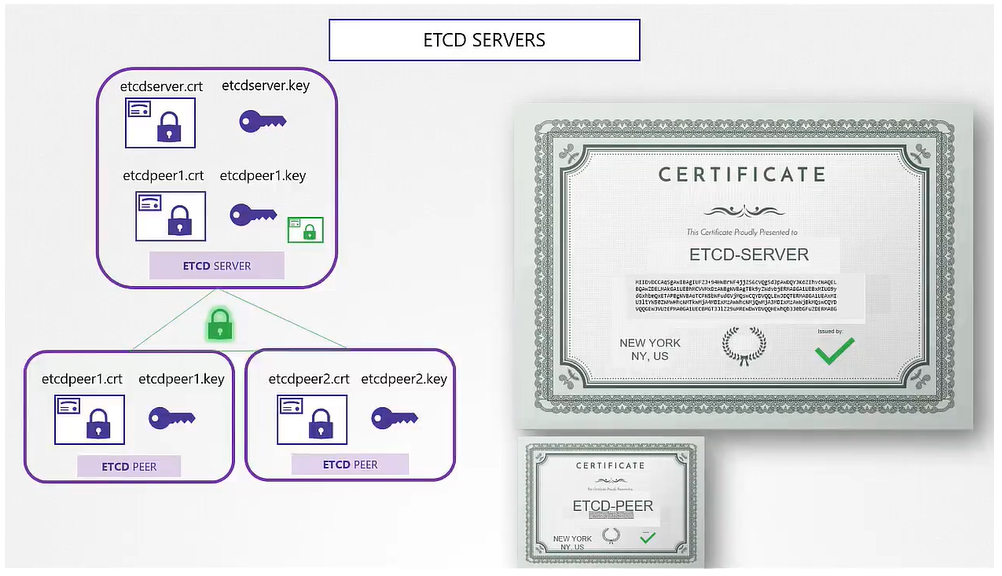
Let’s look at the different components within the Kubernetes cluster and identify the various servers and clients and who talks to whom.
Generate Certificate
There are different tools available such as easyrsa, openssl, cfssl, or many others for generating certificates.
Generate Keys
$ openssl genrsa -out ca.key 2048Generate CSR
$ openssl req -new -key ca.key -subj "/CN=Kubernetes-CA" -out ca.csrSign Certificates
$ openssl x509 -req -in ca.csr -signkey ca.key -out ca.crt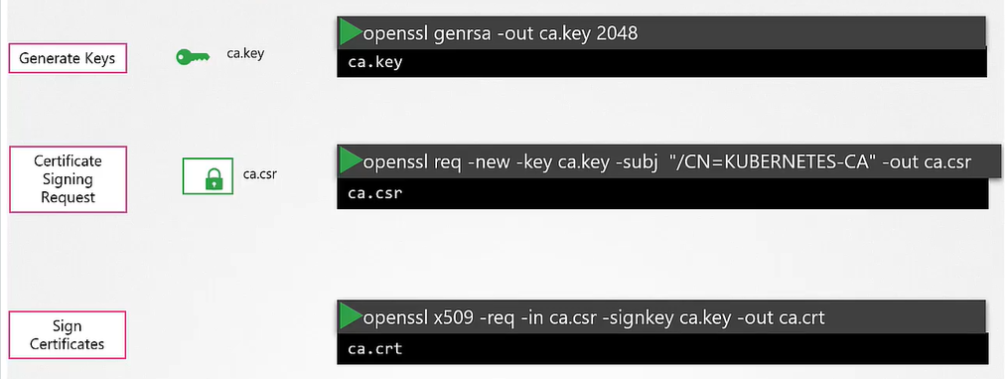
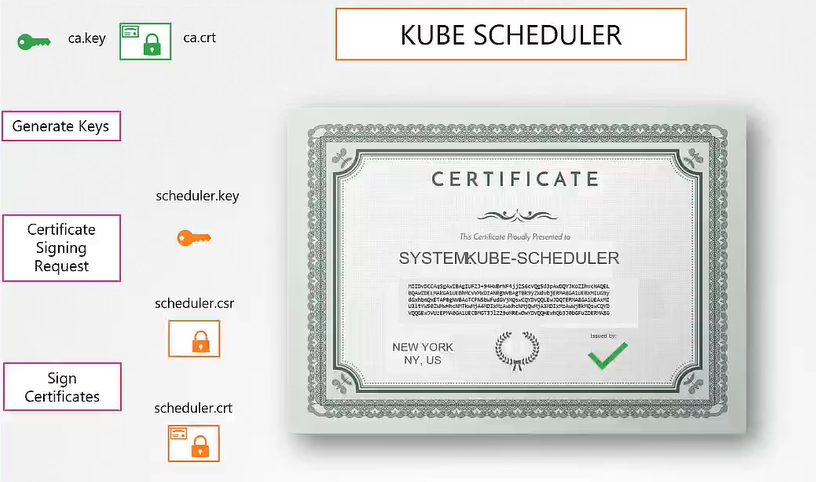
Client Certificate
Generate Keys
$ openssl genrsa -out admin.key 2048Generate CSR
$ openssl req -new -key admin.key -subj "/CN=kube-admin" -out admin.csrSign Certificates
$ openssl x509 -req -in admin.csr -CA ca.crt -CAkey ca.key -out admin.crt
Certificate with Admin Privileges
$ openssl req -new -key admin.key -subj "/CN=kube-admin/O=system:masters" -out admin.csrWe follow the same procedure to generate client certificates for all other components that access the kube-apiserver.


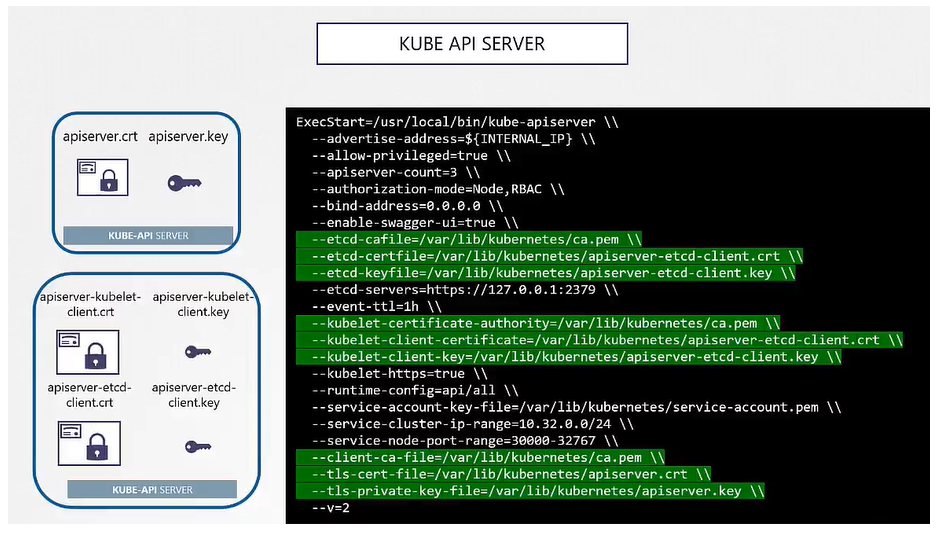
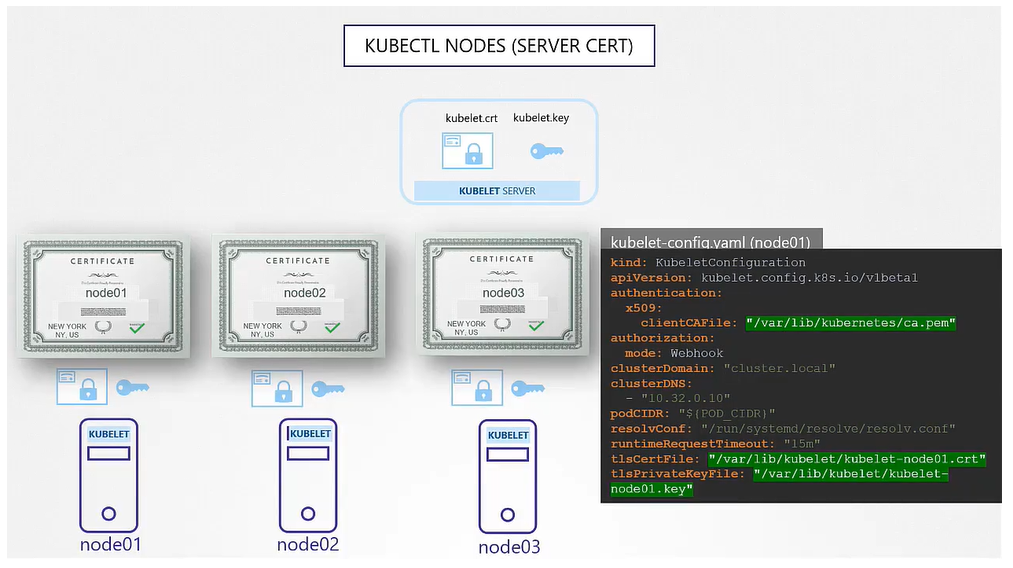
Server Certificate
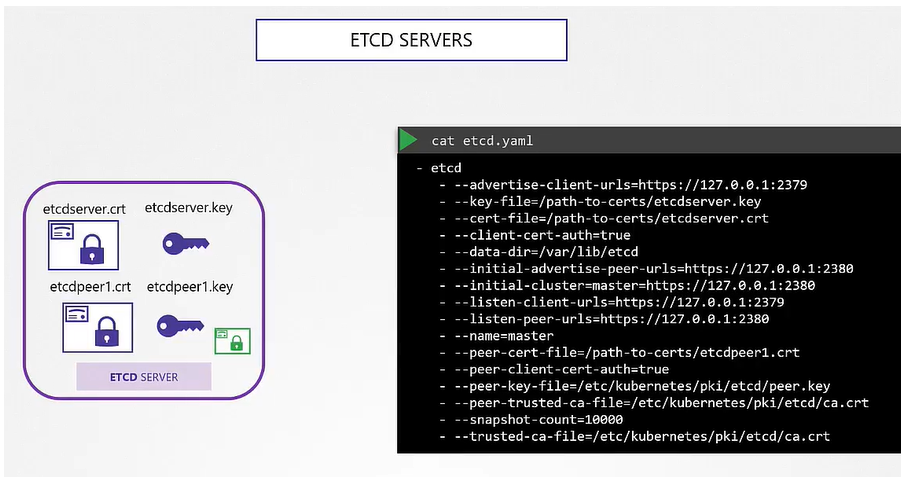

View Certificates
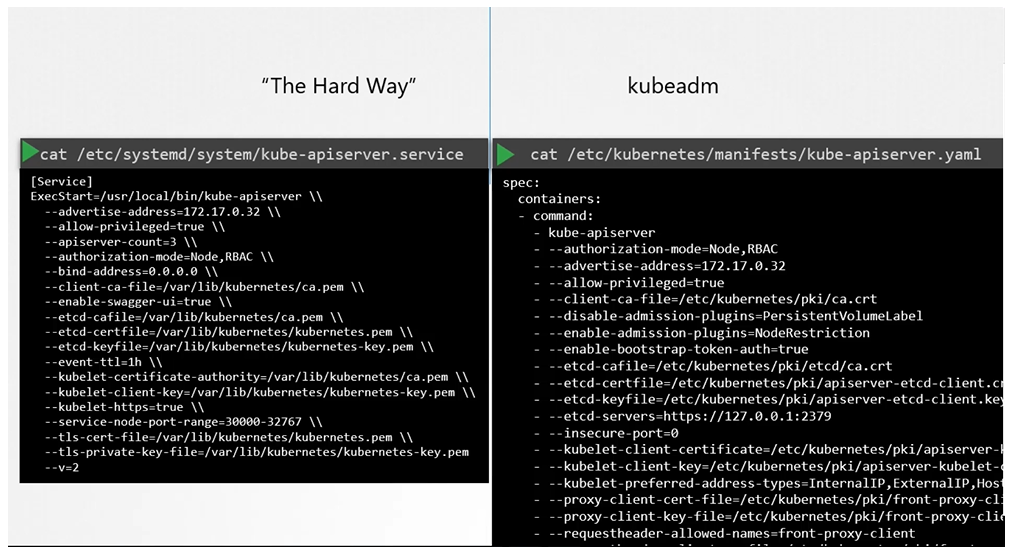
To view details of the certificate:
$ openssl x509 -in /etc/Kubernetes/pki/apiserver.crt -text -noout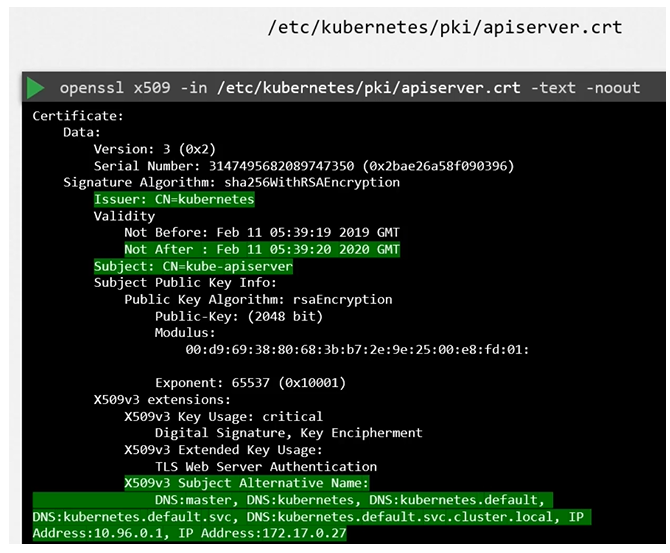
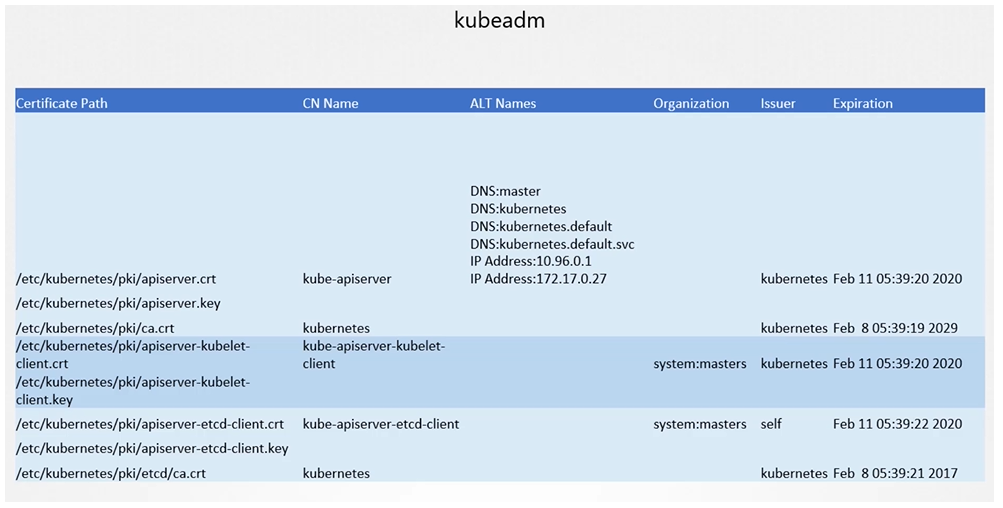
Follow the same procedure to identify information about all the other certificates.
Inspect Server Logs - Hardware Setup
Inspect server logs using journalctl:
$ journalctl -u etcd.service -l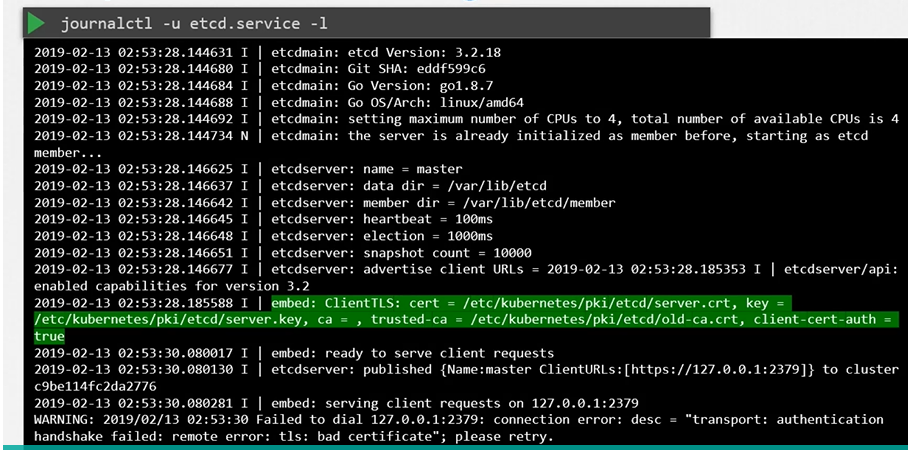
Inspect Server Logs - kubeadm Setup
View logs using kubectl:
$ kubectl logs etcd-master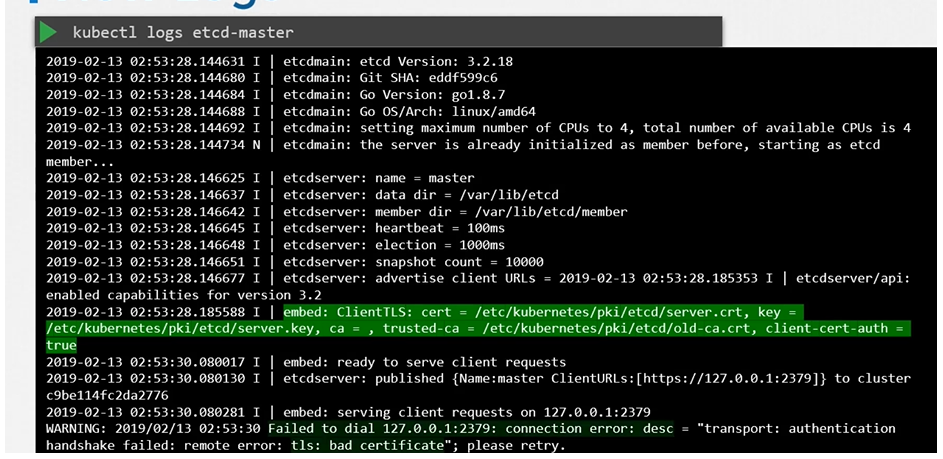
View logs using docker ps and docker logs:
$ docker ps -a
$ docker logs <container-id>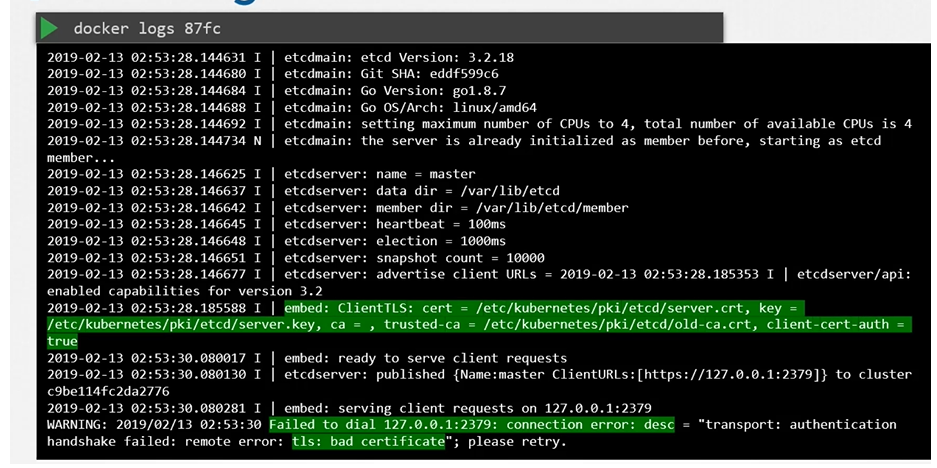
Certificate Authority (CA)
The CA is really just the pair of key and certificate files that we have generated. Whoever gains access to these pairs of files can sign any certificate for the Kubernetes environment.
Kubernetes has a built-in certificates API that can do this for you. With the certificate API, we now send a certificate signing request (CSR) directly to Kubernetes through an API call.
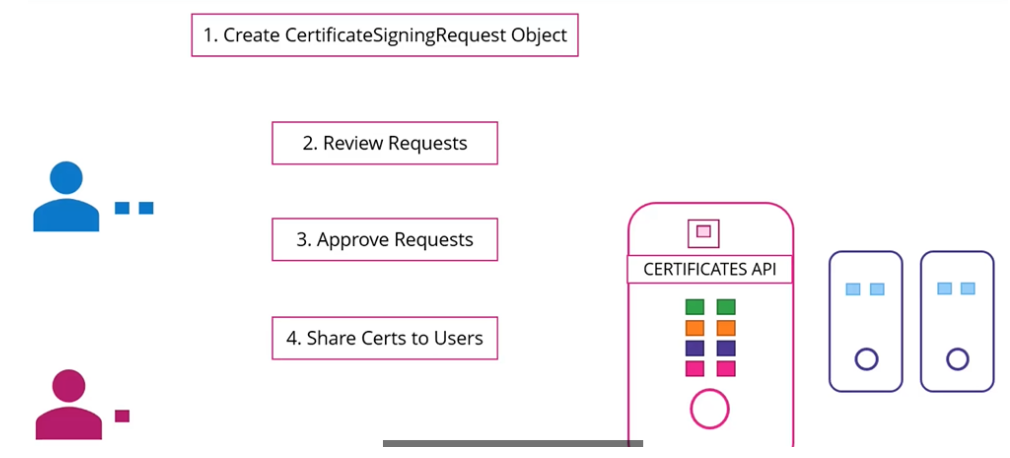
This certificate can then be extracted and shared with the user.
A user first creates a key:
$ openssl genrsa -out jane.key 2048Generates a CSR:
$ openssl req -new -key jane.key -subj "/CN=jane" -out jane.csrSends the request to the administrator and the administrator takes the key and creates a CSR object, with kind as “CertificateSigningRequest” and an encoded “jane.csr”:
apiVersion: certificates.k8s.io/v1beta1
kind: CertificateSigningRequest
metadata:
  name: jane
spec:
  groups:
  - system:authenticated
  usages:
  - digital signature
  - key encipherment
  - server auth
  request:
    <certificate-goes-here>
$ cat jane.csr | base64
$ kubectl create -f jane.yaml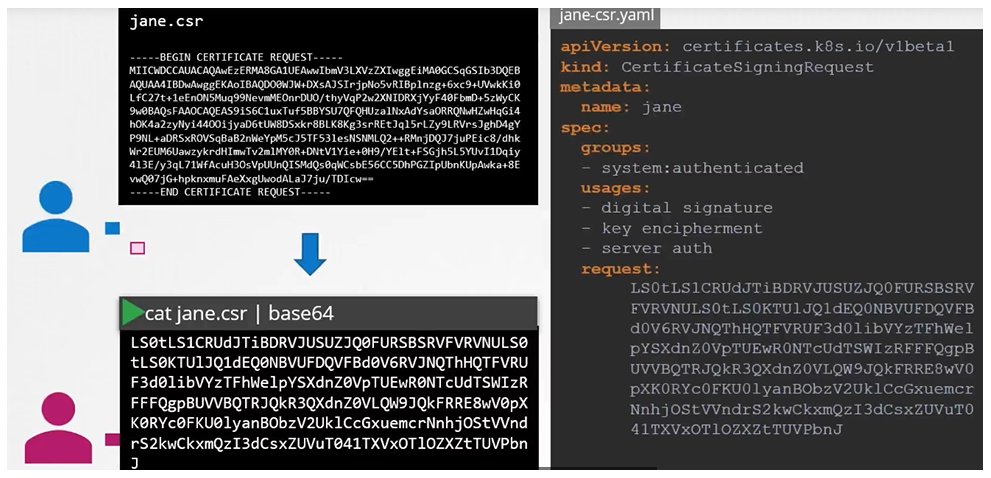
To list the CSRs:
$ kubectl get csrApprove the request:
$ kubectl certificate approve janeTo view the certificate:
$ kubectl get csr jane -o yamlTo decode it:
$ echo "<certificate>" | base64 --decode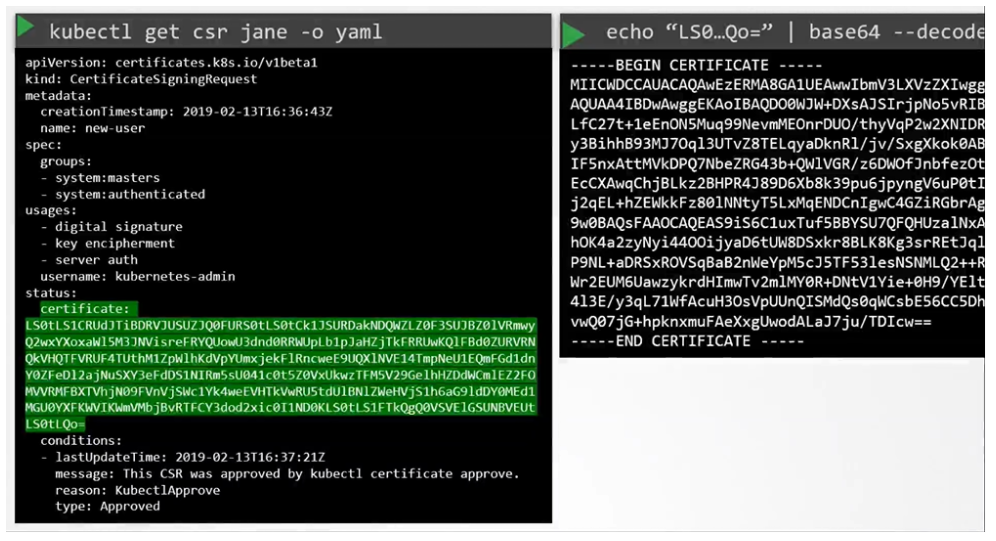
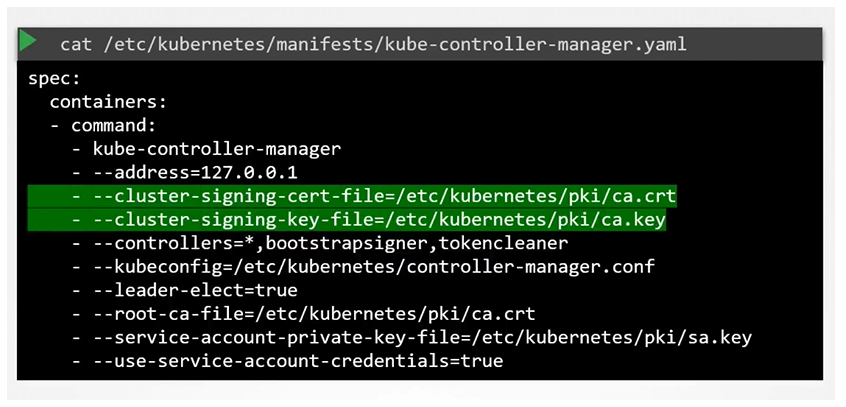
All certificate-related operations are carried out by the controller manager. If anyone has to sign the certificates, they need the CA server’s root certificate and private key. The controller manager configuration has two options where you can specify this.

Authorization
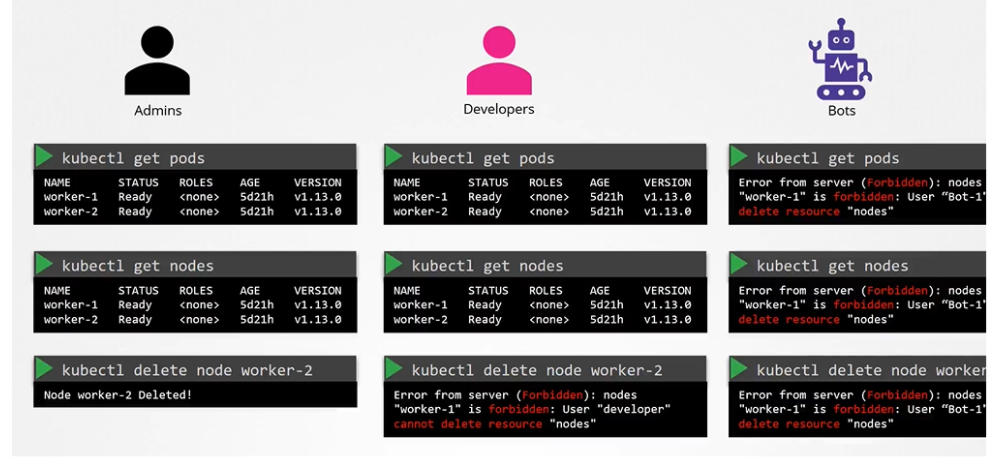
When we share our cluster between different organizations or teams, by logically partitioning it using name spaces, we want to restrict access to the users to their name spaces alone. That is what authorization can help you within the cluster.
As an admin, you can do all operations:
$ kubectl get nodes
$ kubectl get pods
$ kubectl delete node worker-2
Authorization mechanism
- There are different authorization mechanisms supported by Kubernetes
- Node Authorization
- Attribute-based Authorization (ABAC)
- Role-Based Authorization (RBAC)
- Webhook
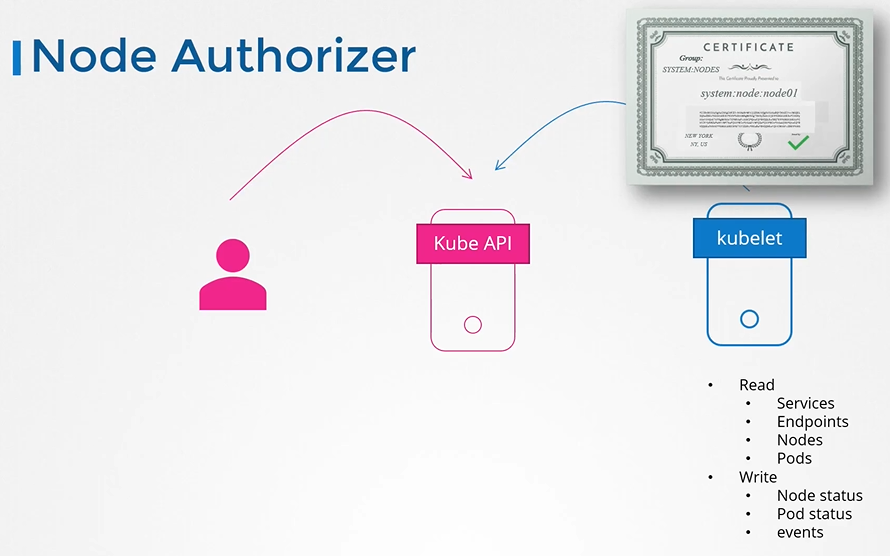
Node authorizer
Request comings from node are authorized with node authorizer.
Kubelets should belong to the system nodes group and have names prefixed with “system:node”.
Thus, any request coming from a user with the name starting with “system:node” and part of the system nodes group is authorized by the node authorizer, granting the privileges required for a kubelet. This pertains to access within the cluster.
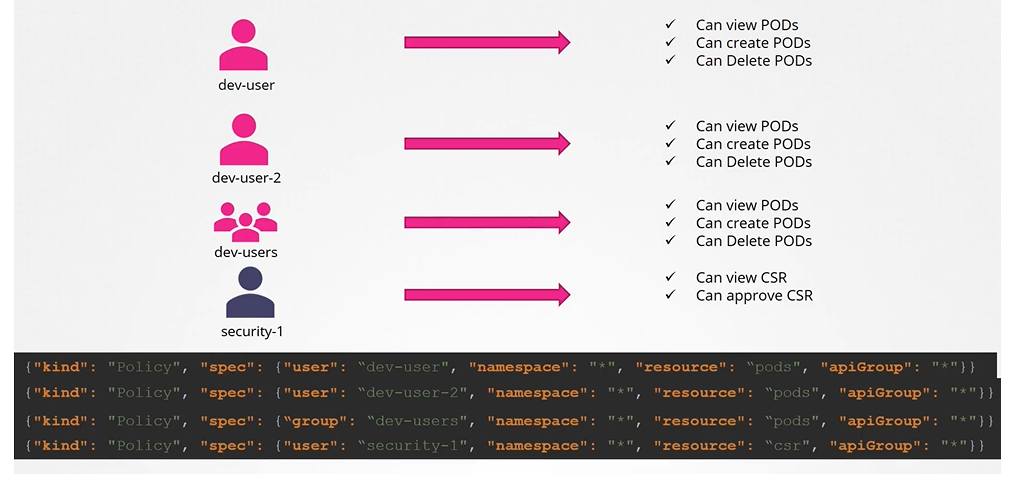
ABAC (Attribute based access controls)
Now, every time you need to add or make a change in the security, you must edit this policy file manually and restart the Kube API server. As such, the attributes based access control configurations are difficult to manage.
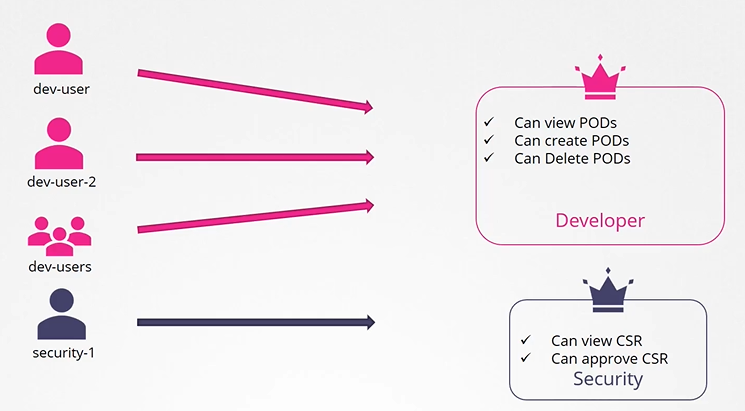
RBAC (role based access controls)
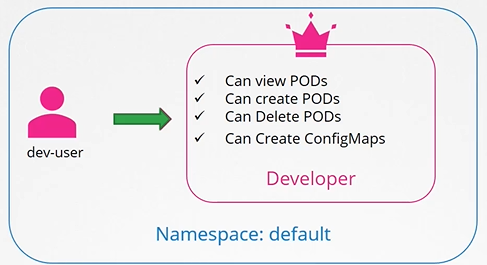
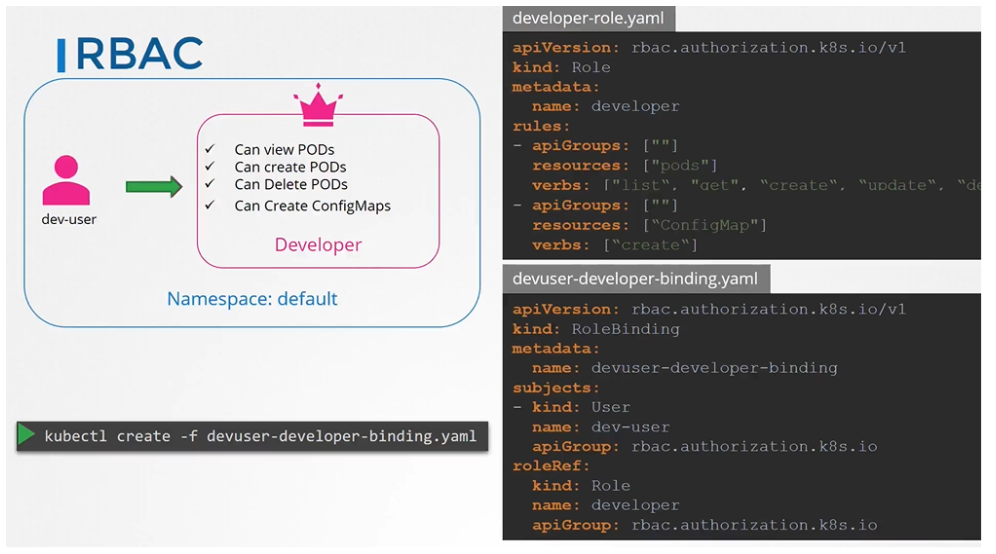
Role based access controls make these much easier. With role based access controls, instead of directly associating a user or a group with a set of permissions, we define a role. In this case, for developers, we create a role with the set of permissions required for developers.
Then, we associate all the developers to that role. Similarly, create a role for security users with the right set of permissions required for them. Then, associate the user to that role, going forward. Whenever a change needs to be made to the user’s access we simply modify the role and it reflects on all developers immediately.
How to create roles
We create role by the Role object.
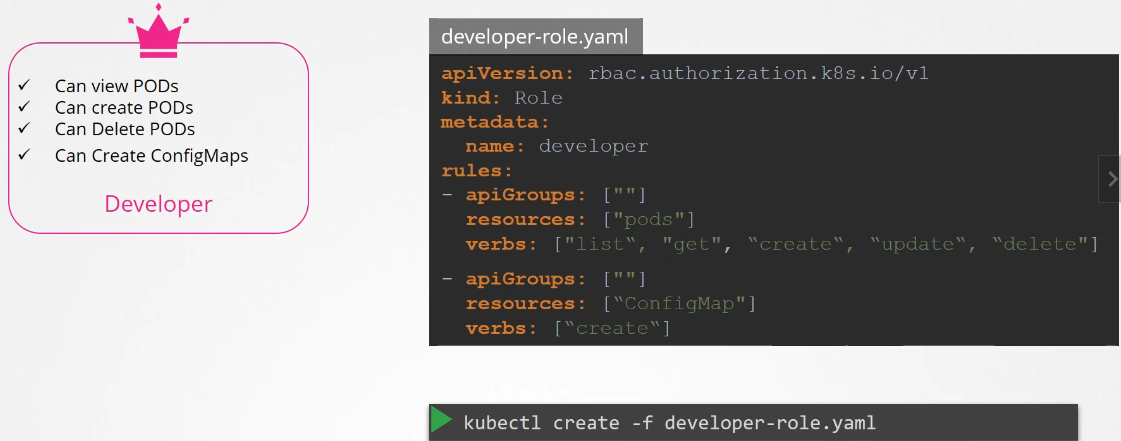
- Each role has 3 sections
- apiGrups
- resources
- verbs
Create the role with kubectl command
$ kubectl create -f developer-role.yaml
View RBAC
To list roles
$ kubectl get roles
To list role bindings:
$ kubectl get rolebindings
To describe role
$ kubectl describe role developer
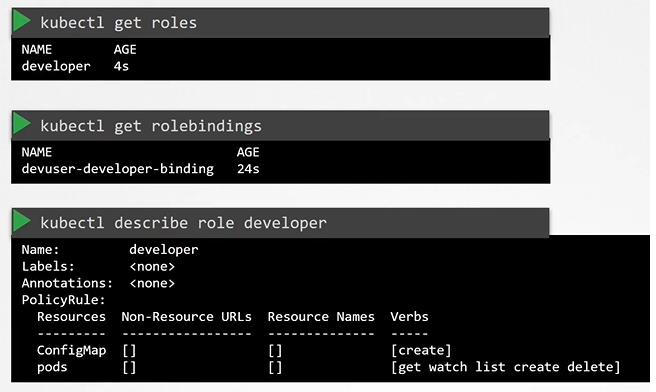
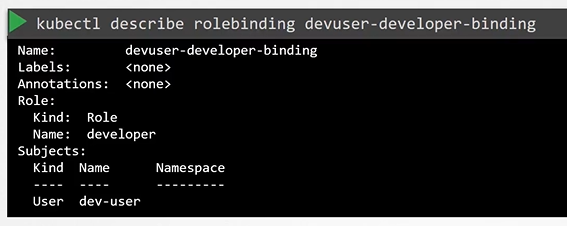
To describe rolebinding
$ kubectl describe rolebinding devuser-developer-binding
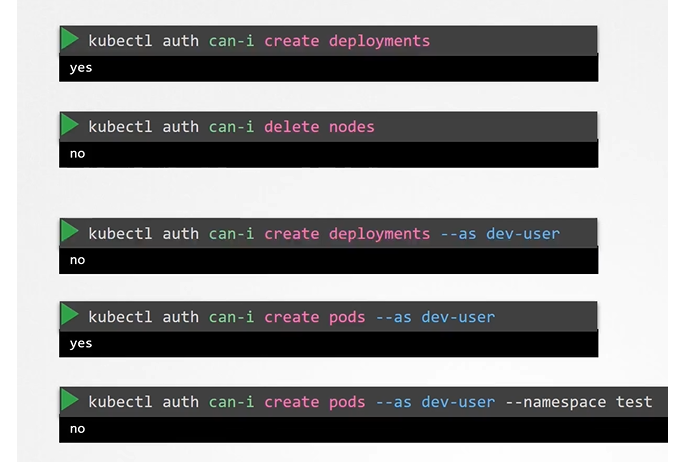
What if you being a user would like to see if you have access to a particular resource in the cluster.
Check access
You can use the kubectl auth command
$ kubectl auth can-i create deployments
$ kubectl auth can-i delete nodes
$ kubectl auth can-i create deployments --as dev-user
$ kubectl auth can-i create pods --as dev-user
$ kubectl auth can-i create pods --as dev-user --namespace test
You can impersonate as a separate user as well to check/test if they have the right access.
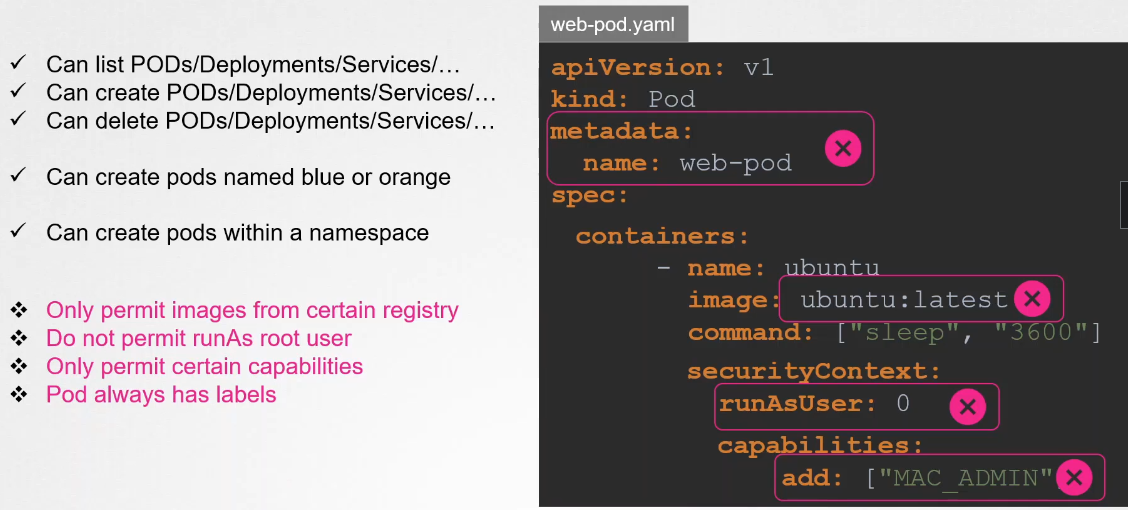
Resource names
Note on resource names we just saw how you can provide access to users for resources like pods within the namespace. we can restrict the user access to blue and orange pod as well. Which allows us to have more granular access.
apiVersion: rbac.authorization.k8s.io/v1
kind: Role
metadata:
  name: developer
rules:
- apiGroups: [""] # "" indicates the core API group
  resources: ["pods"]
  verbs: ["get", "update", "create"]
  resourceNames: ["blue", "orange"]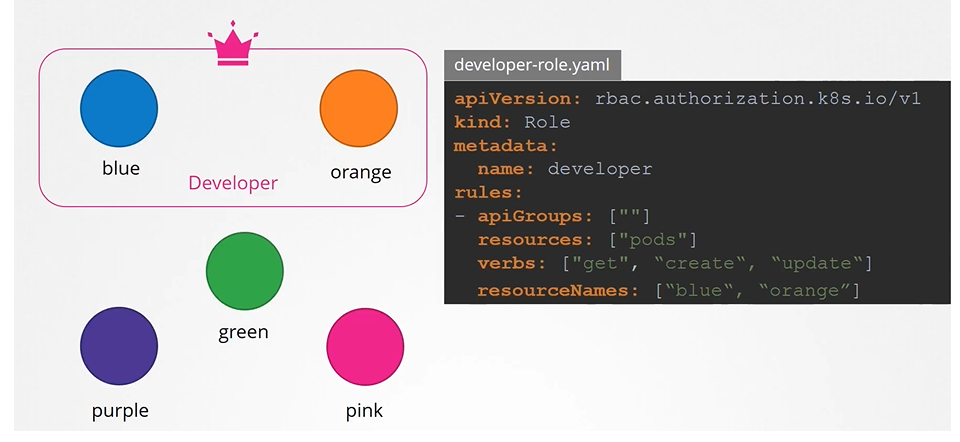
Cluster Roles
Roles and Role bindings are namespaced meaning they are created within namespaces.
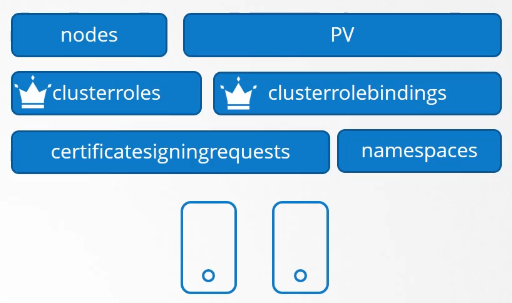
Namespaces
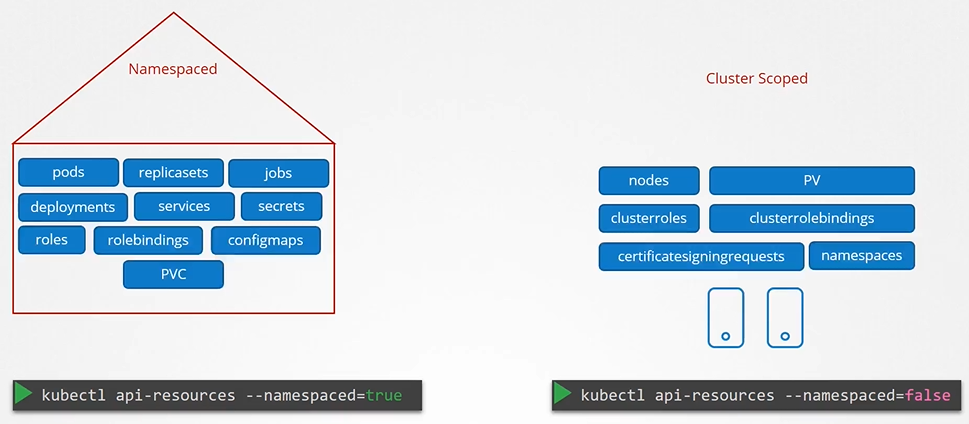
Can you group or isolate nodes within a namespace? No, those are cluster wide or cluster scoped resources. They cannot be associated to any particular namespace.
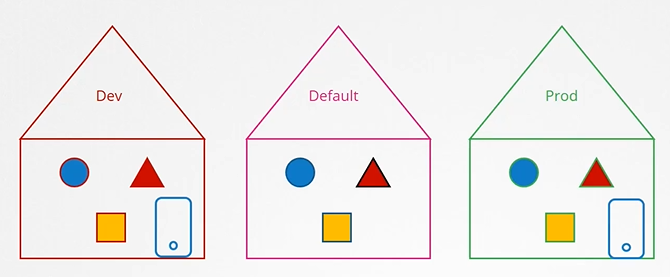
- So the resources are categorized as either namespaced or cluster scoped.
- To see namespaced resources
$ kubectl api-resources --namespaced=true
To see non-namespaced resources
$ kubectl api-resources --namespaced=false
If we don’t define the below objects namespace then they’ll be created in the default namespace.
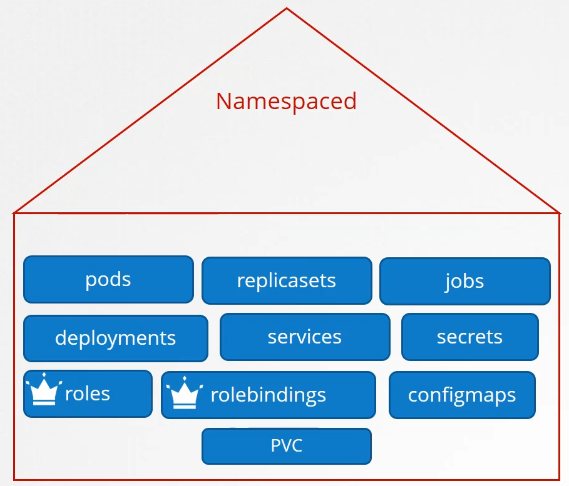
We use roles and roles binding to authorize users to namespaced resources.
Cluster Roles and Cluster Role Bindings
To authorize or restrict access to the cluster scoped resources, we use cluster roles and clusterRoleBindings
Cluster Roles are roles except they are for a cluster scoped resources. Kind as **`CLusterRole

Next step is to link the user to the role: You can create a cluster role for namespace resources as well. When you do that user will have access to these resources across all namespaces.

  apiVersion: rbac.authorization.k8s.io/v1
  kind: ClusterRole
  metadata:
    name: cluster-administrator
  rules:
  - apiGroups: [""] # "" indicates the core API group
    resources: ["nodes"]
verbs: ["get", "list", "delete", "create"]apiVersion: rbac.authorization.k8s.io/v1
kind: ClusterRoleBinding
metadata:
name: cluster-admin-role-binding
subjects:
- kind: User
name: cluster-admin
apiGroup: rbac.authorization.k8s.io
roleRef:
kind: ClusterRole
name: cluster-administrator
apiGroup: rbac.authorization.k8s.io$ kubectl create -f cluster-admin-role.yaml
$ kubectl create -f cluster-admin-role-binding.yamlCan we use cluster roles to access namespaced resources as well?
we said that cluster roles and bindings are used for cluster scoped resources, but that is not a hard rule. You can create a cluster role for name spaced resources as well. When you do that, the user will have access to these resources across all name spaces. Earlier, when we created a role to authorize a user to access pods, the user had access to the pods in a particular name space alone. With cluster roles, when you authorize a user to access the pods, the user gets access to all pods across the cluster.
The next step is to link the user to that role.
-
For this we create another object called
RoleBinding. This role binding object links a user object to a role. -
create the role binding using kubectl command
$ kubectl create -f devuser-developer-binding.yaml
- Also note that the roles and role bindings fall under the scope of name spaces. So here the dev user gets access to pods and config maps within the default name space. If you want to limit the dev user’s access within a different name space, then specify the name space within the metadata of the definition file while creating them.
apiVersion: rbac.authorization.k8s.io/v1
kind: Role
metadata:
  name: developer
rules:
- apiGroups: [""] # "" indicates the core API group
  resources: ["pods"]
  verbs: ["get", "list", "update", "delete", "create"]
- apiGroups: [""]
  resources: ["ConfigMap"]
verbs: ["create"]apiVersion: rbac.authorization.k8s.io/v1
kind: RoleBinding
metadata:
name: devuser-developer-binding
subjects:
- kind: User
name: dev-user # "name" is case sensitive
apiGroup: rbac.authorization.k8s.io
roleRef:
kind: Role
name: developer
apiGroup: rbac.authorization.k8s.ioWebhook
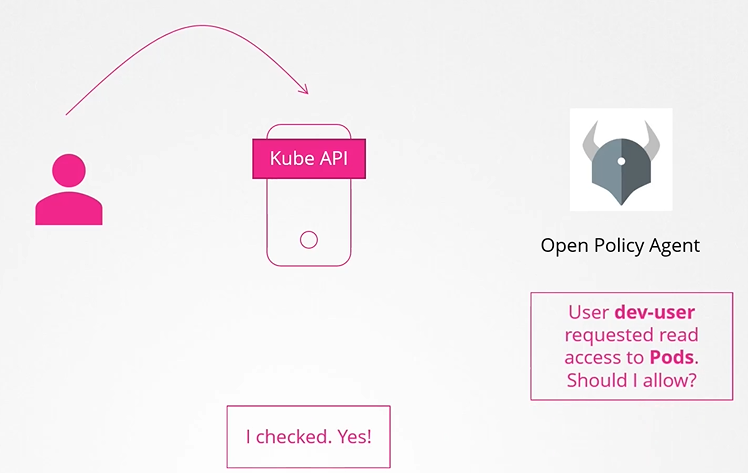
This will outsource the authorization to a 3rd party policy agent such as Open Policy Agent.
For instance, open policy agent is a third party tool that helps with admission control and authorization. You can have Kubernetes make an API call to the open policy agent with the information about the user and his access requirements and have the open policy agent decide if the user should be permitted or not. Based on that response, the user is granted access. Now, there are two more modes
Configuring Authorization modes
The mode options can be defined on the kube-apiserver. If not provided by default it is “AlwaysAllow”.
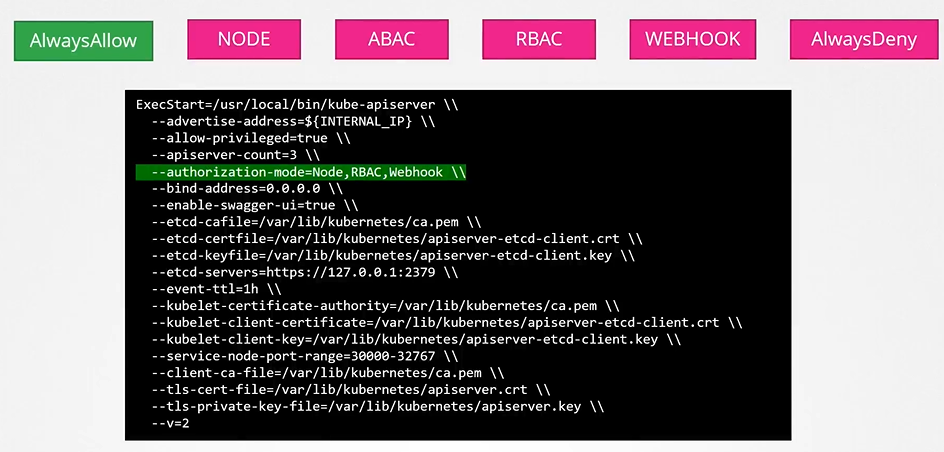
When you specify multiple modes, it will authorize in the order in which it is specified
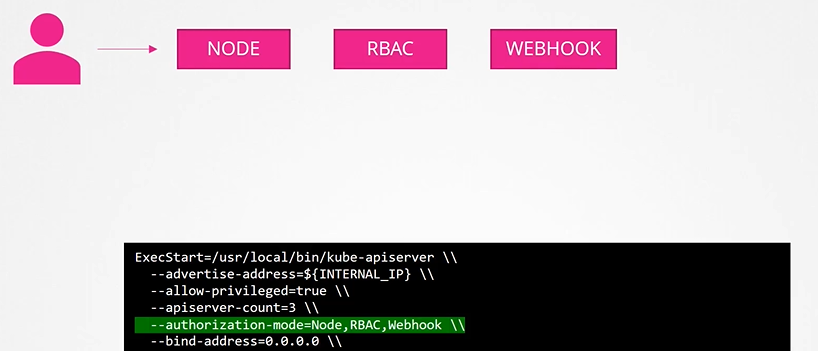
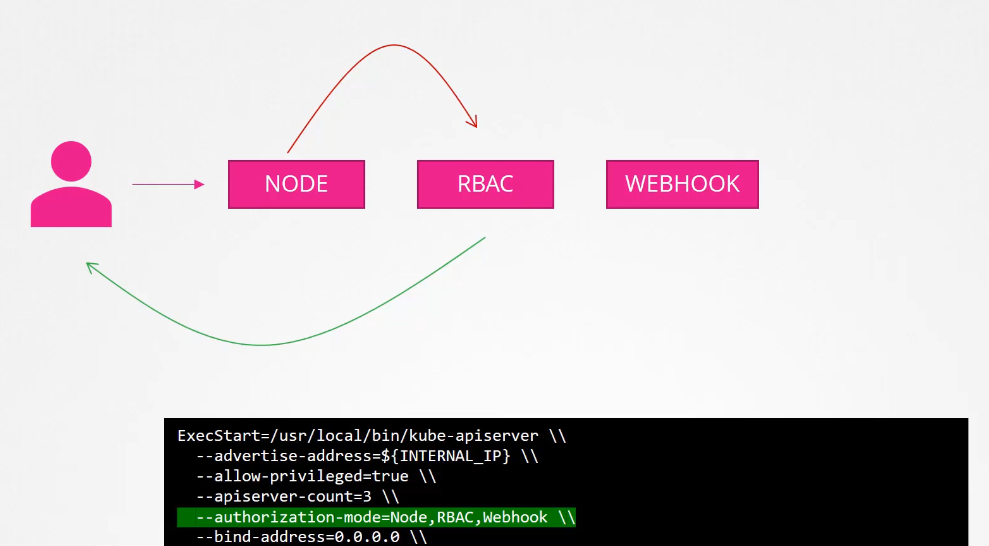
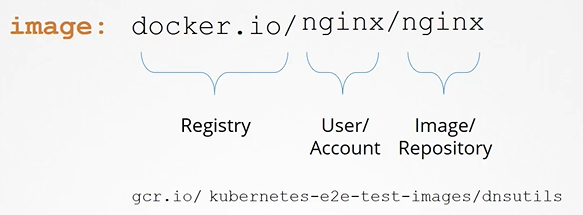
image security
apiVersion: v1
kind: Pod
metadata:
  name: nginx-pod
spec:
  containers:
  - name: nginx
    image: nginx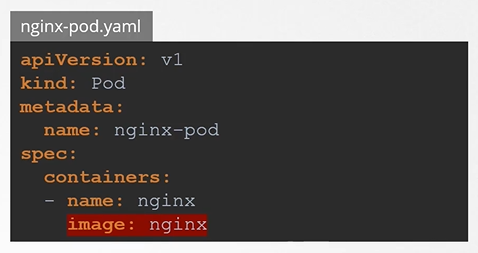
Private registry
To login to the registry
$ docker login private-registry.ioRun the application using the image available at the private registry
$ docker run private-registry.io/apps/internal-app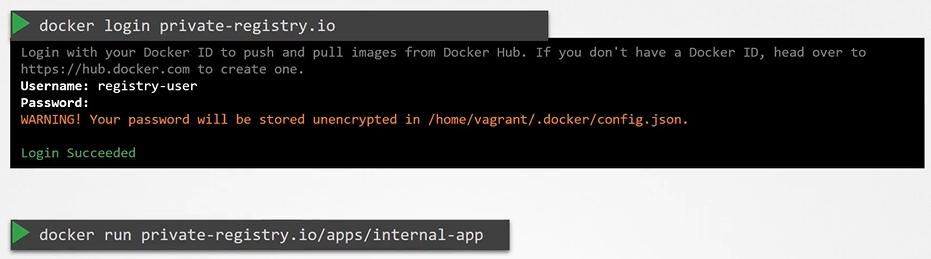
To pass the credentials to the docker untaged on the worker node for that we first create a secret object with credentials in it.
$ kubectl create secret docker-registry regcred \
  --docker-server=private-registry.io \
  --docker-username=registry-user \
  --docker-password=registry-password \
  --docker-email=registry-user@org.com
We then specify the secret inside our pod definition file under the imagePullSecret section
apiVersion: v1
kind: Pod
metadata:
  name: nginx-pod
spec:
  containers:
  - name: nginx
    image: private-registry.io/apps/internal-app
  imagePullSecrets:
  - name: regcred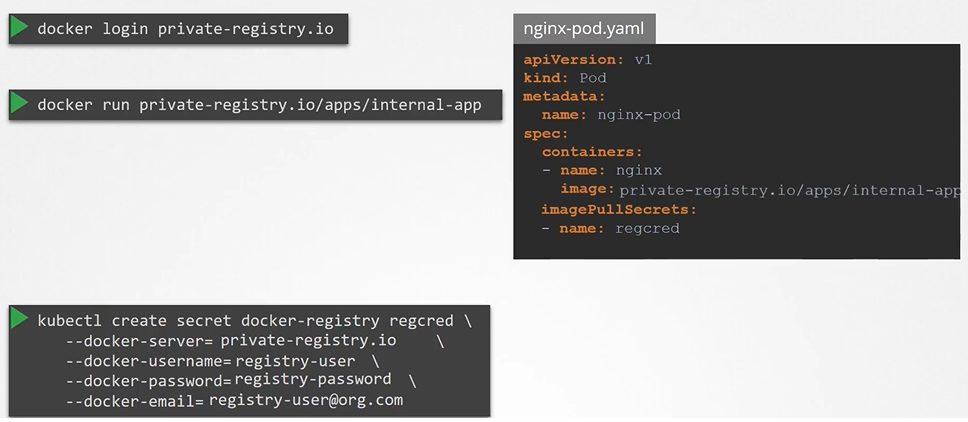
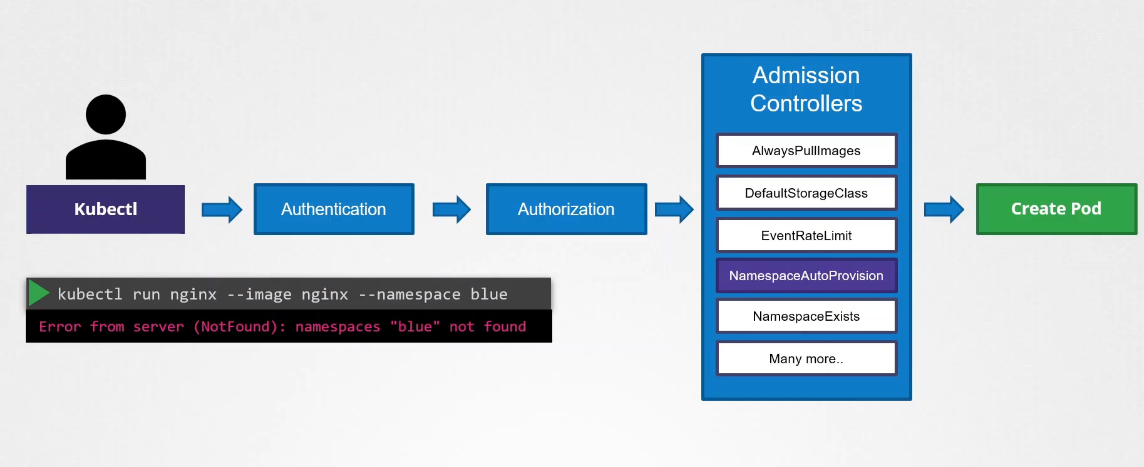
Admission Controller

An admission controller is a piece of code that intercepts requests to the Kubernetes API server prior to the persistence of the object but after the request is authenticated and authorized.
Admission controllers limit requests to create, delete, or modify objects. They can also block custom verbs, such as a request to connect to a Pod via an API server proxy. Admission controllers do not (and cannot) block requests to read (get, watch, or list) objects.
Admission controllers can not only reject but also perform different operations.
In the example below, if the namespace does not exist, it will throw an exception:
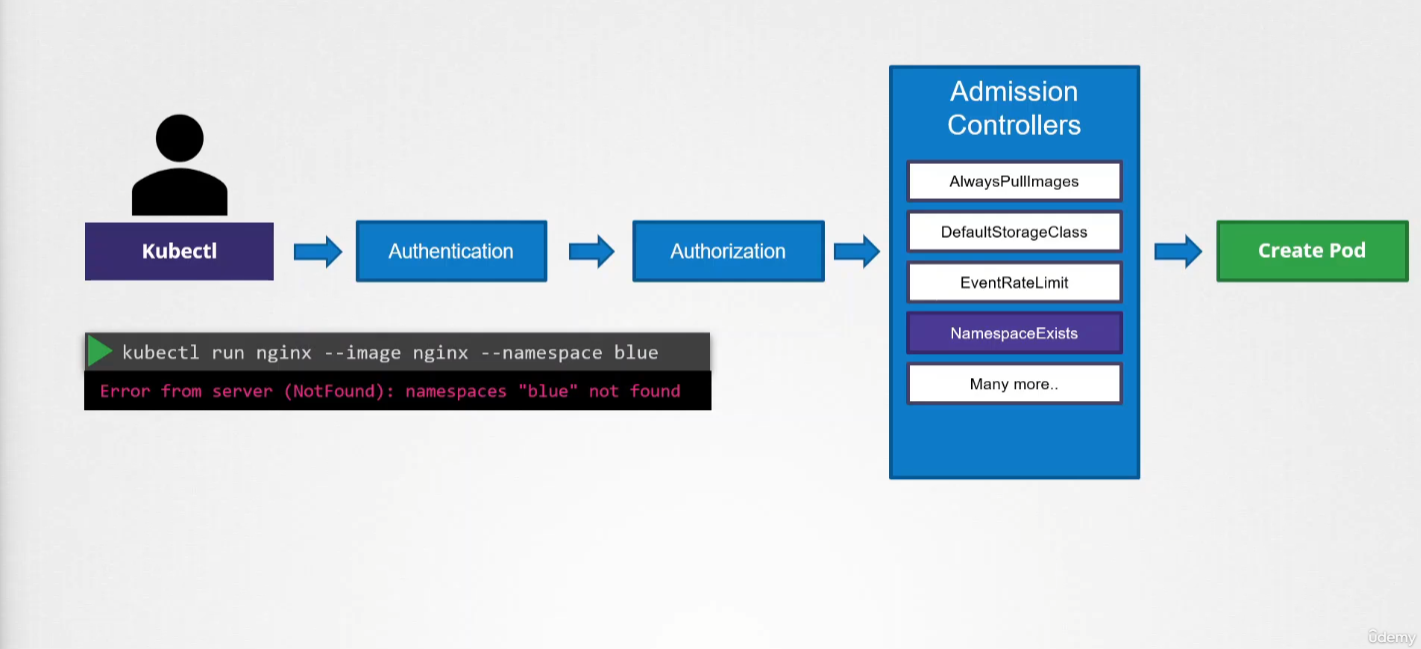
There’s a plugin that intercepts and creates the namespace if it does not exist:
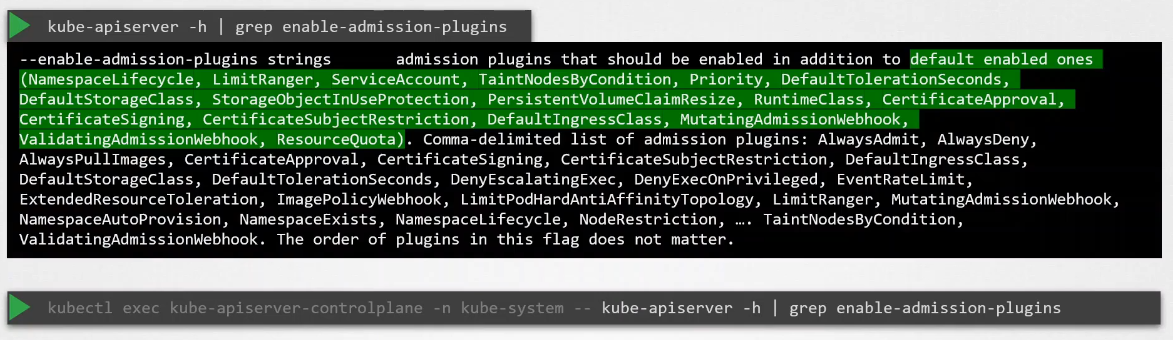
To view the list of enabled admission controllers by default:
- If you are running it in a
kubeadmsetup, the second command is the one to run.
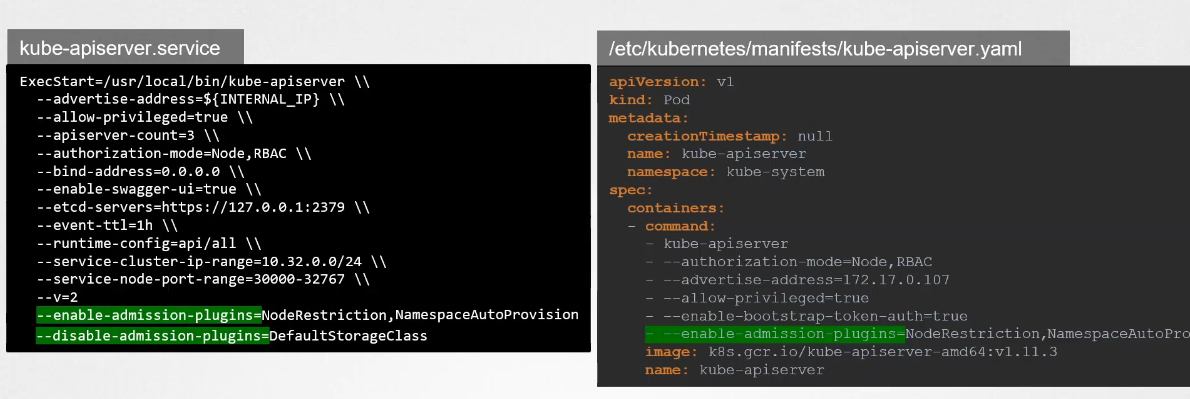
How to Enable or Disable Admission Controllers:
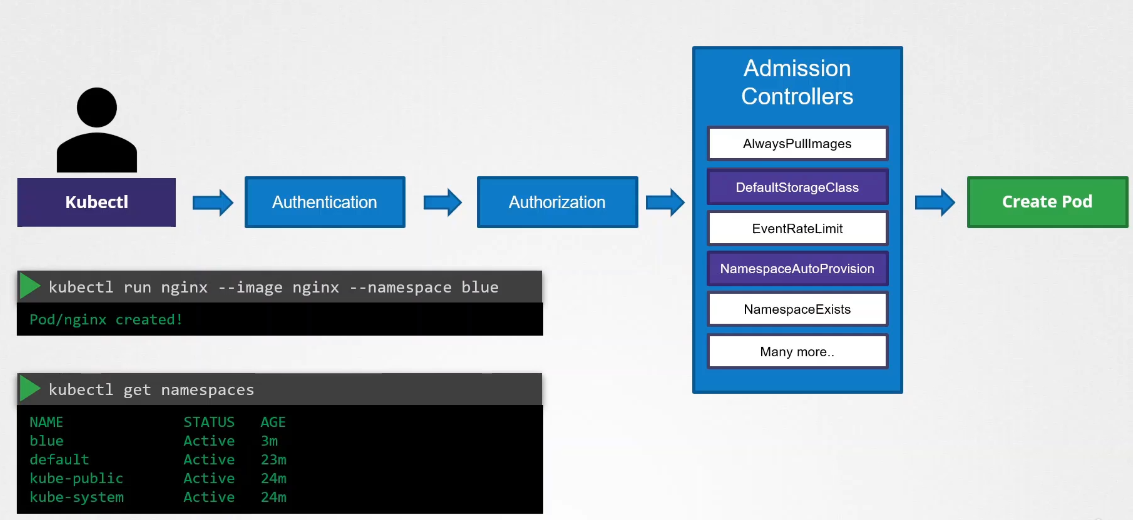
Another example of an admission controller is when you want to have a default storage created for a pod when a pod is created, but no storage was associated with it.
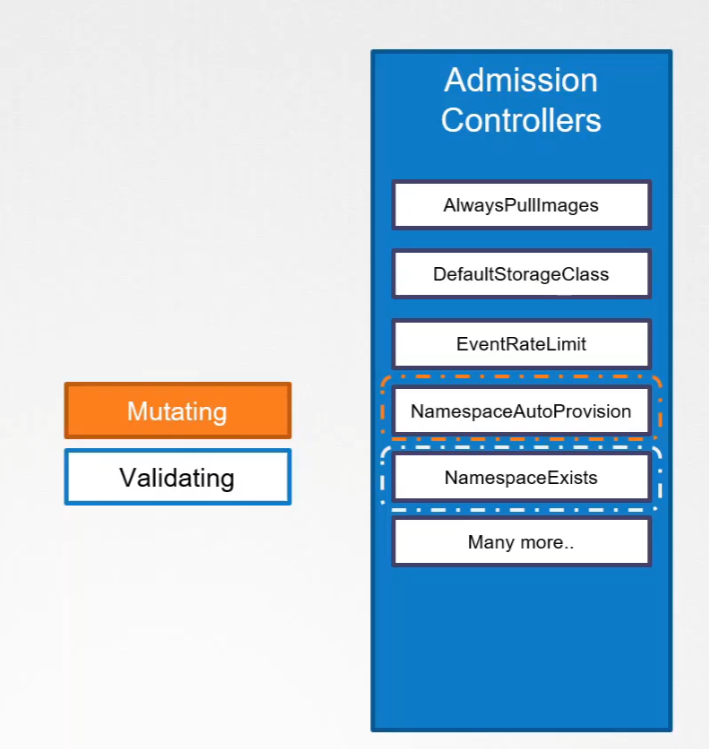
Validating Admission Controller
We looked at the namespace exists or namespace lifecycle admission controller. It can help validate if a namespace already exists and reject the request if it doesn’t exist. This is known as a validating admission controller.

Mutating Admission Controller
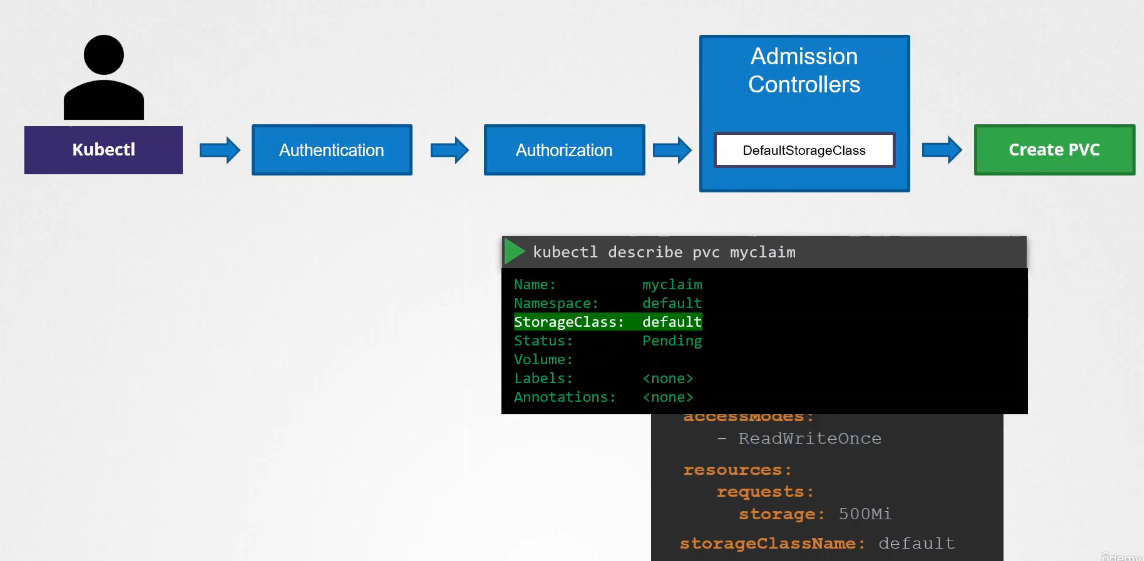
Let’s say you’re submitting a request to create a PVC. The request goes through authentication, authorization, and finally, the admission controller.
The default StorageClass admission controller will watch for requests to create a PVC and check if it has a StorageClass mentioned in it. If not, which is true in our case, it will modify your request to add the default StorageClass to your request.
This could be whatever StorageClass is configured as the default StorageClass in your cluster. So when the PVC is created and you inspect it, you’ll see that a default StorageClass is added to it even though you hadn’t specified it during the creation.
This type of admission controller is known as a mutating admission controller. It can change or mutate the object itself before it is created.
Both Validating and Mutating Admission Controllers
Mutating admission controllers will run first. This is because they want to catch any invalidation during validation.
There may be admission controllers that can do both—mutate a request as well as validate a request. Generally, mutating admission controllers are invoked first, followed by validating admission controllers. This is so that any change made by the mutating admission controller can be considered during the validation process.
For example, the namespace auto-provisioning admission controller, which is a mutating admission controller, is run first, followed by the validating controller namespace exists. If it were run the other way, then the namespace exists admission controller would always reject the request for a namespace that does not exist, and the namespace auto-provisioning controller would never be invoked to create the missing namespace.
When a request goes through these admission controllers, if any admission controller rejects the request, the request is rejected and an error message is shown to the user.
Webhook
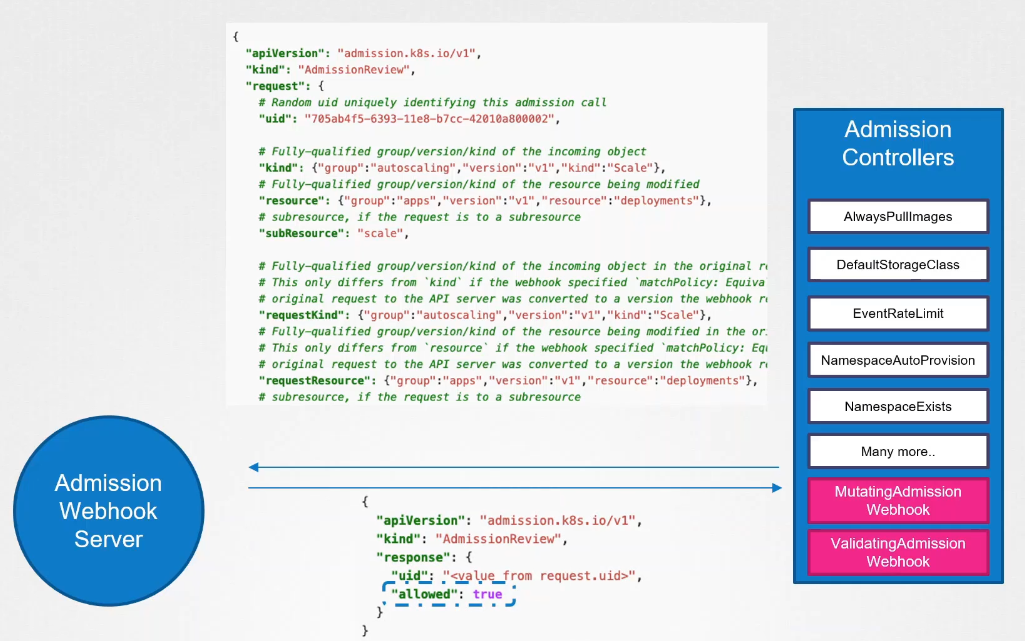
Now, what if we want our own admission controller with our own mutations and validations that have our own logic? To support external admission controllers, there are two special admission controllers available: mutating admission webhook and validating admission webhook.
We can configure these webhooks to point to a server that’s hosted either within the Kubernetes cluster or outside it, and our server will have our own admission webhook service running with our own code and logic.
After our request goes through all the built-in admission controllers, it hits the webhook that’s configured. We will see how to configure that in a bit. Once it hits the webhook, it makes a call to the admission webhook server, passing an admission review object in a JSON format. This object has all the details about the request, such as the user that made the request, the type of operation the user is trying to perform, and the details about the object itself.
On receiving the request, the admission webhook server responds with an admission review object with the result of whether the request is allowed or not. If the allowed field in the response is set to true, then the request is allowed. If it is set to false, it is rejected.
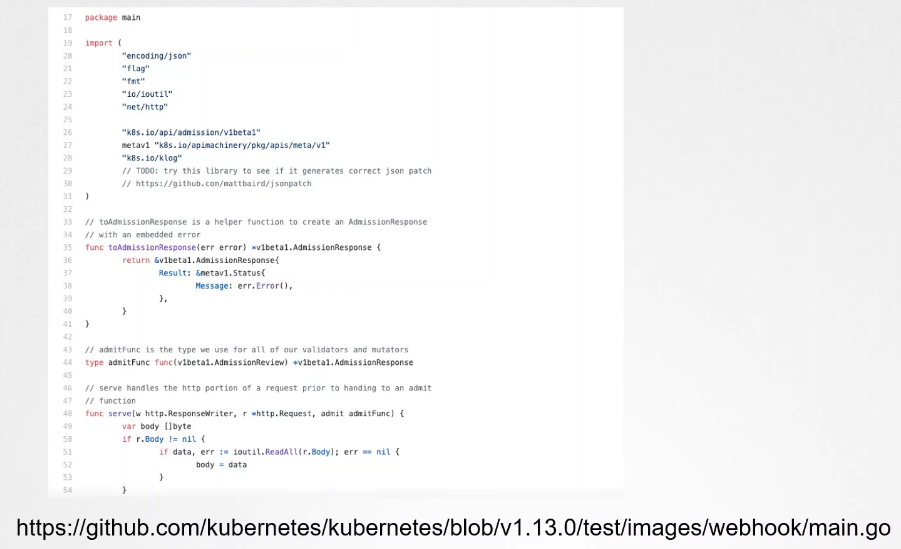
Sample Webhook Server in Go
Sample Webhook Server in Python
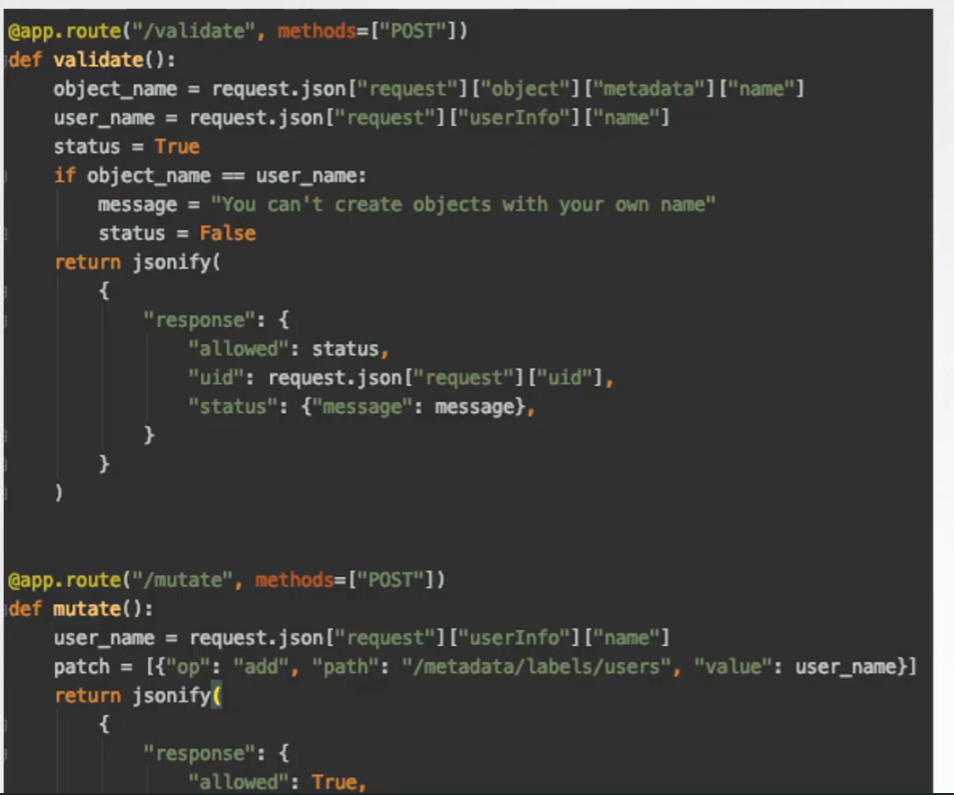 The main takeaway is that the admission webhook server is a server that you deploy that contains the logic or the code to permit or reject a request, and it must be able to receive and respond with the appropriate responses that the webhook expects.
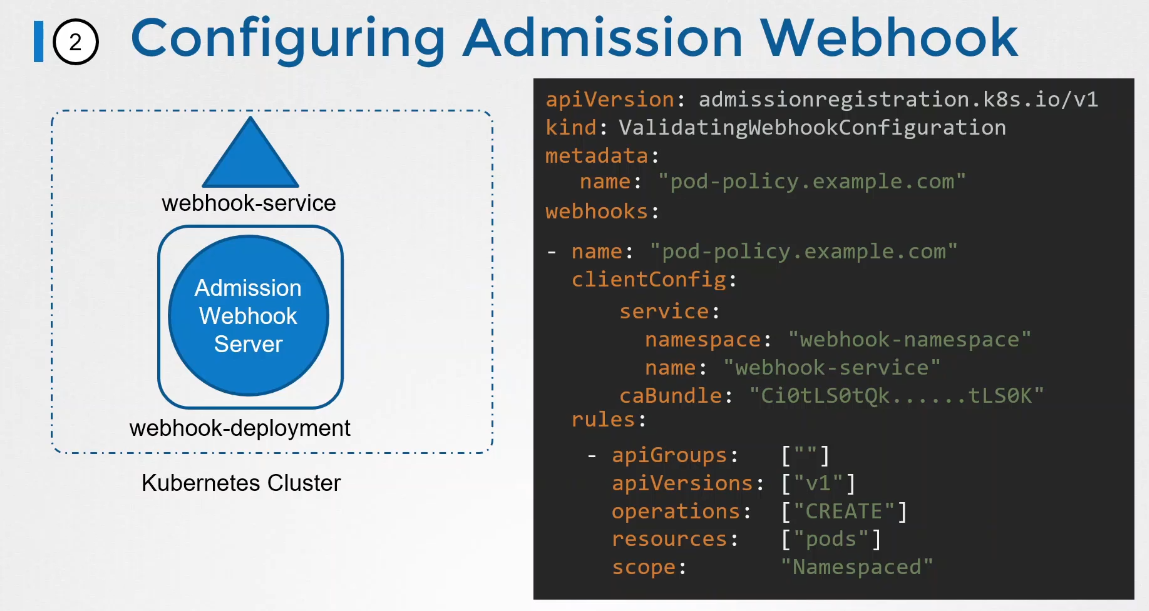
Configuring the Webhook
So we either run it as a server somewhere or containerize it and deploy it within the Kubernetes cluster itself as a deployment.
If deployed as a deployment in a Kubernetes cluster, it needs a service for it to be accessed. So we have a service named webhook service as well. The next step is to configure our cluster to reach out to the service and validate or mutate the requests. For this, we create a validating webhook configuration object. We start with the API version, kind, metadata, and webhooks section.
The API version is admissionregistration.k8s.io/v1, and the kind is ValidatingWebhookConfiguration. If we are configuring a mutating webhook, this would be a MutatingWebhookConfiguration.
In this example, we are only going to call this webhook configuration when calls are made to create pods. Once this object is created, every time we create a pod, a call will be made to the webhook service, and depending on the response, it will be allowed or rejected.