Start a hazelcast pod and let the container expose port 5701
kubectl run hazelcast --image=hazelcast/hazelcast --port=5701
Create a pod called httpd using the image httpd:alpine in the default namespace. Next, create a service of > type ClusterIP by the same name (httpd). The target port for the service should be 80.
k run httpd --image=httpd:alpinek expose pod httpd --name=httpd --type='ClusterIP' --port=80# ORkubectl run httpd --image=httpd:alpine --port=80 --expose
How to ensure guaranteed amount of resource?
Always remember to set resource requests for your pods. This is the only way to guarantee that they receive the minimum required CPU resources. Without setting requests, there’s no guarantee a pod will get the necessary resources, and it might be starved by other pods.
How do you define resource requests and limits for a container in a Kubernetes Pod?
The resources field in a Pod specification allows defining resource requests and limits for a container. In the provided YAML, the container requests 1Gi of memory and 1 CPU, ensuring it gets at least these resources. The limits are set to 2Gi of memory and 2 CPU, preventing the container from exceeding these values.
How can you provide a Pod definition file to the Kubelet without using the kube-apiserver? (Generally api-server is the one that gives the manifests or definitions to the Kubelet running on nodes )
You can configure the Kubelet to read Pod definition files from a designated directory on the host. This directory’s location is specified using the --pod-manifest-path option when running the Kubelet service. This allows the Kubelet to manage static Pods without interacting with the kube-apiserver.
What are the key differences between Static Pods and DaemonSets in Kubernetes?
Static Pods are created directly by the Kubelet on individual nodes and are not managed by the kube-apiserver. They are mainly used for running control plane components or node-specific agents. ==The kube-scheduler ignores Static Pods.==
DaemonSets, on the other hand, are managed by the kube-apiserver through the DaemonSet controller. They ensure that a copy of a Pod runs on each node, commonly used for deploying monitoring agents or logging services.
How do you provide a pod definition file to the kubelet without a kube-apiserver?
You can run a static pod by placing its YAML definition in the /etc/kubernetes/manifests/ directory on the node where the kubelet is running. The kubelet will automatically create the pod without needing the API server.
How can you view the logs of a container in a Kubernetes Pod?
You can use the kubectl logs command to view the logs of a container running inside a Pod. For example, to follow the logs of a single-container Pod, you can use:
kubectl logs -f event-simulator-pod
How do you view logs for a specific container in a multi-container Pod?
When a Pod has multiple containers, you need to specify the container name using the kubectl logs command:
Here, event-simulator-pod is the Pod name, and event-simulator is the specific container whose logs you want to view.
ReplicaSet
What's the purpose of ReplicaSet or ReplicationController?
RC/RS job is to help us achieve high availability. Replication controller could span over multiple nodes.
Why does a ReplicaSet require a selector definition while a Pod template is already providing it's own lables?
A ReplicaSet requires a selector definition because it can manage and take ownership of existing Pods that match its selector, even if they were not created by the ReplicaSet itself. This allows the ReplicaSet to maintain the desired number of replicas by recognizing and managing Pods beyond just those defined in its initial Pod template.
What are the different ways to scale a ReplicaSet in Kubernetes?
There are multiple ways to scale a ReplicaSet:
Updating the YAML definition file: Modify the replicas field in the ReplicaSet definition file (e.g., replicas: 6) and apply the changes using kubectl apply -f replicaset-definition.yaml.
Updates and rollbacks are best handled through deployments. Deployments allow us to perform updates and rollbacks without any downtime.
Why should you manage ReplicaSets through Deployments instead of handling them directly?
Deployments provide a higher-level abstraction over ReplicaSets, allowing for efficient upgrades and rollbacks. They ensure a controlled rollout of new versions and can automatically create, replace, or scale ReplicaSets as needed. Managing ReplicaSets directly lacks these advanced deployment strategies, making Deployments the preferred approach.
What will happen if we delete replicaset that belongs to a deployment?
If we delete a replicaSet all the pods related to that replica set will be removed as well. However, because replicaset is managed by deployment, it will be re-created again.
What is the Recreate deployment strategy in Kubernetes, and when should you use it?
The Recreate strategy terminates all existing Pods before creating new ones, leading to temporary unavailability. This approach is useful when running multiple versions of an application simultaneously is not possible or when a full restart is required.
What is the Rolling Update deployment strategy in Kubernetes, and why is it preferred?
The Rolling Update strategy updates Pods one at a time, ensuring application availability during the update process. This is the preferred approach as it minimizes downtime and allows fine-tuning of rollout behavior, such as defining max unavailable or max surge values.
Updating deployment through set image
If you upgrade the deployment using kubectl set image, the deployment will update, but the YAML definition file could become outdated, as it won’t automatically reflect the changes made to the image. To keep the definition file accurate, you’ll need to manually update it to match the changes.
$ kubectl set image deployment/myapp-deployment nginx=nginx:1.9.1
What is the purpose of the maxSurge property in a Kubernetes deployment rolling update strategy?
The maxSurge property controls the maximum number of additional Pods that can be created during a rolling update. It allows Kubernetes to temporarily exceed the desired replica count by either a specific number or percentage of Pods, ensuring that new Pods are created before terminating old ones to maintain availability.
How does the maxUnavailable property affect a rolling update in Kubernetes?
The maxUnavailable property defines the maximum number or percentage of Pods that can be unavailable at any given time during a rolling update. It ensures that a controlled number of Pods are taken offline while new ones are created, preventing excessive downtime and maintaining application availability.
What happens during a rolling update when maxSurge: 1 and maxUnavailable: 0 are set?
In this scenario, with a desired replica count of 3, Kubernetes creates one additional pod at a time while keeping all existing Pods running. No Pods are removed before the new ones become ready, ensuring zero downtime during the update.
How does a rolling update behave when maxSurge: 0 and maxUnavailable: 1 are configured?
With a desired replica count of 3, Kubernetes does not create any extra Pods (maxSurge: 0) but allows one pod to be unavailable at a time (maxUnavailable: 1). This means one Pod is terminated and replaced before the next one is updated, ensuring at least two Pods remain running at any moment.
What effect does setting maxSurge: 25% and maxUnavailable: 25% have on a rolling update?
If the desired replica count is 4, Kubernetes can create up to 1 additional Pod (25% of 4 = 1) and allow up to 1 Pod to be unavailable (25% of 4 = 1). This approach provides a balance between availability and update speed, ensuring minimal disruption while efficiently rolling out updates.
What is a Blue/Green Deployment, and how is it implemented in Kubernetes?
A Blue/Green Deployment runs two versions of an application simultaneously: Blue (current version) and Green (new version). Once the Green version is tested and verified, traffic is switched over from Blue to Green.
In Kubernetes, you can implement Blue/Green deployment as follows:
Create the Blue Deployment (current version):
kubectl create deploy blue-deployment --image=my-app:v1 --replicas=3 --dry-run=client -o yaml > blue-deployment.yamlvim blue-deployment.yaml# Set labels: app: my-app, version: blue in both deployment and pod metadatakubectl create -f blue-deployment.yaml
Create the Green Deployment (new version):
kubectl create deploy green-deployment --image=my-app:v2 --replicas=3 --dry-run=client -o yaml > green-deployment.yamlvim green-deployment.yaml# Set labels: app: my-app, version: green in both deployment and pod metadatakubectl create -f green-deployment.yaml
Switch traffic to Green once the Green version is verified:
kubectl patch service my-app-service -p '{"spec":{"selector":{"version":"green"}}}'kubectl get svc
Traffic will now route to the Green deployment, and you can scale down or delete the Blue version.
What is a Canary Deployment, and how can it be implemented in Kubernetes? (using ingress)
A Canary Deployment gradually introduces a new version of an application to a small percentage of users before full rollout. It allows real-world testing with minimal risk.
In Kubernetes, you can implement a Canary deployment as follows:
Create the Stable Deployment (current version):
kubectl create deploy stable-deployment --image=my-app:v1 --replicas=3 --dry-run=client -o yaml > stable-deployment.yamlvim stable-deployment.yaml# Set labels: app: my-app, version: stable in both deployment and pod metadatakubectl create -f stable-deployment.yaml
Create the Canary Deployment (new version):
kubectl create deploy canary-deployment --image=my-app:v2 --replicas=1 --dry-run=client -o yaml > canary-deployment.yamlvim canary-deployment.yaml# Set labels: app: my-app, version: canary in both deployment and pod metadatakubectl create -f canary-deployment.yaml
As the canary version proves stable, you can gradually increase traffic to it by adjusting the Ingress weights, eventually promoting it to stable.
How can you check the status of a rollout in Kubernetes?
You can check the status of a rollout using the following command:
kubectl rollout status deployment/myapp-deployment
How can you view the history and revisions of a deployment in Kubernetes?
To view the history and revisions of a deployment, use the following command:
kubectl rollout history deployment/myapp-deployment
What should you do if you realize something is wrong with the new version after a rollout, and you want to roll back to the previous version?
If you want to roll back to the previous version after realizing an issue with the new version, you can use the following command:
kubectl rollout undo deployment/myapp-deployment
What happens when you use the kubectl rollout undo command in Kubernetes?
When you run the kubectl rollout undo command, Kubernetes will destroy the Pods in the new replica set and bring up the older ones in the previous replica set, effectively reverting to the previous deployment version.
Namespaces
What is the default namespace in Kubernetes, and what resources does it hold?
The default namespace is automatically created when Kubernetes is set up. It is where resources like Pods, Deployments, and Services are created unless another namespace is specified.
How can you check which resources in Kubernetes are namespaced?
You can check which resources are namespaced by running the following command:
kubectl api-resources --namespaced=true
This will list all the resources that are scoped to a namespace. Resources that are not namespaced will have false under the “Namespaced” column.
What are the three default namespaces in Kubernetes, and what are their purposes?
default - Automatically created and used for most user workloads.
kube-system - Holds internal Kubernetes components like networking and DNS.
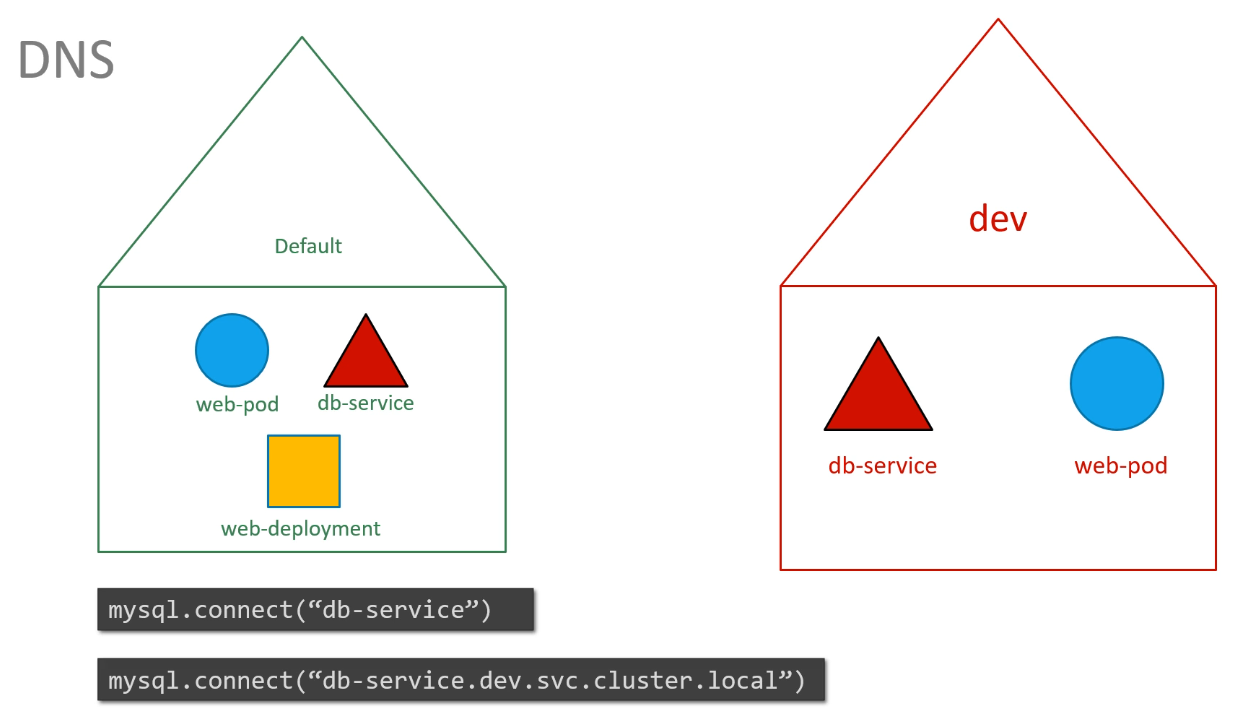
How does DNS work within a namespace in Kubernetes?
Within a namespace, resources can refer to each other by their simple names. For services in other namespaces, the full DNS name includes the namespace, service name, and the suffix svc.cluster.local. For example, dbservice.dev.svc.cluster.local is the DNS name for the dbservice in the dev namespace.
How do you access a service in a different namespace, for example, a DB service in the dev namespace?
To connect to a service in a different namespace, use the format:
dbservice.dev.svc.cluster.local
namespace in definition file
Moving the namespace to a file ensures that it always be created in that namespace
Imperative commands
How do you create a ClusterIP service named redis-service to expose the redis pod on port 6379? You can use the following command:
kubectl expose pod redis --port=6379 --name redis-service --dry-run=client -o yaml
What is the difference between the kubectl expose and kubectl create service commands for creating a ClusterIP service?
kubectl expose automatically uses the selected resource labels as selectors, while kubectl create service clusterip may assume defaults that do not match your pod labels unless explicitly set.
How would you create a NodePort service named nginx-service to expose the nginx pod's port 80 on node port 30080? Use the following command:
What command do you use to create a NodePort service without using the pod's labels as selectors? You can use the following command:
kubectl create service nodeport nginx --tcp=80:80 --node-port=30080 --dry-run=client -o yaml
How do you create a pod named httpd using the httpd:alpine image and expose it as a service of type ClusterIP on port 80 in a single step? You can achieve this with the following command:
kubectl run httpd --image=httpd:alpine --port=80 --expose --dry-run=client -o yaml
What happens if you remove the --dry-run=client -o yaml options from the kubectl run command for creating a pod and exposing it via a ClusterIP service?
The pod and service are created directly in the cluster instead of only printing the generated YAML.
How would you create a new pod named custom-nginx using the nginx image running on container port 8080? You can create it with the following command:
kubectl run custom-nginx --image=nginx --port=8080 --dry-run=client -o yaml
What is the resulting YAML configuration when creating a pod named custom-nginx using the nginx image and container port 8080? The YAML configuration generated would look like this:
How would you create a pod named httpd using the httpd:alpine image and expose it as a ClusterIP service with port 80? You can use the following command:
kubectl run httpd --image=httpd:alpine --port=80 --expose
What are the key aspects to check when creating a httpd pod and service of type ClusterIP? You need to check the following:
The httpd pod is created with the correct image (httpd:alpine).
The httpd service is of type ClusterIP.
The service uses the correct target port (80).
The httpd service exposes the httpd pod correctly.
Command and Args
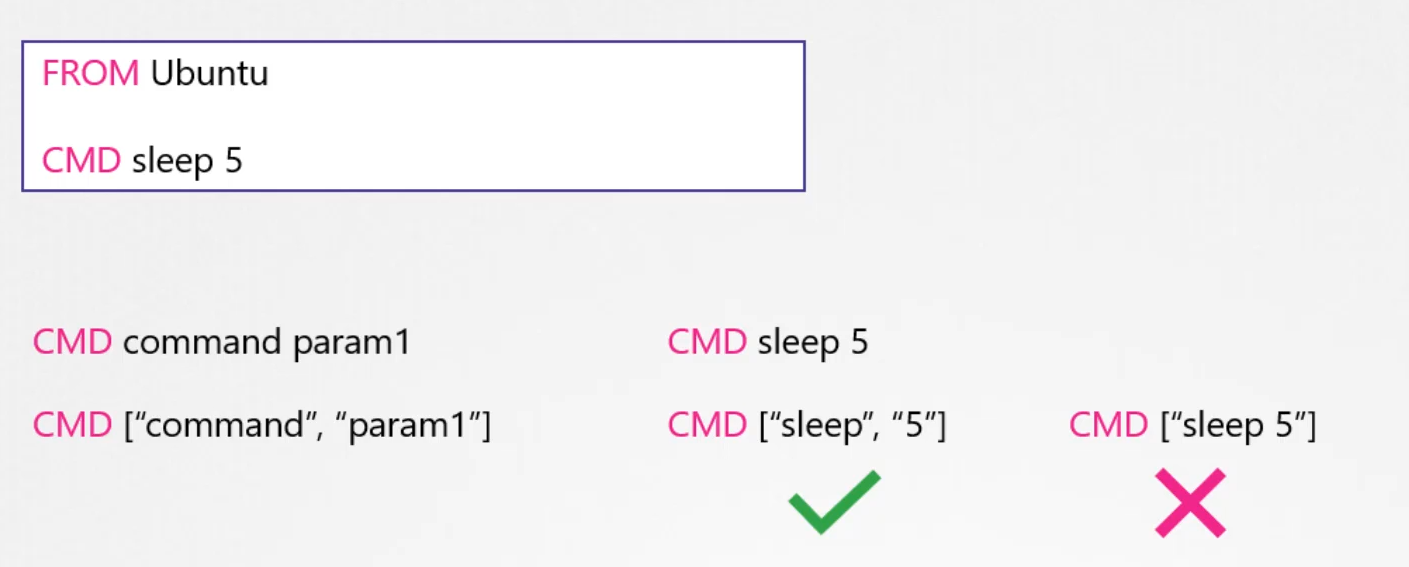
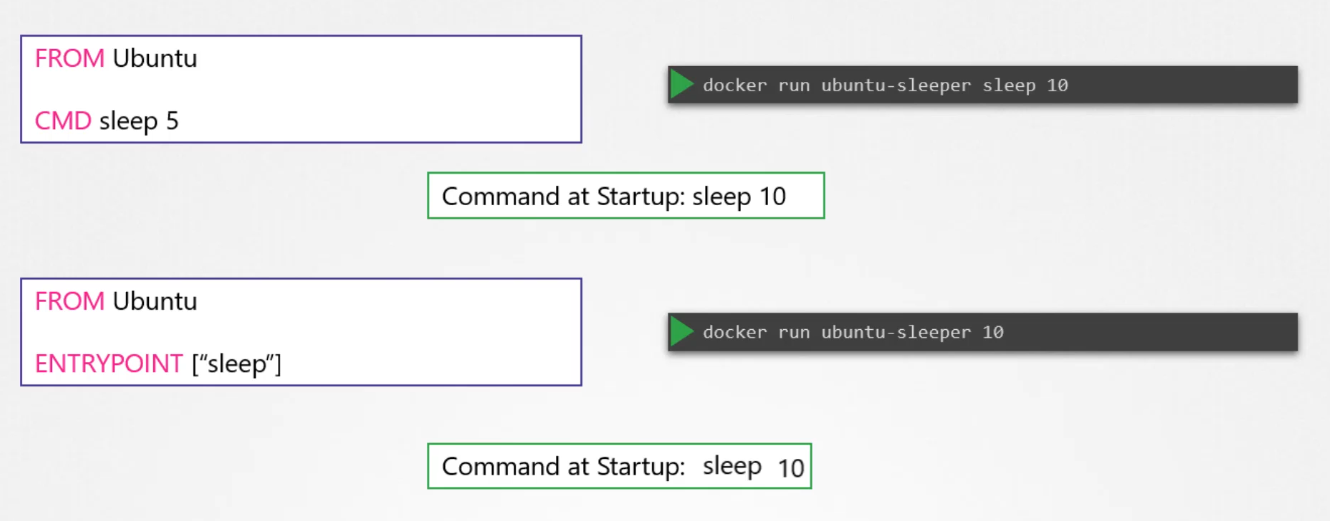
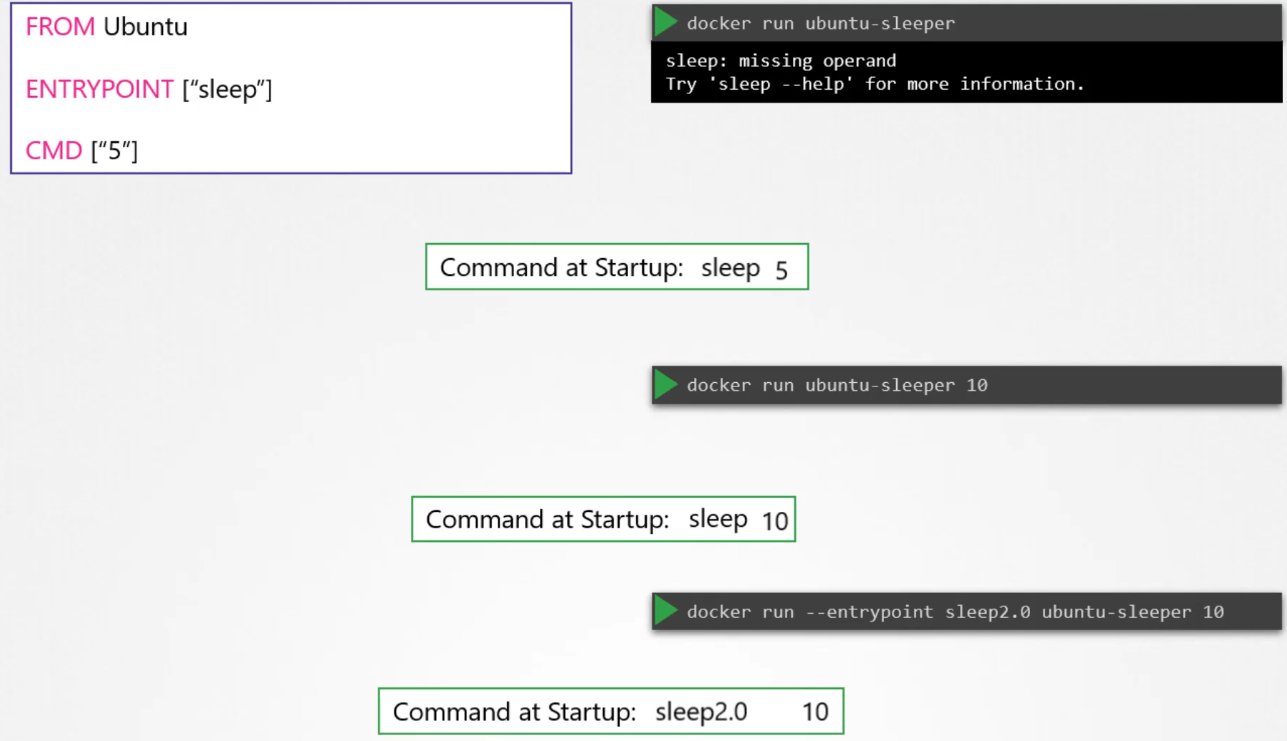
What is the difference between CMD and ENTRYPOINT in Docker?
CMD is used to provide default arguments for the entry point or a default command to run. It can be overridden when running the container. ENTRYPOINT, on the other hand, defines the main process to run in the container, and it doesn’t get overridden by default arguments. If both CMD and ENTRYPOINT are defined, CMD supplies the arguments to ENTRYPOINT.
When defining it in array format, the first element must be the executable.
How do you change the entry point at runtime for a Docker container?
You can change the entry point at runtime by using the --entrypoint flag in the docker run command. For example, docker run --entrypoint sleep ubuntu 10 will run the sleep command with an argument 10 instead of the default entry point.
What is the difference between ADD and COPY in Dockerfiles?
Both ADD and COPY copy files into the container, but ADD has additional features. ADD can automatically extract the contents of a tar file, and it can fetch files from a URL (though fetching from URLs is deprecated). COPY is simpler and doesn’t have these additional capabilities.
How can you save changes made to a container into an image in Docker?
You can save changes to a container into an image using the docker commit command. For example: docker commit -m "custom web server" -a "Sander van Vugt" myapache myapache
How do you use environment variables in Docker?
Environment variables in Docker can be set using the -e flag during container runtime. For example: docker run -e APP_COLOR=pink simple-webapp-color
Environment variables
How can you set environment variables for a Kubernetes Deployment using the kubectl command?
You can set environment variables in Kubernetes using the kubectl set env command. For example: kubectl set env deploy mydb MYSQL_ROOT_PASSWORD=password
How do you set environment variables for a pod in Kubernetes?
To set environment variables for a pod, you can define the env field within the container definition in the pod spec. For example:
This will set the environment variable MY_ENV_VAR with the value my-value in the container.
Can you set environment variables in a pod based on a specific condition or value?
Yes, you can conditionally set environment variables based on values using valueFrom in combination with Kubernetes features like ConfigMaps, Secrets, or Downward API for pod-specific information. Here’s an example of using the Downward API to set an environment variable based on pod metadata:
In this case, the environment variable POD_NAME will be set to the name of the pod.
How do you overwrite an existing environment variable in a Kubernetes pod?
To overwrite an existing environment variable in a pod, simply define the environment variable again in the pod specification. Kubernetes will override the existing value with the new one. Here’s an example:
This will override the value of the environment variable EXISTING_VAR with "new-value".
How do you view the environment variables set for a running pod?
You can view the environment variables of a running pod by using the following kubectl command:
kubectl exec pod-name -- printenv
This will display the environment variables for the container within the specified pod.
ConfigMap
How do you reference a ConfigMap in Kubernetes to set environment variables?
You can reference a ConfigMap in Kubernetes by using the envFrom property in the pod definition file. For example:
envFrom:
  - configMapRef:
      name: app-config
How can you rename a key from a ConfigMap when injecting it as an environment variable in Kubernetes?
You can rename a key from a ConfigMap when injecting it by using the name field in the env section and referencing the specific key in the ConfigMap. For example:
What is the purpose of Kubernetes ConfigMap and how is it created?
A ConfigMap in Kubernetes is used to store configuration data that can be used by containers in a pod. It can be created imperatively using commands like kubectl create cm or declaratively by defining it in a YAML file.
How can you load all the values from a ConfigMap as environment variables in Kubernetes?
You can load all the values from a ConfigMap as environment variables using the envFrom property in a pod definition file. For example:
envFrom:
  - configMapRef:
      name: app-config
What command is used to inspect the details of Docker containers?
The docker inspect command is used to get detailed information about Docker containers. docker inspect <container_id_or_name>
What is the user used to execute the sleep process within the ubuntu-sleeper pod?
In most training examples, the process runs as root unless the image sets a non-root USER.
kubectl exec ubuntu-sleeper -- whoami
What is the difference between data and stringData in a Kubernetes Secret?
data expects base64-encoded values, while stringData accepts plain text and Kubernetes encodes it for you when the Secret is created.
What is the difference between containerPort, Service port, and targetPort?
containerPort is metadata on the Pod container, Service port is the port exposed by the Service, and targetPort is the Pod port the Service forwards traffic to.
How do you pause and resume a Deployment rollout?
Use kubectl rollout pause deployment/<name> to pause and kubectl rollout resume deployment/<name> to continue.
What command in Docker allows you to commit changes made to a container and save it as a new image?
The command docker commit allows you to save changes made to a container as a new image. For example, docker commit -m "custom web server" -a "Sander van Vugt" myapache myapache saves the container with the name myapache as an image with the same name.
How do you tag a Docker image to target a specific registry?
You can tag a Docker image to a specific registry by using the docker tag command. For example:
docker tag myapache localhost:5000/myapache:1.0
This tags the myapache image to be pushed to the localhost:5000 registry with the version 1.0.
What is the function of namespaces in Linux-based containers?
In Linux-based containers, namespaces provide isolation between different system components. They separate key aspects like:
Network
Files
Users
Processes
Inter-Process Communication (IPC)
This isolation ensures that each container operates independently without interfering with others on the host system.
How can you use Kubernetes environment variables declaratively in a Pod?
To set environment variables declaratively in a Kubernetes Pod, you can include them in the env field in the container specification of the Pod definition file. For example:
How can you set an environment variable in a Kubernetes Deployment using the kubectl command?
You can set an environment variable in a Kubernetes Deployment by using the kubectl set env command. For example:
kubectl set env deploy mydb MYSQL_ROOT_PASSWORD=password
This will set the environment variable MYSQL_ROOT_PASSWORD to password in the mydb Deployment.
What is the function of a ConfigMap in Kubernetes, and how do you create one?
A ConfigMap in Kubernetes stores configuration data that can be used by containers in Pods. You can create a ConfigMap using either the imperative or declarative method. For example, using the imperative method:
kubectl create cm myconfig --from-literal=APP_COLOR=blue
Alternatively, you can define a ConfigMap in a YAML file and apply it using kubectl apply -f configmap.yaml.
Secrets
What are the benefits of using Secrets?
They reduce the risk of accidental exposure of sensitive data and keep it out of Pod definitions.
Are all Secrets created by users?
No, some Secrets are automatically created by the system.
What is the significance of system-created Secrets?
They are crucial for Kubernetes resources to connect to other cluster resources.
What is the docker-registry Secret type used for?
Connecting to a Docker registry.
Give an example of creating a generic Secret from a file.
How can you imperatively provide a Secret to a Deployment?
Create the secret, then use
kubectl set env deploy <deployment_name> --from=secret/<secret_name>
What is the first step in creating a Secret declaratively?
Generate base64-encoded values for the secret data.
What command is used to base64 encode a string?
echo -n "string" | base64
How do you view existing Secrets in a Kubernetes cluster?
kubectl get secrets
When a Secret is mounted as a volume, what happens to each key in the Secret?
Each key becomes a file within the mounted volume, and the value associated with the key becomes the content of that file.
What are some recommended practices for handling Secrets securely?
Avoid committing Secret files to version control (e.g., GitHub), encrypt ETCD, use RBAC to restrict access, and consider third-party Secret providers.
What are Kubernetes Secrets used for?
Kubernetes Secrets are used for storing sensitive data such as passwords, authentication tokens, and SSH keys. They allow storing such data securely without having to put it in a Pod, reducing the risk of accidental exposure.
How are Kubernetes Secrets encoded?
Kubernetes Secrets are base64-encoded, but they are not encrypted by default.
What are the three types of Kubernetes Secrets?
The three types of Kubernetes Secrets are:
docker-registry: Used for connecting to a Docker registry.
TLS: Used to store TLS key materials.
generic: Creates a secret from a local file, directory, or literal value.
How would you create a TLS Secret in Kubernetes?
You can create a TLS Secret using the following command:
What is the difference between Secrets and ConfigMaps in Kubernetes?
ConfigMaps store data in plain text, making them unsuitable for sensitive information like passwords. Secrets, on the other hand, are used to store sensitive data securely (though base64-encoded, not encrypted by default).
How can you create a generic Secret imperatively in Kubernetes?
You can create a generic Secret imperatively like this:
What is the difference between Pod-level and Container-level security settings in Kubernetes?
Pod-level security settings are applied to all containers within a pod, while Container-level security settings are specific to the container they are defined for. If both are applied, the container’s security settings will override those set at the pod level.
How can you configure security settings at the pod level in Kubernetes?
To configure security settings at the pod level, you define the securityContext under the spec field in the pod specification. For example:
This will set the pod-level security settings such as runAsUser, runAsGroup, and fsGroup, applying them to all containers in the pod.
How do container-level security settings differ from pod-level security settings in Kubernetes?
Container-level security settings are defined within the securityContext field of a specific container in the pod. These settings only affect that container, even if the pod has its own security settings. If both pod and container-level security settings are specified, the container’s settings will override the pod’s settings.
How does process isolation work in Kubernetes containers?
Kubernetes uses Linux namespace security isolation, ensuring that a container can only see its own processes. However, the host system can view both the container’s processes and its own processes, but with different process IDs (PIDs), which provides isolation between the host and containers.
Is the root user inside a container the same as the root user on the host system?
No, the root user inside a container is not identical to the root user on the host system, although both have the same UID (0). Docker applies various security mechanisms to limit the capabilities of the root user inside the container, preventing it from performing operations on the host system unless explicitly allowed.
What are the risks of running a container as the root user?
Running containers as root is risky because, even though Docker limits the root user’s power inside the container, if the container escapes its isolation or exploits vulnerabilities, it could gain control over the host system. It’s recommended to avoid running containers as root unless absolutely necessary.
How does Docker manage the root user privileges within containers?
Docker limits the root user’s privileges using Linux capabilities, which are granular controls over the actions the root user can perform. For example, containers cannot:
Reboot the host.
Modify kernel parameters.
Change the network configuration of the host.
Docker reduces the root user’s capabilities to the minimum needed for most tasks.
How can you grant additional privileges to a container's root user?
You can grant additional privileges by using the --cap-add option when running the container. This allows you to add specific capabilities to the root user inside the container.
How can you further restrict a container’s privileges in Kubernetes?
To further restrict a container’s privileges, you can use the --cap-drop option, which removes specific capabilities, making the container more restricted.
What is a privileged container in Kubernetes, and why is it discouraged?
A privileged container is one that has nearly the same level of access as the root user on the host system, granted by the --privileged flag. It’s highly discouraged for security reasons, as it gives the container almost unrestricted access to the host system, increasing the risk of a security breach.
How can you view the security context of a Kubernetes pod?
You can view the security context of a pod using the following command:
$ kubectl explain pod.spec.securityContext | less
This command provides detailed information about the security settings of a pod in Kubernetes.
What are best practices for managing container root privileges?
Best practices for managing container root privileges include:
Avoid running containers as root unless necessary.
Use the --cap-add option to grant only required capabilities.
Use the --cap-drop option to remove unnecessary capabilities.
Refrain from using the --privileged flag as it grants the container unrestricted access to the host system.
Service Account
What are the types of accounts in Kubernetes, and what are they used for?
Kubernetes has two types of accounts:
User accounts: These are used by humans, such as developers deploying applications or administrators managing the cluster.
Service accounts: These are used by applications and automated tools, such as Prometheus or Jenkins, to interact with the Kubernetes API.
What is the default service account in Kubernetes, and what are its limitations?
Every Kubernetes namespace comes with a default service account, which is automatically created. This service account allows pods to contact the API server but has limited permissions, typically restricted to basic API queries. The default service account token is automatically mounted to pods as a volume.
How can a Kubernetes pod use a custom service account?
To use a custom service account, you can specify the serviceAccountName in the pod’s definition file like this:
This will associate the pod with the specified service account.
How does Kubernetes handle automatically mounting service account tokens to pods?
By default, Kubernetes automatically mounts the service account token for a pod as a volume, unless specified otherwise. If you do not want this behavior, you can disable it by setting automountServiceAccountToken: false in the pod specification:
What security improvements were introduced in Kubernetes 1.22 regarding service accounts?
Kubernetes 1.22 introduced Bound Service Account Tokens via the TokenRequestAPI. These tokens are:
Time-bound (with an expiry date).
Audience-bound (specific to the requesting API).
Object-bound (specific to the service account).
This new approach replaces the older system of non-expiring tokens and enhances security by limiting token lifespan and scope.
What changes were made to service account token management in Kubernetes 1.24?
In Kubernetes 1.24, secret-based token generation was removed. Now, to generate a token for a service account, you must manually create it using the kubectl create token command. These tokens are time-bound, with a default expiry of one hour. Non-expiring tokens can still be created manually, but this is discouraged due to security concerns.
How can a service account token be securely mounted inside a pod?
You can securely mount a service account token into a pod by using the TokenRequestAPI. For example, you can specify the token’s expiration time and audience in the pod specification:
What is the role of RBAC in Kubernetes service account permissions?
RBAC (Role-Based Access Control) allows administrators to control what a service account can access. Permissions can be granted through Roles (which define the permissions) and RoleBindings (which link a service account to a role). Custom service accounts can be created and given specific roles to access Kubernetes resources.
How can you troubleshoot service account authentication problems in Kubernetes?
To troubleshoot service account authentication problems, you can check the RBAC configurations and use the kubectl auth can-i command to verify the permissions for a specific action. For example:
$ kubectl auth can-i create pods
Additionally, the service account’s token can be checked via kubectl describe secret <secret-name>.
Resource requirements
What are resource requests and limits in Kubernetes?
Resource Requests: These are the minimum amount of CPU and memory that a pod needs to run effectively. Kubernetes ensures that the pod gets these resources when it is scheduled on a node. Resource Limits: These are the maximum resources a pod can use. If a pod exceeds its memory limit, it will be terminated with an “Out of Memory” (OOM) error. CPU limits throttle the pod’s CPU usage but don’t kill the pod.
What happens when resource requests or limits are not set?
By default, Kubernetes doesn’t set any resource requests or limits, which can lead to resource contention. If multiple pods are running on the same node without these settings, one pod can monopolize the available CPU or memory, potentially causing other pods to fail or get starved for resources.
How does the Kubernetes scheduler place pods on nodes based on resource requests?
The Kubernetes scheduler places pods on nodes based on available resources. If a node has enough resources to meet the pod’s requested CPU and memory, the pod is scheduled there. If no node has enough resources, the pod remains in a “Pending” state.
What is the purpose of setting resource requests and limits in a pod definition?
Setting resource requests ensures that a pod gets the guaranteed amount of resources it needs to function properly. Setting resource limits prevents a pod from using more resources than it should, avoiding resource contention and potential crashes.
What are LimitRanges in Kubernetes?
LimitRanges are used to define default resource requests and limits at the namespace level. This ensures that all pods in a namespace have default resources if not explicitly set. You can also use LimitRanges to enforce maximum and minimum resource values for pods.
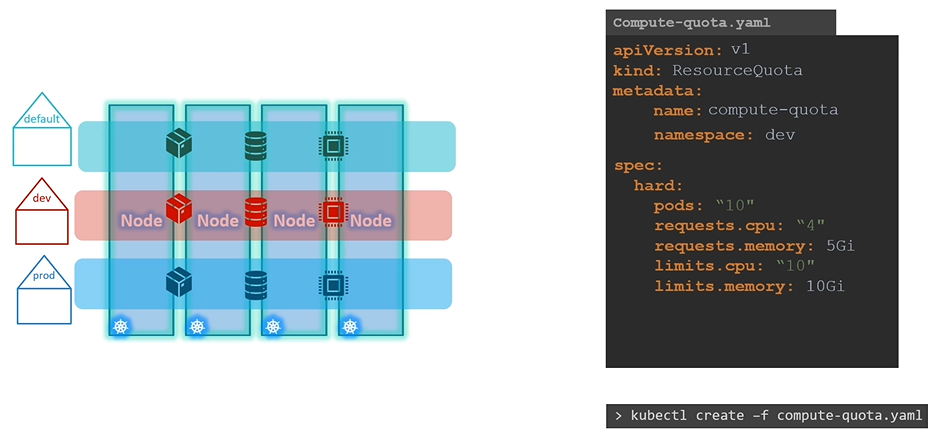
What are ResourceQuotas in Kubernetes, and how are they used?
ResourceQuotas limit the total amount of CPU and memory that can be consumed by all pods in a namespace. This is useful in environments where multiple teams share the same Kubernetes cluster. Resource quotas help prevent any single team from consuming more than its fair share of resources.
How does Kubernetes handle resource limitations when there are insufficient resources?
If there are insufficient resources available on any node in the cluster, the pod will remain in a Pending state. The Pending status indicates that the pod couldn’t be scheduled due to insufficient resources, and the reason can be investigated with the kubectl describe pod command.
What is the default resource request for a pod in Kubernetes, and how can it be modified?
By default, Kubernetes assumes a pod or its container needs 0.5 CPU and 256Mi of memory, known as the Resource Request. If your application requires more resources than these defaults, you can specify the requested resources in the pod definition file, like so:
What happens if no node can satisfy the requested resources for a pod?
If no node in the cluster has enough resources to meet the pod’s requests, the pod will remain in a Pending state. You can check the reason for this using the kubectl describe pod command, which will show an “insufficient resources” error.
How does the Kubernetes scheduler behave when there are no available resources on the nodes?
In a 3-node Kubernetes cluster, if none of the nodes have enough available resources (CPU, memory, or disk), the Kubernetes scheduler will delay scheduling the pod. As a result, the pod will remain in a Pending state. The event logs will show the reason as “Insufficient CPU” or “Insufficient memory” depending on which resource is lacking.
What happens when a pod exceeds its resource limits in Kubernetes?
When a pod tries to exceed its resource limits:
If it uses more memory than allowed, an Out of Memory (OOM) error will be triggered, and the pod will be killed.
If it requests more CPU or memory than what’s available on the node, an insufficient resources error will occur, and the pod will remain in the Pending state.
Taints and tolerations
What is the analogy used to explain taints and tolerations in Kubernetes?
The analogy compares taints and tolerations to a bug and a person: a taint is like a repellent applied to a person to keep the bug away, and tolerations are like the bug’s ability to withstand the repellent.
What role do taints and tolerations play in Kubernetes?
Taints are applied to nodes to control which pods can be scheduled on them, while tolerations are applied to pods to specify which taints they can tolerate.
What happens when a taint is applied to a node in Kubernetes?
When a taint is applied to a node, it prevents any pod without a matching toleration from being scheduled on that node.
What is the relationship between taints and tolerations in Kubernetes?
Taints are set on nodes, and tolerations are applied to pods. Tolerations allow pods to be scheduled onto nodes that have matching taints.
How does the kubectl taint nodes command work?
The command is used to apply a taint to a node by specifying the node name, key-value pair, and the taint effect (e.g., NoSchedule, PreferNoSchedule, NoExecute).
What are the three taint effects in Kubernetes?
The three taint effects are: NoSchedule, PreferNoSchedule, and NoExecute.
What is the effect of the NoSchedule taint effect on existing pods?
Pods that are already running on the node will not be affected by the taint, but no new pods will be scheduled on that node unless they tolerate the taint.
How does the PreferNoSchedule taint effect affect pod scheduling?
The scheduler will try to avoid scheduling pods on the tainted node, but it is not guaranteed that no pod will be scheduled.
What happens when the NoExecute taint effect is applied to a node?
New pods will not be scheduled on the node, and any existing pods that do not tolerate the taint will be evicted and need to be rescheduled on another node.
What is the purpose of tolerations in Kubernetes?
Tolerations are applied to pods to allow them to be scheduled onto nodes that have matching taints.
How do you define tolerations in a pod's configuration?
Tolerations are defined in the tolerations section of a pod’s YAML specification, where you specify the key, operator, value, and effect.
Why is a taint added to the master node in Kubernetes?
A taint is added to the master node to ensure that no pods are scheduled on it, keeping the master node dedicated to control plane operations.
What command can be used to view the taints applied to a node?
The command kubectl describe node <node-name> | grep Taint can be used to view the taints applied to a node.
Can a pod be scheduled on a node that has a taint but without a matching toleration?
No, a pod cannot be scheduled on a node that has a taint unless the pod has a toleration for that taint.
How does Kubernetes handle pods already running on a node when a taint is added?
If the taint effect is NoSchedule or PreferNoSchedule, existing pods will not be affected, but if the effect is NoExecute, existing pods without a matching toleration will be evicted.
What happens if a pod is scheduled on a node that does not tolerate the node's taint?
The pod will not be scheduled on that node. If it’s already running there and the taint effect is NoExecute, the pod will be evicted.
Node Selectors & Node Affinity
What is the purpose of Node Selectors in Kubernetes?
Node Selectors are used to constrain a Pod to run on particular nodes or to prefer running on certain nodes by using labels. The nodeSelector property in the Pod spec allows the scheduler to match nodes based on the specified labels.
How do you label a node in Kubernetes?
To label a node in Kubernetes, you use the kubectl label nodes command, followed by the node name and the key-value pair for the label. For example: kubectl label nodes node-1 size=Large.
What happens when a node label is changed in Kubernetes?
If a node label is changed, the behavior depends on the type of affinity specified. With Node Affinity, Pods may continue to run on a node even if its label is changed (unless using “required during execution,” which would evict the Pod if the label no longer matches).
How do Node Selectors differ from Node Affinity?
Node Selectors are simpler and can only match exact labels on nodes. Node Affinity, on the other hand, allows more complex rules and gives greater flexibility by supporting expressions like In, Exists, or NotIn.
What is the difference between Required and Preferred Node Affinity during scheduling?
Required Node Affinity mandates that a Pod must be scheduled on a node that meets the affinity rules, or it won’t be scheduled. Preferred Node Affinity allows the scheduler to place the Pod on any available node if a matching node isn’t found, but it tries to place it on a preferred node if possible.
How does Node Affinity behave during execution if node labels are changed?
Node Affinity can be set to ignore changes in node labels during execution, allowing Pods to continue running on nodes even if the labels are modified. A new option “required during execution” is expected in the future, which would evict Pods if their node labels no longer match the affinity rules.
What are the limitations of Node Selectors in Kubernetes?
Node Selectors are limited because they can only match nodes using exact label-value pairs and don’t support more complex expressions or conditions. For more complex scenarios, Node Affinity should be used.
How do Taints and Tolerations differ from Node Affinity in Kubernetes?
Taints and Tolerations control whether a node accepts a Pod, while Node Affinity attracts Pods to particular nodes. Taints prevent Pods from being scheduled on certain nodes unless the Pod has the corresponding toleration. Node Affinity doesn’t prevent other Pods from being scheduled on the node, it only attracts them.
How can Taints, Tolerations, and Node Affinity be used together?
Taints, Tolerations, and Node Affinity can be combined to ensure that certain Pods are scheduled on specific nodes. Taints and Tolerations restrict which nodes accept which Pods, while Node Affinity can direct Pods to specific nodes if available.
How can you deploy an additional scheduler in Kubernetes?
You can deploy an additional scheduler in Kubernetes by downloading the scheduler binary and creating a custom scheduler pod definition. Afterward, you can create Pods that specify the custom scheduler by using the schedulerName property in the Pod spec.
How do you view the scheduler logs in Kubernetes?
You can view the scheduler logs by using the kubectl logs command, followed by the scheduler pod name and namespace. For example: kubectl logs my-custom-scheduler -n kube-system.
How do you create a Pod that uses a custom scheduler in Kubernetes?
To create a Pod that uses a custom scheduler, you need to include the schedulerName property in the Pod’s spec, specifying the name of the custom scheduler. For example:
What is the difference between Taints and Tolerations and Node Affinity in Kubernetes, and when should you use both together?
Taints and Tolerations are used to restrict nodes to accept certain Pods. They allow you to prevent Pods from being scheduled on nodes that are not tainted with the appropriate toleration. However, they do not guarantee that Pods will only be placed on the nodes with matching tolerations; Pods could still end up on other nodes without any taint or toleration.
On the other hand, Node Affinity is a mechanism to attract Pods to specific nodes based on node labels. It helps to ensure that Pods are scheduled on nodes with matching labels, but it does not prevent other Pods from being scheduled on those same nodes.
In scenarios where you want to completely dedicate nodes to specific Pods (e.g., ensuring a coloured Pod always goes to a specific node), using a combination of Taints and Tolerations and Node Affinity together is the best approach. This combination ensures that:
The correct Pod can be accepted by nodes with the appropriate taints.
The node affinity rules prevent other Pods from being scheduled on the same nodes.
This approach helps to ensure a more precise control over Pod scheduling and node utilization.
Multi Container POD
What happens when one container in a multi-container Pod needs updating?
Both containers will be brought down for the upgrade.
What is the role of a sidecar container in a multi-container Pod?
A sidecar container provides additional functionality to the main container, such as logging, monitoring, and syncing, where running this functionality in a separate Pod wouldn’t make sense.
How do the main and sidecar containers share resources in a multi-container Pod?
The main container and the sidecar container share resources to exchange information, often using shared volumes.
What is the role of Istio in multi-container Pods?
Istio service mesh injects sidecar containers into Pods to enable traffic management.
How is networking between containers in a multi-container Pod facilitated?
Networking between containers is easier since they can refer to each other as localhost.
How do you create a new multi-container Pod in Kubernetes?
You can create a new multi-container Pod by adding the container information to the Pod definition file, like this:
What is a real-world scenario where the Sidecar pattern is used in Kubernetes?
The Sidecar pattern is used in scenarios like deploying a logging agent alongside an application to collect logs and send them to a log server or in service meshes for observability and networking, such as with Istio.
How does the Sidecar pattern assist in service meshes like Istio?
In service meshes, the Sidecar pattern is used to manage networking, security, and observability, such as traffic routing, load balancing, monitoring, and logging, by deploying a sidecar proxy like Envoy alongside each service.
What is the purpose of the Adapter pattern in Kubernetes?
The Adapter pattern is used to integrate components with incompatible interfaces, such as converting the interface of a legacy system to a modern API or integrating different payment gateways with a unified interface.
How does the Adapter pattern help with legacy system integration?
The Adapter pattern can wrap a legacy system’s interface and convert it into a modern REST API format, such as converting SOAP/XML responses into JSON for easier consumption by modern services.
What is the role of an Ambassador container in a multi-container Pod?
An Ambassador container acts as a proxy for the main container, representing it to the outside world and handling tasks like retries, logging, and adding authentication headers to outgoing requests.
In what scenario would the Ambassador pattern be used with external services?
The Ambassador pattern can be used to manage retries, logging, and security for outgoing API requests in a microservices architecture when services need to communicate with external services like payment gateways or third-party APIs.
How does the Ambassador pattern work in database access with caching and metrics?
The Ambassador pattern can introduce caching to reduce load on the database, record metrics about database queries, and manage fallback mechanisms when the database becomes temporarily unavailable.
What are some use cases where multi-container Pods are beneficial in Kubernetes?
Multi-container Pods are useful for scenarios like sidecar containers for logging, ambassador containers for proxying, and adapter containers for matching data patterns between applications.
How do you check available Kubernetes API resources related to multi-container Pods?
You can use the command kubectl api-resources | less to check available Kubernetes API resources.
Logging & Monitoring
How can you monitor resource consumption in Kubernetes?
You can monitor resource consumption at both the cluster and pod level. At the cluster level, you monitor nodes, including their health and performance metrics like CPU, memory, RAM, and disk usage. At the pod level, you track the number of pods, their health, and their performance usage.
What are the key performance metrics to monitor at the node level in Kubernetes?
At the node level, the key performance metrics to monitor include the number of nodes, the health of the nodes, and performance metrics like CPU, memory, RAM, and disk usage.
What are the metrics that can be monitored at the pod level in Kubernetes?
At the pod level, you can monitor the number of pods, the health of the pods, and their performance usage.
What is the difference between Heapster and metrics server in Kubernetes?
Heapster has been deprecated, and a slimmed-down version known as the “metrics server” has replaced it. The metrics server is an in-memory solution, meaning it does not store historical data, unlike Heapster.
What component of Kubernetes is responsible for sending retrieved performance metrics from pods to the metrics server?
The Kubelet contains a sub-component called “cAdvisor,” which is responsible for sending retrieved performance metrics from pods to the metrics server.
How can you deploy the metric server in Kubernetes?
You can deploy the metric server by cloning the GitHub repository with the command:
What command is used to view cluster performance in Kubernetes?
To view cluster performance in Kubernetes, use the following command:
$ kubectl top node
How can you view the performance metrics of a pod in Kubernetes?
To view the performance metrics of a pod in Kubernetes, use the following command:
$ kubectl top pod
How can you view logs of a single container in a pod in Kubernetes?
To view the logs of a single container in a pod, use the following command:
$ kubectl logs -f pod-name
How can you view logs of a specific container within a pod in Kubernetes?
If a pod has multiple containers, you must specify the container name in the command to view its logs:
$ kubectl logs -f pod-name container-name
What command would you use to view cluster-wide events in Kubernetes?
To view cluster-wide events in Kubernetes, use the following command:
$ kubectl get events
How can you get more detailed information about cluster events in Kubernetes?
To get a more detailed overview of cluster-wide events, use:
$ kubectl get events -o wide
When should you use kubectl get events versus kubectl describe [resource]?
Use kubectl get events when you’re unsure which resource an error relates to. If you know the specific resource involved, it’s better to use kubectl describe [resource] for more targeted information.
Init Containers
What is an init container in Kubernetes, and how does it work?
An init container is an additional container that runs before the main or regular container starts. It performs a task (like setup or configuration) that must complete before the main container can start. If the init container doesn’t complete, the main container will not start. Init containers always run to completion, regardless of how long it takes.
How can the main container and init containers share data in Kubernetes?
The best approach for sharing data between the main container and init containers in Kubernetes is to use a shared volume. This allows both containers to access the same data storage.
Can you provide an example of a Pod with init containers waiting for a service to be available in Kubernetes?
Yes, here’s an example where init containers wait for myservice and mydb to be available via DNS lookup before the main container starts:
What happens if an init container does not complete in Kubernetes?
If an init container does not complete, the main container will not start. The init container must successfully finish its task before the main container is allowed to begin its execution.
Labels Selectors
What is a label in Kubernetes and how is it used?
A label in Kubernetes is a key-value pair that provides additional information about resources. Labels are used to categorize resources like Deployments and Services, and they utilize selectors to link related resources.
How can administrators use labels in Kubernetes?
Administrators can manually set labels to facilitate the management and selection of resources in Kubernetes. This allows for efficient organization and grouping of resources.
How can you find all resources matching a specific label in Kubernetes?
To find all resources matching a specific label, you can use the command kubectl get <resource> --selector key=value, where key=value is the label you want to filter by.
What is a selector in Kubernetes?
A selector in Kubernetes is used to filter resources based on labels. It allows you to choose resources that match specific criteria, such as filtering by class or color.
What are auto-created labels in Kubernetes?
Kubernetes automatically creates labels for certain resources. For example, Deployments created with kubectl create automatically get a label app=appname, and Pods started with kubectl run automatically get a label run=podname.
How do you specify labels in Kubernetes?
Labels can be specified in the metadata section of a Kubernetes resource, like in the following example for a Pod:
How do you select a pod with a specific label in Kubernetes?
Once a pod is created with a label, you can select it by using the command kubectl get pods --selector app=App1, where app=App1 is the label you want to filter by.
How does Kubernetes leverage labels in Deployments and Services?
In Kubernetes, Deployments and Services use selectors to find and manage related resources. A Deployment uses a selector to find its Pods, and a Service uses a selector to find its endpoint Pods.
What is the purpose of a ReplicaSet label in Kubernetes?
A ReplicaSet label in Kubernetes is used to identify the ReplicaSet itself and to target the Pods it manages. The ReplicaSet uses a selector to find and manage the Pods based on their labels.
How does a ReplicaSet ensure the desired number of Pods are running?
A ReplicaSet ensures that a specific number of Pods are running by using its selector to monitor and manage the Pods. Even if Pods are created separately, the ReplicaSet can monitor them and maintain the desired replication factor.
How does a Service use labels in Kubernetes?
A Service in Kubernetes uses labels to select and target Pods for managing endpoints. The Service and ReplicaSet both rely on Pod labels to find and manage Pods.
What are annotations in Kubernetes and how are they different from labels?
Annotations in Kubernetes are used to provide detailed metadata about resources, such as license information or build versions. Unlike labels, annotations cannot be used in queries and are not used for grouping resources. They are intended for informational purposes.
Can annotations be used in queries in Kubernetes?
No, annotations cannot be used in queries. They are primarily for storing additional details about resources, but unlike labels, they are not intended for selection or grouping.
Can you provide an example of a Kubernetes resource with annotations?
Yes, here’s an example of a ReplicaSet with annotations:
How can you view the labels of all resources in Kubernetes?
You can view the labels of all resources in Kubernetes by running the command kubectl get all --show-labels.
Jobs and Cron Jobs
What should you use in Kubernetes if you need a Pod that runs until it completes a task
You should use a Job instead of a Pod when you need a task to run until completion, like backups, calculations, or batch processing.
What is the default restart policy of a Pod in Kubernetes, and how does it affect tasks that run to completion
The default restart policy of a Pod in Kubernetes is set to “Always,” meaning the Pod will keep restarting whenever it exits. This can cause an issue when running tasks that complete, as the Pod will try to run the task again.
How can you prevent Kubernetes from restarting a container after it finishes a task
You can change the Pod’s restart policy to “Never” or “OnFailure” to prevent Kubernetes from restarting the container after it completes its task.
What does a Job in Kubernetes do
A Job is used to run a set of Pods that perform a task until completion, unlike a ReplicaSet, which ensures a specific number of Pods are always running.
What happens when a Pod in a Job fails in Kubernetes
When a Pod in a Job fails, Kubernetes will create a new Pod to replace it and continue until the specified number of successful completions is reached.
How do you define the number of completions for a Job in Kubernetes
You can define the number of completions for a Job using the completions field in the Job specification.
What is the purpose of the backoffLimit field in a Kubernetes Job specification
The backoffLimit field specifies the number of retries allowed for failed Pods in a Job. Once the limit is reached, no more Pods will be created.
How can you run Pods in parallel within a Job in Kubernetes
You can run Pods in parallel within a Job by adding the parallelism property to the Job specification. For example, setting parallelism: 3 will create three Pods simultaneously.
What happens when you set parallelism: 3 in a Kubernetes Job
When you set parallelism: 3, Kubernetes will create three Pods simultaneously. If two of them succeed, Kubernetes will only create one more Pod to meet the required number of successful completions.
What is a CronJob in Kubernetes and how is it different from a regular Job
A CronJob is similar to a regular Job but can be scheduled to run at specific times, using a Cron-like format string. This makes it ideal for periodic tasks.
What is the structure of a CronJob specification in Kubernetes
A CronJob specification in Kubernetes contains three spec sections: one for the CronJob, one for the Job, and one for the Pod. The CronJob section defines the schedule, while the Job section contains the task definition, and the Pod section defines the containers.
How can you create a CronJob in Kubernetes
You can create a CronJob by defining its specification in a YAML file and then using the kubectl create command. You can check the newly created CronJob with kubectl get cronjob.
How does a CronJob handle the creation of Jobs and Pods in Kubernetes
A CronJob handles the creation of Jobs and Pods based on the defined schedule. It automatically triggers new Jobs at the specified times and ensures the necessary Pods are created for the Jobs to run.
Services
Why can't we rely on the IP addresses of Pods for internal communication in Kubernetes?
Because Pod IP addresses are dynamic and change when Pods go down and come back up, making them unsuitable for stable internal communication.
What does Kubernetes Service do to address the challenges of connecting to Pods?
Kubernetes provides a Service resource that exposes a logical set of Pods, allows for load balancing, and provides access to Pods even if they fail or are moved.
What is the role of the kube-controller-manager in a Kubernetes Service?
The kube-controller-manager continuously monitors Pods that match the selector specified in the Service and includes them in the Service. If Pods are added or removed, the Service is updated.
Why are endpoints not shown in kubectl describe svc?
Endpoints are dynamic and do not appear in the Service description. To view them, kubectl get endpoints should be used.
How does a Kubernetes Service provide loose coupling between microservices?
A Service abstracts the communication between Pods, ensuring that the microservices do not directly depend on the IP addresses or internal details of each other.
What are two ways an external user can access a web page in Kubernetes?
SSH into the node and access the Pod directly.
Access through the node configured with services that route traffic to the Pod.
How does the ClusterIP service type work in Kubernetes?
The ClusterIP service type exposes a service within the cluster by allocating a virtual IP address that is only accessible from within the cluster.
What is the default Kubernetes service type?
The default service type is ClusterIP, which provides an internal virtual IP for communication within the cluster.
What is the significance of the targetPort, port, and nodePort in a Kubernetes service definition?
targetPort is the port on the container, port is the service port, and nodePort is the external port exposed on the node when using a NodePort service type.
What does the NodePort service type do in Kubernetes?
The NodePort service type exposes a service on a specific port on every node in the cluster, allowing external access to the service.
What are the main differences between the ClusterIP and NodePort service types?
ClusterIP is used for internal communication within the cluster, while NodePort exposes a port on every node, allowing external traffic to reach the service.
How does Kubernetes load balancing work when Pods are distributed across multiple nodes?
Kubernetes ensures that the Service is expanded across multiple nodes, and traffic is balanced across Pods even if they are added or removed.
How can you expose the redis pod within the cluster on port 6379 using Kubernetes?
Use the command kubectl expose pod redis --port=6379 --name redis-service.
What is the role of kube-proxy in Kubernetes services?
kube-proxy watches the Kubernetes API for new Services and endpoints, sets up iptables rules on nodes, and redirects traffic to the appropriate Pods.
How can you create a ClusterIP service for the redis pod in Kubernetes?
Use the command kubectl expose pod redis --port=6379 --name redis-service --dry-run=client -o yaml.
What command would you use to expose a deployment as a NodePort service?
Use the command kubectl expose deployment nginx --port=80 --name nginx-service --type=NodePort.
What is the default range for the NodePort in Kubernetes?
The default range for NodePort is 30000-32767.
How does a Kubernetes LoadBalancer service type work?
The LoadBalancer service type provisions an external load balancer, typically used in public cloud environments, to route traffic directly to Pods.
How do you verify the details and endpoints of a service in Kubernetes?
Use the command kubectl describe svc <service-name> to check the details and endpoints.
How can services be accessed externally when using the NodePort service type?
External users can access the service through the node’s IP and the allocated nodePort.
How does coreDNS help with Kubernetes service discovery?
coreDNS automatically updates and resolves service names within the cluster, enabling seamless DNS name lookup from Pods.
What is the purpose of kubectl expose?
kubectl expose is used to create services and expose deployments, ReplicaSets, Pods, or other services to provide access.
How do you create a service with a specific node port in Kubernetes?
In the service definition YAML, specify nodePort under the ports section for the service.
What happens when a pod is added or removed from a service?
The Service automatically adjusts and reflects the changes, including the newly added or removed Pods.
What type of communication does the ClusterIP service type enable?
The ClusterIP service type enables internal communication within the cluster.
How do you create a service of type NodePort for an application in Kubernetes?
Define the service type as NodePort in the service definition and specify the nodePort in the ports section.
What are the benefits of using a Kubernetes service?
Kubernetes services provide load balancing, abstraction for accessing Pods, and they help manage communication between different components of an application.
How do you create a service that exposes multiple Pods using Kubernetes?
Define a selector in the service definition that matches the labels of the Pods you want to expose.
What command can be used to retrieve the list of services in Kubernetes?
Use kubectl get services to retrieve the list of services in the cluster.
How do you access a Kubernetes service using curl from the command line?
Use the command curl http://<minikube-ip>:<nodePort> to access the service from the CLI.
How does Kubernetes handle services when Pods are located across different nodes?
Kubernetes ensures the service is expanded across multiple nodes, distributing traffic to Pods regardless of their node location.
How do you create a ClusterIP service in Kubernetes to expose a pod, and what are the key differences between the two commands in the example?
The first command automatically uses the pod’s labels as selectors, while the second command does not. You need to manually modify the selectors in the second approach.
Example 1: Creating a ClusterIP Service
To create a service named redis-service of type ClusterIP to expose the redis pod on port 6379:
kubectl expose pod redis --port=6379 --name redis-service --dry-run=client -o yaml
(This command will automatically use the pod’s labels as selectors.)
Alternatively:
kubectl create service clusterip redis --tcp=6379:6379 --dry-run=client -o yaml
This command does not use the pod’s labels as selectors. Instead, it assumes selectors like app=redis. Since you can’t pass in custom selectors with this command, it’s less effective if your pod > has different labels. You’ll need to generate the YAML file and manually modify the selectors before creating the service.
How do you create a NodePort service to expose a pod in Kubernetes, and what are the key differences between the two commands in the example?
The first command automatically uses the pod’s labels as selectors, but you can’t specify the node port, so you need to manually edit the YAML file. The second command doesn’t use labels as selectors but > allows specifying the node port directly.
Example 2: Creating a NodePort Service
To create a service named nginx of type NodePort to expose the nginx pod’s port 80 on node port 30080:
(This will use the pod’s labels as selectors automatically, but you can’t specify the node port. You’ll need to generate a YAML definition file and manually add the node port before creating the service.)
Alternatively:
kubectl create service nodeport nginx --tcp=80:80 --node-port=30080 --dry-run=client -o yaml
(This will not use the pod’s labels as selectors.)
Network Policies
What is the default behavior of Kubernetes network traffic between pods in different namespaces?
By default, there are no restrictions to network traffic in Kubernetes, meaning pods can communicate with each other even if they are in different namespaces.
How can network traffic be restricted in Kubernetes?
Network traffic can be restricted in Kubernetes using Network Policies.
What happens when there is no match in a network policy?
If there is no match in a network policy, traffic will be denied.
What happens if no Network Policy is used in Kubernetes?
If no Network Policy is used, all traffic is allowed between pods.
What is the prerequisite for Network Policies to work in Kubernetes?
Network Policies need to be supported by the network plugin in use.
How does networking work in Kubernetes pods?
Kubernetes pods can communicate with each other using a virtual networking solution, and by default, pods can reach each other using IP addresses, pod names, or services.
What rule is applied by default in Kubernetes for network traffic?
Kubernetes is configured by default with an “Allow All” rule, permitting traffic from any pod to any other pod or service within the cluster.
What is the difference between ingress and egress traffic in Kubernetes?
Ingress refers to incoming traffic to a resource, while egress refers to outgoing traffic from that resource.
What are some key components of a network policy in Kubernetes?
A network policy links to pods and defines rules like ingress and egress traffic for controlling access.
How is a network policy linked to a pod in Kubernetes?
A network policy is linked to one or more pods using labels and selectors.
What does the podSelector do in a network policy?
The podSelector in a network policy selects the pods to which the policy applies, based on labels.
In the provided YAML example, which pods are allowed to send egress traffic on port 3306?
The internal pod is allowed to send egress traffic to the mysql pod on port 3306.
Why is Egress traffic to TCP and UDP port allowed in the example?
It is allowed to ensure that internal DNS resolution works from the internal pod.
What service is exposed on port 53 in Kubernetes?
The kube-dns service is exposed on port 53 for DNS resolution.
What happens if the podSelector is removed from a network policy?
If the podSelector is removed, the network policy will accept ingress traffic from all pods in the selected namespace.
What is the difference between AND and OR in the pod selector of a network policy?
AND requires both conditions to match, while OR allows either condition to match.
What is the effect of specifying only ingress in the policy type of a network policy?
It isolates ingress traffic but leaves egress traffic unaffected, meaning egress traffic is not blocked.
How can network policies be isolated in Kubernetes?
Network policies can be isolated by specifying ingress or egress under the policyTypes field in the network policy.
Which network solutions support Kubernetes network policies?
Network solutions like Kube Router, Calico, Romana, and Weave Net support Kubernetes network policies.
What happens if you try to create network policies with a solution that doesn't support them?
Network policies can still be created, but they will not be enforced, and no error message will indicate this.
What do you need to do to enable the Calico plugin in Minikube?
To enable the Calico plugin in Minikube, start Minikube with the --cni=calico option.
How can you verify if the Calico agent is used in Minikube?
You can verify if the Calico agent is used by running kubectl get pods -n kube-system.
What is the process to restart Minikube with the Calico plugin?
To restart Minikube with the Calico plugin, you need to stop Minikube, delete it, and then start it with the --cni=calico option.
Ingress
What is an Ingress in Kubernetes?
In Kubernetes, Ingress refers to inbound proxies that allow external access to internal Kubernetes cluster resources, using a load balancer that can be either inside or outside the cluster.
What features does Ingress provide in Kubernetes?
Ingress provides external URLs for services, load balancing traffic, terminating SSL/TLS, and supporting name-based virtual hosting.
What are the common Ingress Controllers in Kubernetes?
Common Ingress controllers in Kubernetes include NGINX, HAProxy, Traefik, Kong, and Contour.
What is the role of an Ingress Controller in Kubernetes?
The Ingress Controller manages Ingress resources and configures the routing of traffic based on URL paths or hostnames, enabling features like SSL termination and load balancing.
What is an Ingress resource in Kubernetes?
An Ingress resource defines rules for routing traffic based on URL paths or hostnames to the appropriate Kubernetes services.
What happens if you don’t have an Ingress Controller in Kubernetes?
Without an Ingress Controller, Ingress resources won’t have any effect because there is no controller to handle the routing and configurations.
What is the advantage of using Ingress over NodePort in Kubernetes?
Ingress allows you to manage external access to multiple services using a single externally accessible URL, avoiding the need to expose multiple ports, unlike NodePort, which requires assigning high ports for each service.
How can you route traffic to different services using Ingress in Kubernetes?
You can route traffic based on URL paths (e.g., /wear to one service and /watch to another) or use host-based routing (e.g., wear.my-online-store.com to one service and watch.my-online-store.com to another).
How does Kubernetes Ingress help with scaling applications?
Ingress allows you to manage traffic routing across multiple instances of services, making it easier to scale applications horizontally while maintaining a single externally accessible URL.
What is the Ingress pathType in Kubernetes?
The pathType specifies how path requests are handled, with options being Exact for exact path matches and Prefix for matches based on the start of the path.
How do you specify path-based routing with Ingress in Kubernetes?
Path-based routing is specified by defining a rule where the path (e.g., /wear or /watch) is mapped to a service in the Ingress definition.
What is Name-Based Virtual Hosting in Kubernetes Ingress?
Name-Based Virtual Hosting allows you to route traffic to different services based on the hostname (e.g., mars.example.com to one service and saturn.example.com to another).
What is the purpose of the IngressClass in Kubernetes?
The IngressClass specifies the default Ingress controller for the cluster, ensuring that Ingress resources refer to the appropriate controller.
How do you create an Ingress resource in Kubernetes?
An Ingress resource can be created using the command kubectl create ingress <name> --rule="<host/path=service:port>".
How does SSL termination work with Ingress in Kubernetes?
Ingress can be configured to terminate SSL/TLS, enabling secure communication between external clients and services within the Kubernetes cluster.
How do you expose an Ingress controller in Kubernetes?
An Ingress controller can be exposed using a NodePort or LoadBalancer service to make it externally accessible.
What is the advantage of using a LoadBalancer service in Kubernetes?
A LoadBalancer service provisions an external IP for the service, making it easier to manage external access to the service, especially in cloud environments like GCP.
How does traffic splitting work with Ingress in Kubernetes?
Traffic splitting can be done based on URL paths, where different paths route traffic to different services, or based on hostnames with multiple rules, each for a different path.
How do you configure URL-based routing with Ingress in Kubernetes?
URL-based routing is configured by defining rules that map specific paths (e.g., /wear or /watch) to the corresponding services in the Ingress resource.
How do you configure host-based routing with Ingress in Kubernetes?
Host-based routing is configured by specifying different hostnames (e.g., wear.my-online-store.com) in the Ingress resource, which route traffic to different services.
How do you expose a service using Ingress in Kubernetes?
You expose a service using Ingress by creating an Ingress resource with rules that map URLs or hostnames to the service’s backend, making it accessible externally.
How do you view the status of an Ingress resource in Kubernetes?
The status of an Ingress resource can be viewed using the command kubectl describe ingress <name> or kubectl get ingress <name> -o yaml.
What is the purpose of the annotations in an Ingress resource?
Annotations in an Ingress resource are used to configure specific behaviors like SSL redirection and path rewrites, such as nginx.ingress.kubernetes.io/rewrite-target.
How do you define multiple URL paths for different services in a single Ingress resource?
Multiple URL paths can be defined in a single Ingress resource by specifying multiple path rules under the spec.rules section, each mapping a path to a different service.
How does Ingress help reduce costs compared to using multiple LoadBalancer services?
Ingress allows you to route traffic to multiple services using a single externally accessible URL, avoiding the cost of provisioning multiple LoadBalancer services for each application.
How does Ingress handle SSL/TLS termination in Kubernetes?
Ingress can terminate SSL/TLS connections and route the traffic to the appropriate service using HTTP once the secure connection has been established, simplifying SSL management.
How do you configure an Ingress to use SSL in Kubernetes?
SSL can be configured in Ingress by specifying an SSL certificate in the Ingress resource, often in combination with annotations like nginx.ingress.kubernetes.io/ssl-redirect.
How do you update an existing Ingress resource in Kubernetes?
An existing Ingress resource can be updated using kubectl edit ingress <name>, where you can modify the rules, annotations, and other settings.
PV & PVC & # Storage Classes
What is the advantage of Docker’s layered architecture when building images?
Docker’s layered architecture allows Docker to reuse the same layers from the cache, making image builds faster and more efficient in saving disk space.
What happens when Docker rebuilds an image with new source code and a new entry point?
Docker reuses the first three layers from the cache and only creates the last two layers with the updated source code and entry point.
How does Docker help in building images faster and saving disk space?
Docker reuses the layers from previous builds that have not changed, thus speeding up the process and saving disk space by avoiding rebuilding layers that are already cached.
How does understanding Docker storage help when working with Kubernetes?
Understanding Docker storage fundamentals, like storage drivers and volume drivers, helps in comprehending how storage works in Kubernetes, making it easier to manage storage in containerized applications.
Where does Docker store data by default on a system?
Docker stores its data by default in the /var/lib/docker directory, with subdirectories for aufs, containers, images, volumes, etc.
What does Docker store in the containers directory under /var/lib/docker?
Docker stores all the files related to containers in the containers directory.
What is the purpose of Docker's layered architecture?
Docker’s layered architecture makes it efficient in building images by storing each layer separately. This way, layers that don’t change can be reused, reducing build time and storage requirements.
What happens when a container is run from a Docker image?
When a container is run from an image, Docker creates a new writeable layer on top of the image’s read-only layers, where data such as log files and temporary files are stored.
What is the "copy-on-write" mechanism in Docker?
The “copy-on-write” mechanism ensures that when you modify a file in a container, Docker creates a copy of that file in the writeable layer, leaving the original image layer unchanged.
What happens to the writeable layer and its data when a Docker container is destroyed?
When a container is destroyed, the writeable layer and any data stored in it are also destroyed, while the original image layer remains unchanged.
What is the command to create a volume in Docker?
The command to create a volume in Docker is docker volume create <volume_name>.
Where are Docker volumes stored on the host machine by default?
Docker volumes are stored by default in the /var/lib/docker/volumes/ directory on the host machine.
What happens if a Docker volume is created after running the container?
If a volume is created after the container is run, Docker automatically creates the volume and mounts it to the specified location inside the container.
What is the difference between volume mounting and bind mounting in Docker?
Volume mounting uses Docker-managed volumes located in the /var/lib/docker/volumes/ directory, while bind mounting allows mounting files or directories from any location on the Docker host.
What is the recommended option for mounting volumes in Docker: -v or --mount?
It is recommended to use the --mount option for mounting volumes in Docker, as it provides a more explicit and flexible configuration compared to the -v option.
What are the two main types of Docker mounts?
The two main types of Docker mounts are volume mounts and bind mounts.
What does the --mount option in Docker allow you to specify?
The --mount option in Docker allows you to specify the mount type, source, and target for volumes or bind mounts.
What is the role of storage drivers in Docker?
Storage drivers in Docker maintain the layered architecture, create writeable layers, and manage file movement across layers, enabling efficient container storage operations.
Name some common Docker storage drivers.
Some common Docker storage drivers are AUFS, ZFS, BTRFS, Device Mapper, Overlay, and Overlay2.
What determines which storage driver Docker selects?
Docker automatically selects the best storage driver available based on the underlying operating system.
What are volume drivers in Docker, and what do they do?
Volume drivers in Docker manage the creation and mounting of volumes, allowing data to persist outside of containers. The default volume driver is “local.”
How does Docker use volume drivers in the context of third-party storage solutions?
Docker can use volume drivers to create and manage volumes on third-party storage solutions, like Amazon EBS or Google Persistent Disks, through plugins.
What is the command to use a specific volume driver in Docker?
The command to use a specific volume driver in Docker is docker run with the --volume-driver option, specifying the driver name.
How does Kubernetes interact with Docker for container storage?
Kubernetes interacts with Docker for container storage using storage drivers to manage data in containers and volume drivers to manage persistent storage.
What is the purpose of persistent volumes in Kubernetes?
Persistent volumes in Kubernetes provide a way to store data that persists beyond the lifecycle of individual pods, ensuring data is retained even when pods are deleted.
[!question]- What is a Persistent Volume (PV)?
A Persistent Volume (PV) is a cluster-wide pool of storage volumes configured by an administrator to be used by users deploying applications on the cluster. The users can select storage from this pool using Persistent Volume Claims (PVCs).
What does a user need to do every time they deploy a pod that requires storage?
A user needs to configure the storage every time for each pod definition file. If a change is required, the user has to apply the changes on all their pods.
What is the relationship between Persistent Volumes (PV) and Persistent Volume Claims (PVC)?
Persistent Volumes are resources in the cluster that administrators manage, while Persistent Volume Claims are requests for storage made by users. PVCs request specific storage properties, and Kubernetes binds them to appropriate PVs based on those requests.
What is the access mode of a Persistent Volume in the given example?
The access mode for the Persistent Volume in the example is “ReadWriteOnce” (RWO), meaning the volume can be mounted as read-write by a single node.
How do you create a Persistent Volume in Kubernetes?
You can create a Persistent Volume using a YAML definition file, such as the provided pv-definition.yaml, and then apply it with the command kubectl create -f pv-definition.yaml.
What is the status of a Persistent Volume right after creation?
After creation, the Persistent Volume will have a status of “Available” until it is bound to a Persistent Volume Claim.
What happens when a Persistent Volume Claim (PVC) is created?
When a PVC is created, Kubernetes will attempt to bind it to an available Persistent Volume (PV) that satisfies the requested storage and access mode. If no matching PV is available, the PVC will remain in a “Pending” state.
How does Kubernetes handle a PVC if there is no available Persistent Volume to bind to it?
If there is no matching Persistent Volume available, the PVC will remain in the “Pending” state.
What is the purpose of the resources.requests.storage field in a Persistent Volume Claim?
The resources.requests.storage field specifies the amount of storage the PVC requests.
What is the ReclaimPolicy of a Persistent Volume and what are its possible values?
The ReclaimPolicy defines what happens to a Persistent Volume after its Persistent Volume Claim is deleted. Possible values are Retain, Recycle, and Delete.
What happens to a Persistent Volume when its claim is deleted and the ReclaimPolicy is set to Retain?
When the ReclaimPolicy is set to Retain, the Persistent Volume is not deleted and cannot be reused by other claims. It holds the data from the previous usage.
What happens when the ReclaimPolicy is set to Recycle?
When the ReclaimPolicy is set to Recycle, the data on the Persistent Volume is scrubbed, and the volume becomes available for reuse.
What happens when the ReclaimPolicy is set to Delete?
When the ReclaimPolicy is set to Delete, the Persistent Volume is deleted along with its data when the Persistent Volume Claim is deleted.
Can a Persistent Volume Claim (PVC) be used across different namespaces in Kubernetes?
No, a PVC must exist in the same namespace as the Pod using it. PVs are cluster-scoped, but PVCs are namespace-scoped.
How does a Pod use a Persistent Volume through a Persistent Volume Claim?
A Pod uses a Persistent Volume by specifying a Persistent Volume Claim in its volume definition. Kubernetes binds the claim to an available Persistent Volume, and the volume is mounted into the Pod.
What is the storage class used for dynamic provisioning in Kubernetes?
A StorageClass is used to define the provisioning parameters for Persistent Volumes. With dynamic provisioning, Kubernetes automatically creates the PV based on the StorageClass when a PVC is created.
What is the difference between Static and Dynamic provisioning of Persistent Volumes?
In Static provisioning, administrators manually create Persistent Volumes, while in Dynamic provisioning, Kubernetes automatically creates Persistent Volumes when a PVC is created, based on a StorageClass.
How do you create a StorageClass in Kubernetes?
You create a StorageClass by defining it in a YAML file (such as sc-definition.yaml) and applying it with the command kubectl create -f sc-definition.yaml.
What is the provisioner field in the StorageClass definition?
The provisioner field specifies the volume plugin that should be used for provisioning Persistent Volumes. For example, Kubernetes.io/gce-pd for Google Cloud Persistent Disks.
What does the storageClassName field in a Persistent Volume Claim specify?
The storageClassName field in a PVC specifies the StorageClass to be used for provisioning the Persistent Volume.
What are the benefits of using Dynamic provisioning for Persistent Volumes?
Dynamic provisioning automates the creation of Persistent Volumes, making it easier to manage storage resources without manual intervention, and it can be tailored to the needs of the workload.
What does the allowVolumeExpansion field in a StorageClass define?
The allowVolumeExpansion field in a StorageClass defines whether the volume can be resized after it is created. If set to true, the volume can be expanded.
What is the significance of the volumeBindingMode in a StorageClass?
The volumeBindingMode determines when the volume binding and dynamic provisioning should occur. It can be set to Immediate or WaitForFirstConsumer.
How do you list all StorageClasses in your cluster?
You can list all StorageClasses in your cluster using the command kubectl get sc.
What is the difference between Immediate and WaitForFirstConsumer in the volumeBindingMode of a StorageClass?
Immediate means that the Persistent Volume is provisioned as soon as the PVC is created, while WaitForFirstConsumer means that the Persistent Volume is provisioned only when the first Pod using the PVC is scheduled.
How can you verify the status of a Persistent Volume Claim?
You can verify the status of a Persistent Volume Claim by running the command kubectl get pvc, which will show the status (e.g., Pending, Bound).
How do you delete a Persistent Volume or a Persistent Volume Claim?
You can delete a Persistent Volume or Persistent Volume Claim using the command kubectl delete pv <pv-name> or kubectl delete pvc <pvc-name>.
KubeConfig
What is the purpose of a kubeconfig file?
A kubeconfig file is used to store Kubernetes cluster access details, including clusters, contexts, and users, allowing clients to interact with the Kubernetes API securely.
What are the three main sections in a kubeconfig file?
The kubeconfig file consists of three sections: Clusters, Contexts, and Users.
How can you specify a kubeconfig file when using kubectl?
You can specify a kubeconfig file using the --kubeconfig flag, e.g., $ kubectl get pods --kubeconfig config.
How do you check which kubeconfig file is currently being used?
You can check the current kubeconfig file using the command $ kubectl config view.
How can you specify a custom kubeconfig file while viewing the config?
You can specify a custom kubeconfig file using $ kubectl config view --kubeconfig=my-custom-config.
How do you set a default context in kubeconfig?
You set the default context by configuring the current-context field in the kubeconfig file.
How do you change the current context in Kubernetes?
You can change the current context using $ kubectl config use-context <context-name>.
What is the purpose of the kubectl config command?
The kubectl config command is used to modify, view, and manage kubeconfig files, including switching contexts, setting users, and viewing configurations.
How can you access the help documentation for kubectl config?
You can access the help documentation using the command $ kubectl config -h.
What are the two ways to provide certificates in kubeconfig?
The two ways to provide certificates in kubeconfig are:
Specifying the file path to the certificate.
Embedding the certificate data directly within the kubeconfig file.
How does Kubernetes use certificates in kubeconfig?
Kubernetes uses certificates in kubeconfig to authenticate and authorize requests made to the cluster’s API server securely.
What is a Kubernetes namespace?
A namespace is a way to logically partition resources within a Kubernetes cluster, allowing multiple environments or teams to work within the same cluster while keeping resources isolated.
How do you list all available contexts in kubeconfig?
You can list all available contexts using $ kubectl config get-contexts.
How do you set a namespace as the default for a context?
You can set a namespace as the default for a context using $ kubectl config set-context --current --namespace=<namespace>.
How can you switch between different contexts in Kubernetes?
You can switch between different contexts using $ kubectl config use-context <context-name>.
What command can be used to verify which context is currently active?
You can verify the current active context using $ kubectl config current-context.
How do you add a new cluster to a kubeconfig file?
You can add a new cluster using $ kubectl config set-cluster <cluster-name> --server=<server-address>.
How do you add a new user to a kubeconfig file?
You can add a new user using $ kubectl config set-credentials <user-name> --client-certificate=<path-to-cert> --client-key=<path-to-key>.
How do you associate a user with a specific cluster in kubeconfig?
You associate a user with a cluster by creating a context that links a cluster, a user, and optionally a namespace.
What is the purpose of a Kubernetes context?
A Kubernetes context is a named set of access parameters that defines a specific cluster, user, and namespace, allowing easy switching between multiple Kubernetes environments.
How can you delete a context from a kubeconfig file?
You can delete a context using $ kubectl config delete-context <context-name>.
How do you delete a cluster entry from a kubeconfig file?
You can delete a cluster entry using $ kubectl config delete-cluster <cluster-name>.
How do you delete a user from a kubeconfig file?
You can delete a user using $ kubectl config delete-user <user-name>.
Role & Cluster Role
What is Role-Based Access Control (RBAC)?
RBAC is a method of access control that associates users or groups with roles, which define permissions. Instead of assigning permissions directly to users, a role is created with the necessary permissions, and users are assigned to that role.
How does RBAC simplify user permission management?
RBAC allows changes to user permissions by modifying roles instead of updating each user’s permissions individually. When a role is modified, all users assigned to that role automatically receive the updated permissions.
What are the key components of a Kubernetes Role?
A Kubernetes Role consists of three main sections:
apiGroups: Specifies the API group the Role applies to.
resources: Defines the Kubernetes resources the Role has permissions for.
verbs: Lists the actions (e.g., get, list, create, delete) allowed on the resources.
How do you create a Role in Kubernetes using a YAML file?
You define a Role in a YAML file with kind: Role and specify rules containing apiGroups, resources, and verbs. Then apply it using:
kubectl create -f role-file.yaml
How do you create a Role using kubectl?
kubectl create role role-name --namespace=namespace --verb=verbs --resource=resources
How do you define an RBAC Role that allows a user in the blue namespace to get, watch, create, and delete a specific pod (> dark-blue-app), while also granting permission to create deployments?
Can ClusterRoles be used to authorize access to namespaced resources?
Yes, ClusterRoles can be used to authorize access to namespaced resources. When assigned, they apply across all namespaces.
How do you configure authorization modes in Kubernetes?
You specify the --authorization-mode flag in the API server, such as:
--authorization-mode=Node,RBAC,Webhook
What are the different authorization modes in Kubernetes?
Node: Authorizes kubelets to access resources required for scheduling and execution.
RBAC: Uses Role-Based Access Control (Roles, RoleBindings, ClusterRoles, ClusterRoleBindings).
Webhook: Delegates authorization decisions to an external service.
What happens if multiple authorization modes are enabled in Kubernetes?
Kubernetes checks each authorization mode in order. As soon as one authorizer grants access, no further checks are performed.
Admission Controller
What is an Admission Controller in Kubernetes?
An admission controller is a component that intercepts requests to the Kubernetes API server after authentication and authorization but before the object is stored.
What are the limitations of RBAC in Kubernetes?
RBAC does not enforce security policies beyond access control. It cannot block images from public registries, ensure Pods never use the latest image tag, prevent containers from running as root, or require specific metadata labels.
What are some actions that Admission Controllers can perform?
Admission controllers can validate requests (e.g., reject Pods using public images), modify requests (e.g., inject required labels automatically), and perform extra actions (e.g., assign a default storage class to Persistent Volume Claims).
Can you name some built-in Admission Controllers in Kubernetes?
Yes, some built-in Admission Controllers include:
AlwaysPullImages → Ensures images are always pulled when creating a Pod.
DefaultStorageClass → Assigns a default storage class to PVCs if none is specified.
EventRateLimit → Limits the number of requests to the API server.
NamespaceExists → Rejects requests for namespaces that don’t exist.
How can you check which Admission Controllers are enabled in Kubernetes?
You can run the following command to check enabled Admission Controllers:
A Validating Admission Controller checks whether a request meets certain criteria before allowing it. For example, the NamespaceExists admission controller validates if a namespace exists before allowing requests to it.
What is a Mutating Admission Controller?
A Mutating Admission Controller modifies an object before it is stored in Kubernetes. For example, the DefaultStorageClass admission controller adds a default storage class to PVCs if one isn’t specified.
Why do Mutating Admission Controllers run before Validating Admission Controllers?
Mutating Admission Controllers run first so that any modifications they make can be considered during validation, ensuring that requests are properly formatted before validation occurs.
Can an Admission Controller both validate and mutate requests?
Yes, some Admission Controllers can both validate and mutate requests. Mutating Admission Controllers are run first, followed by Validating Admission Controllers.
What happens if an Admission Controller rejects a request?
If an Admission Controller rejects a request, the request is denied, and an error message is returned to the user.
What are Admission Webhooks in Kubernetes?
Admission Webhooks are external Admission Controllers that allow users to define their own validation and mutation logic. There are two types: Mutating Admission Webhook and Validating Admission Webhook.
Where can custom Admission Webhooks be hosted?
Custom Admission Webhooks can be hosted inside the Kubernetes cluster or outside of it, as long as they are reachable by the API server.
How does an Admission Webhook process a request?
When a request reaches an Admission Webhook, the API server sends an AdmissionReview object in JSON format. The webhook server processes it and responds with an AdmissionReview object indicating whether the request is allowed or denied.
What does an AdmissionReview object contain?
An AdmissionReview object contains details about the request, including the user who made the request, the type of operation, and the object being created or modified.
How can you implement an Admission Webhook server in Kubernetes?
You can implement an Admission Webhook server using a programming language like Go or Python. The server should accept requests, process the AdmissionReview object, and return an appropriate response.
How do you configure an Admission Webhook in Kubernetes?
You configure an Admission Webhook by creating a ValidatingWebhookConfiguration or MutatingWebhookConfiguration resource, specifying the webhook service URL and the operations it should handle.
What is the difference between ValidatingWebhookConfiguration and MutatingWebhookConfiguration?
ValidatingWebhookConfiguration is used to define webhooks that validate incoming requests.
MutatingWebhookConfiguration is used to define webhooks that modify incoming requests before they are stored.
How can you deploy a custom Admission Webhook inside a Kubernetes cluster?
You can deploy the webhook server as a Kubernetes Deployment and expose it using a Service. Then, configure Kubernetes to send requests to the webhook using ValidatingWebhookConfiguration or MutatingWebhookConfiguration.
Custom Resource Definition & Operator
What is a controller in Kubernetes?
A controller is a process that runs in the background, continuously monitoring the status of resources it manages and making necessary changes to the cluster to match the desired state.
What happens when we create a deployment object?
The controller creates a replica set, which in turn creates the number of pods specified in the deployment definition file.
What are some examples of Kubernetes resources that have controllers?
Replica sets, deployments, jobs, cron jobs, stateful sets, namespaces, and more.
What is a Custom Resource Definition (CRD)?
A CRD allows users to define custom resources in a Kubernetes cluster, enabling the integration of new functionality without modifying the core Kubernetes API.
How do CRDs help extend Kubernetes?
CRDs enable users to add new resources as extensions to the original Kubernetes API server without requiring programming skills.
What is an alternative way to create custom resources in Kubernetes besides using CRDs?
Custom resources can also be created via API integration by developing a custom API server, which requires programming skills.
What happens when a custom resource like FlightTicket is created in Kubernetes?
Initially, it is only stored in ETCD, and nothing happens until a controller is created to react to it.
What is the role of a custom controller in Kubernetes?
A custom controller monitors specific resources and performs actions when they are created, updated, or deleted.
In the FlightTicket example, what does the custom controller do?
It listens for FlightTicket objects and interacts with a flight booking API to book or cancel flights based on resource creation or deletion.
What is the difference between a custom resource and a controller?
A custom resource is the object definition, whereas the controller reacts to changes in that object and performs necessary actions.
How do you create a custom resource using a CRD?
Define the resource using the CustomResourceDefinition API kind.
Create and manage the resource using its own API.
What are the key steps to create a CRD in Kubernetes?
What is stored in ETCD when a custom resource is created?
The data about the custom resource, such as FlightTicket, is stored in ETCD, but no action is taken unless a controller is implemented.
What does a Kubernetes controller do when it detects changes in a custom resource?
It performs necessary actions, such as calling an external API, modifying related Kubernetes objects, or triggering an automated workflow.
How can you distribute a custom controller in Kubernetes?
A custom controller can be packaged as a Docker image and run inside a Kubernetes cluster as a pod or deployment.
What is an operator in Kubernetes?
An operator is a combination of a controller and a CRD packaged together, allowing automation of complex application management within Kubernetes.
What does the Operator Framework do?
The Operator Framework helps deploy and manage both the CRD and the custom controller, making it easier to manage Kubernetes applications.
What is an example of a real-life Kubernetes operator?
The ETCD Operator, which manages ETCD clusters within Kubernetes, including tasks such as deployment, scaling, backup, and restore.
What are some common operators in Kubernetes?
Prometheus Operator: Manages monitoring and alerting with Prometheus.
Tigera Operator: Manages the Calico network plugin.
Jaeger Operator: Provides tracing for distributed services.
Where can you find community-developed operators for Kubernetes?
OperatorHub.io, which provides a registry of Kubernetes operators.
Can a CRD object be namespaced or cluster-scoped?
Yes, a CRD object can be either namespaced or cluster-scoped.
What is an example of a cluster-wide CRD?
A CRD that defines an ETCD cluster across the whole Kubernetes cluster rather than within a single namespace.
What happens when an operator is deployed in Kubernetes?
It creates and manages the custom resource definition, deploys the custom controller, and automates the lifecycle of the application.
How does the ETCD Operator help manage ETCD clusters?
It deploys and manages the ETCD cluster and provides backup and restore capabilities using additional components.
What is the advantage of using an operator instead of a standalone controller?
An operator automates more complex application lifecycle tasks, such as upgrades, backups, and self-healing, beyond just monitoring and reacting to events.
How do operators improve Kubernetes automation?
Operators extend Kubernetes’ native capabilities by encapsulating domain-specific knowledge into software, making applications easier to manage.
Helm
What is Helm used for in Kubernetes?
Helm is used to streamline installing and managing Kubernetes applications.
What are the components of Helm?
Helm consists of the Helm tool (which needs to be installed) and a Helm chart.
What is a Helm chart?
A Helm chart is a package that contains a description of the package, one or more templates with Kubernetes manifest files, and can be stored locally or in remote Helm repositories.
Why is installing WordPress without Helm challenging?
Without Helm, installing WordPress requires managing multiple files like services, deployments, and databases, making maintenance and upgrades difficult.
How does Helm simplify application management?
Helm allows installing, updating, rolling back, and deleting a whole stack with a single command.
What is the difference between Helm and a Helm chart?
Helm: The package manager used to install, manage, and upgrade applications on Kubernetes.
Helm Chart: A package of pre-configured Kubernetes resources managed by Helm.
How can Helm charts be customized?
Helm charts can be customized using the values.yaml file.
Where can you find installation instructions for Helm?


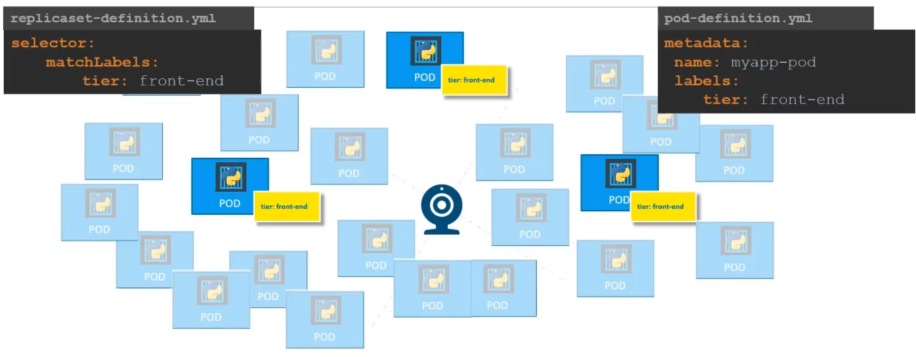
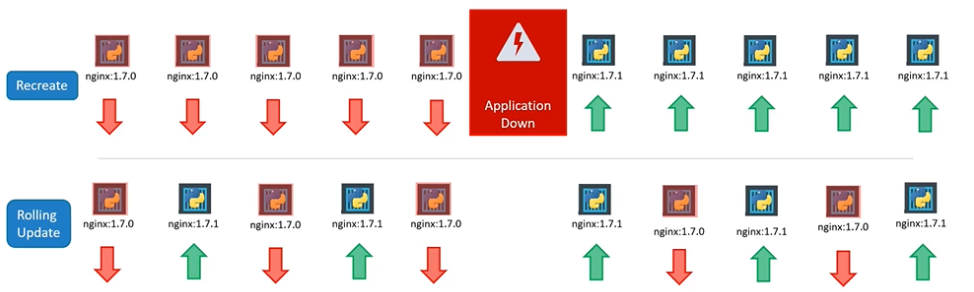
In Kubernetes, you can implement Blue/Green deployment as follows:
In Kubernetes, you can implement a Canary deployment as follows: