Containers
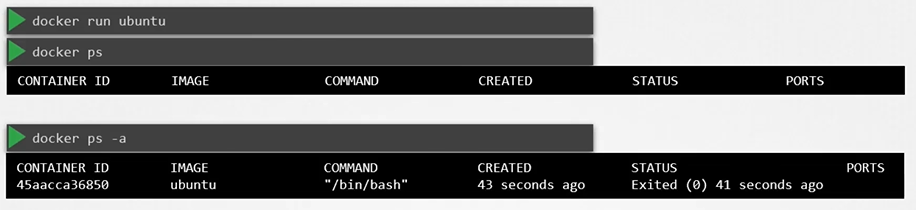
Containers are designed to run a specific task and then shut down once the task is complete. They only exist as long as the process inside them is running.
What is a Container Runtime?
A container runtime manages containers on a host platform. It allows communication between the host system, its kernel, and the container.
Most containers are Linux-based because the Linux kernel provides isolation between different system components through namespaces. These namespaces separate:
- Network
- Files
- Users
- Processes
- IPC (Inter-Process Communication)
Linux CGroups handle resource allocation and limit usage to ensure efficiency.
For more on container standards, check out the Open Container Initiative.
CMD vs Entrypoint
Below container would run the “bash” and expects some command as input. If it doesn’t find anything, it will exit(0).
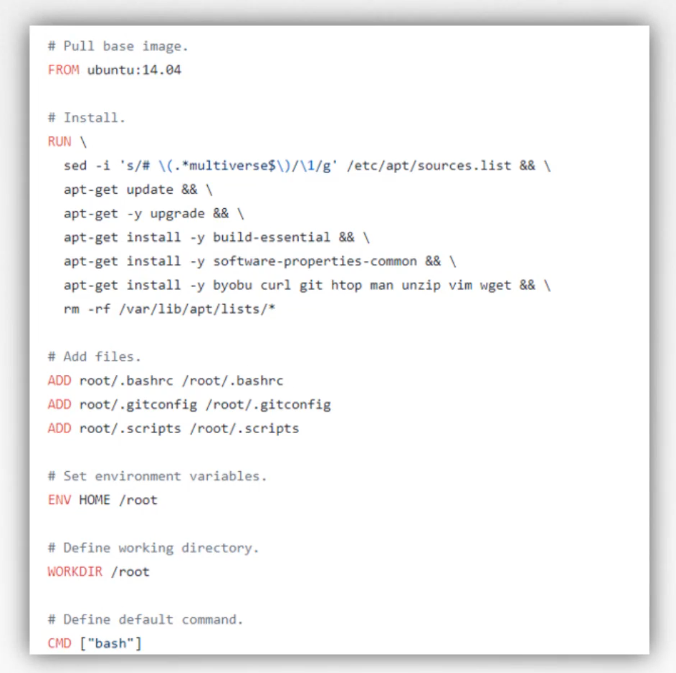
When defining the CMD command we have two different style:
- In array format
- In space separated
When defining it in array format, the first element must be the executable.
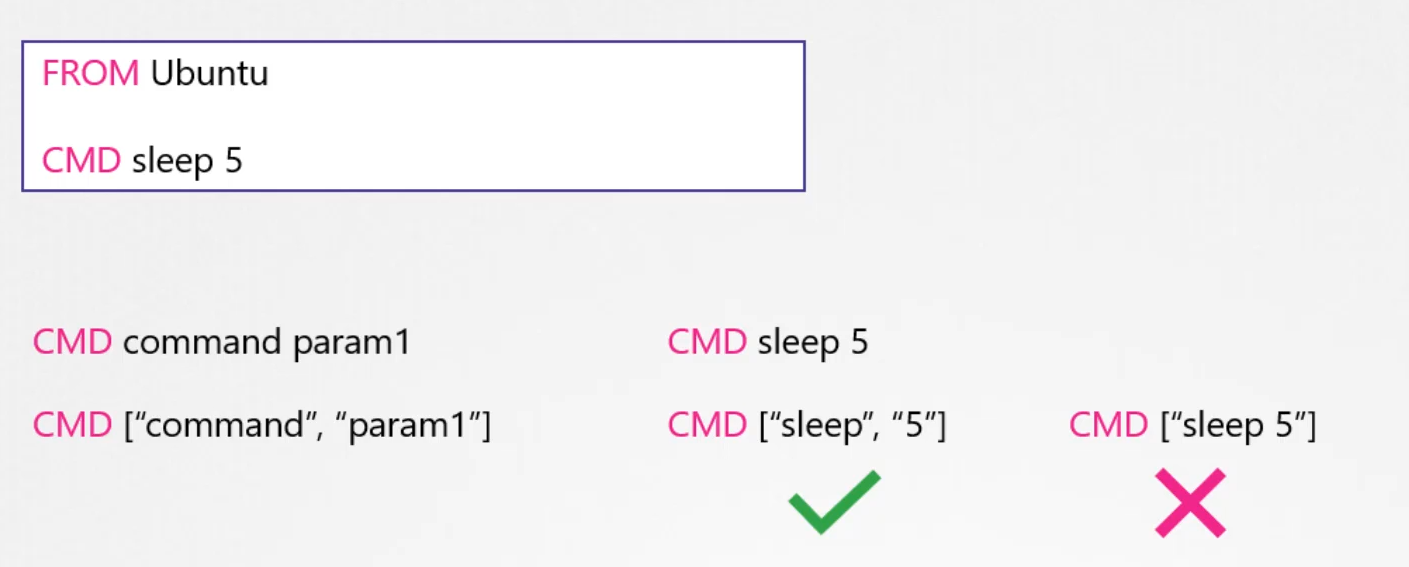
- CMD needs to have the executable and the args
- docker run ubuntu-sleeper sleep 10
- Entrypoint allows us to include the executable and only accept the args
- docker run ubuntu 10
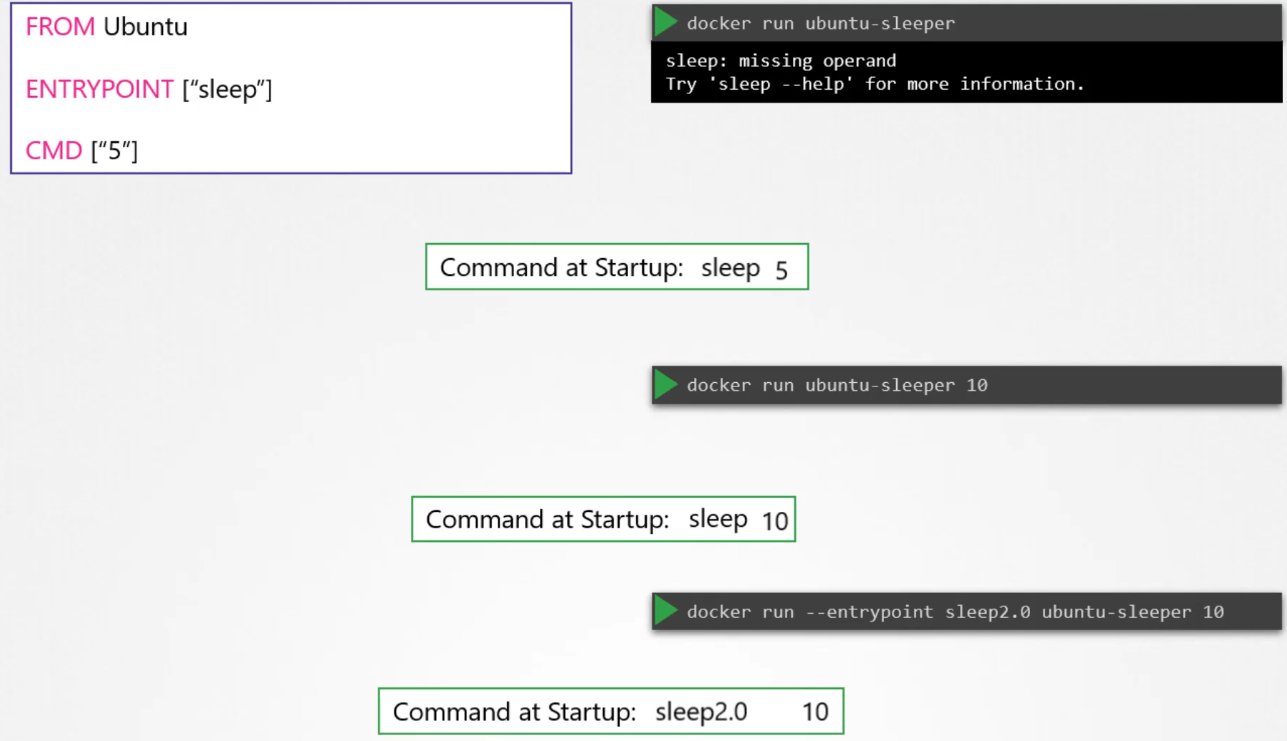
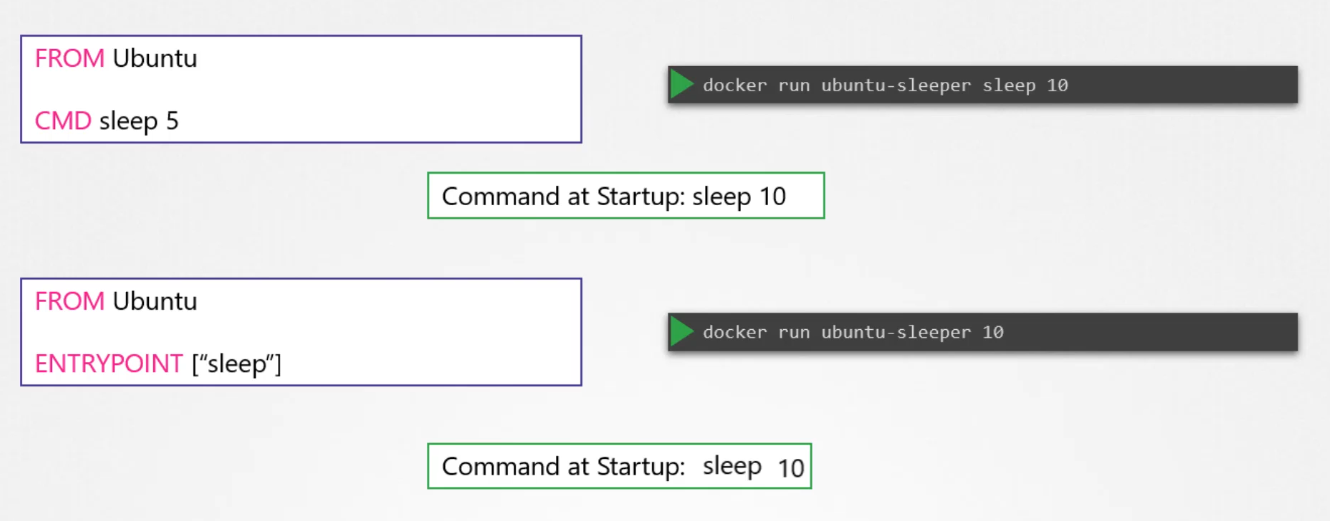 So how do you configure a default value for the command, if one was not specified in the command line?
At startup, the default command will be
So how do you configure a default value for the command, if one was not specified in the command line?
At startup, the default command will be sleep 5 if no parameters are specified in the command line. If you do provide parameters, they will override the default command. Remember to specify the entry point and command instructions in an adjacent format for this to work.
Now, what if you want to change the entry point at runtime? For example, if you want to switch from sleep to an imaginary sleep 2.0 command? You can do this by using the entry point option in the Docker run command. The final command at startup would then be sleep 2.0 10.
Add vs Copy
-
ADDandCOPYare doing the same thing -
COPYis simple and has less features -
ADDhas specific featuresADDcan directly extract the contents of a tar file into the containerADDcan fetch files from a URL, but this is deprecated. Rather, useRUNwget to fetch the file, and delete them afterwards when the file is no longer needed
-
Each command used in a
Dockerfilecreates a new layer and this should be avoided -
So don’t run multiple
RUNcommands, connect them using&& -
RUN yum --disablerepo=* --enablerepo="myrepo" && yum update -y && yum install nmap -
To maintain readability, write the commands on different lines using
&& \\at the end of each line:
RUN yum --disablerepo=* --enablerepo="rhel7-server-rpms" && \\
    yum update -y && \\
    yum install -y nginx
Docker inspect
Docker inspect provides detailed information on constructs controlled by Docker. By default, docker inspect will render results in a JSON array. For example uses of this command, refer to the examples section below.
$ docker inpect

$ docker inspect —format=

$ docker history <imageID> or docker history image:tag
Registry
Tags can also be used to identify the target registry
$ docker tag myapache localhost:5000/myapache:1.0Commit
After making changes to a container, you can save it to an image. Use docker commit to do so.
docker commit -m "custom web server" -a "Sander van Vugt" myapache myapache- Use docker images to verify
- Next, use
docker save -o myapache.tar myapacheand transport it to anywhere you’d like - From another system, use
docker load -i myapache.tarto import it as an image
The entrypoint instruction is like the command instruction as in you can specify the program that will be run when the container starts and whatever you specify on the command line.
Scenario
What is the user used to execute the sleep process within the ubuntu-sleeper pod?
kubectl exec ubuntu-sleeper -- whoami
K8S arguments and commands
There are two fields in the pod definition that correspond to two instructions in the Dockerfile.
apiVersion: v1
kind: Pod
metadata:
  name: ubuntu-sleeper-pod
spec:
  containers:
    - name: ubuntu-sleeper
      image: ubuntu-sleeper
      command: ["sleep2.0"]
      args: ["10"]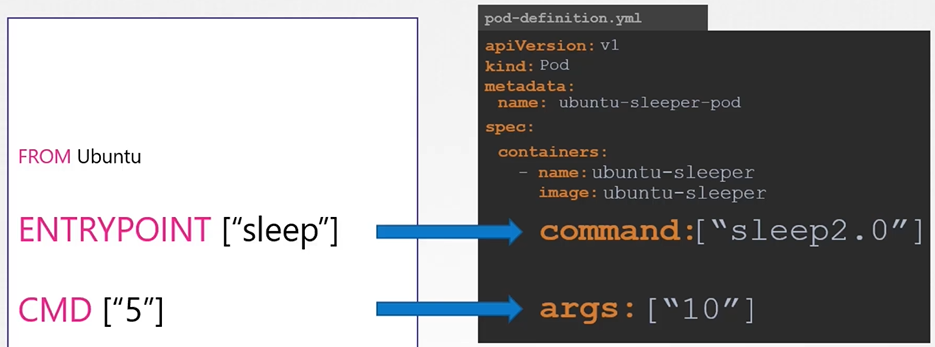
Both of the definition files below behave the same way; they both run the same command (sleep 5000). When we describe the pod, Kubernetes does an excellent job of providing details about the object and the definition file.
If we describe the pod created with the first definition file, it will show:
Containers:
  ubuntu:
    Container ID:  containerd://9cb58a1e0ecef4e93e5e526a56d760a99b02a6b5e128b47eae4a6cc61ac41e84
    Image:         ubuntu
    Image ID:      docker.io/library/ubuntu@sha256:dfc10878be8d8fc9c61cbff33166cb1d1fe44391539243703c72766894fa834a
    Port:          <none>
    Host Port:     <none>
    Command:
      sleep
      5000
    State:          Running
      Started:      Thu, 26 Sep 2024 23:52:33 +0000
    Ready:          True
    Restart Count:  0
    Environment:    <none>
    Mounts:
      /var/run/secrets/kubernetes.io/serviceaccount from kube-api-access-ktgp4 (ro)
If we describe the pod created with second definition file it’ll show:
Containers:
  ubuntu:
    Container ID:  containerd://9cb58a1e0ecef4e93e5e526a56d760a99b02a6b5e128b47eae4a6cc61ac41e84
    Image:         ubuntu
    Image ID:      docker.io/library/ubuntu@sha256:dfc10878be8d8fc9c61cbff33166cb1d1fe44391539243703c72766894fa834a
    Port:          <none>
    Host Port:     <none>
    Command:
      sleep
    Args:
	  5000
    State:          Running
      Started:      Thu, 26 Sep 2024 23:52:33 +0000
    Ready:          True
    Restart Count:  0
    Environment:    <none>
    Mounts:
      /var/run/secrets/kubernetes.io/serviceaccount from kube-api-access-ktgp4 (ro)
apiVersion: v1
kind: Pod
metadata:
  name: ubuntu-sleeper-2
spec:
  containers:
  - name: ubuntu
    image: ubuntu
    command: ["sleep", "5000"]


apiVersion: v1
kind: Pod
metadata:
  name: ubuntu-sleeper-2
spec:
  containers:
  - name: ubuntu
    image: ubuntu
    command: ["sleep"]
    args: ["5000"]
Environment variables
ENV in docker
$ docker run -e APP_COLOR=pink simple-webapp-colorK8s env imperative
Kubernetes does not offer a command line option to provide variable! while running a Deployment with kubectl create deploy. Thus we use kubectl set env
$ kubectl create deploy mydb --image=mariadb
$ kubectl set env deploy mydb MYSQL_ROOT_PASSWORD=password
# While running a Pod
# environment variables can be provided, but you shouldn't run naked Pods
$ kubectl run mydb --image=mysql -- env="MYSQL_ROOT_PASSWORD=password"
Generate a YAML file with env very fast:
$ kubectl create deploy mydb --image=mariadb
$ kubectl describe pods mydb-xxx-yyy
$ kubectl logs mydb-xxx-yyy
$ kubectl set env deploy mydb MYSQL_ROOT_PASSWORD=password
$ kubectl get deploy mydb -o yaml > mydb.yaml
K8s env declarative
To set an environment variable you can also set an env property in pod definition file.
apiVersion: v1
kind: Pod
metadata:
  name: simple-webapp-color
spec:
  containers:
    - name: simple-webapp-color
      image: simple-webapp-color
      ports:
        - containerPort: 8080
      env:
        - name: APP_COLOR
          value: pink
ENV Sources
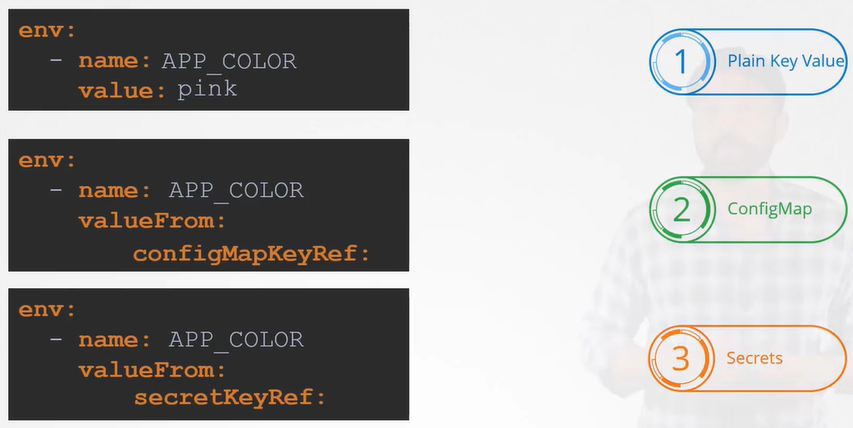
In a Kubernetes (K8s) environment, environment variables can be sourced from three different places:
- Plain key-value pairs embedded in the definition file.
- ConfigMap references for configuration data.
- Secret references for sensitive information.
Config Map
ConfigMap Creation Step
Create configMap imperatively
- Imperative from values
- Imperative from file
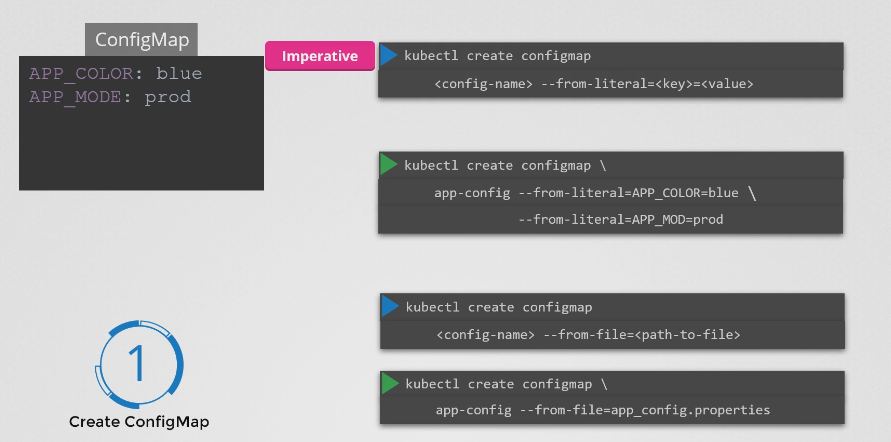
While creating a ConfigMap with kubectl create cm, variables can be provided in two ways:
-
Using
--from-env-file:kubectl create cm --from-env-file=dbvars -
Using
--from-literal:kubectl create vm --from-literal=MYSQL_USER=anna
Notice that it’s possible to use multiple
--from-literal, you cannot use multiple--from-env-file!
After creating the ConfigMap, use kubectl set env -- from=configmap/mycm deploy/myapp to use the ConfigMap in your Deployment
Use --dry-run=client and command line redirection on kubectl create deploy and kubectl set env to generate a YAML file using ConfigMap.
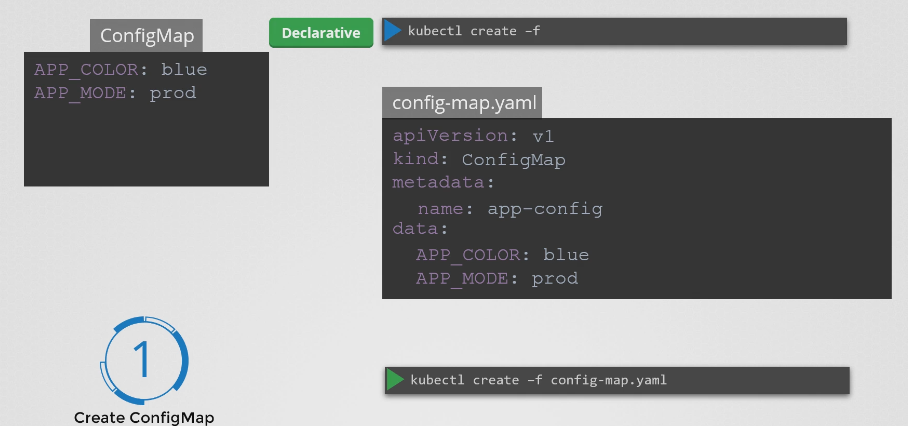
create configMap declarative
Consumption/Injection of configMap
Load all the config map values AS ENVIRONMENT VARIABLE at once
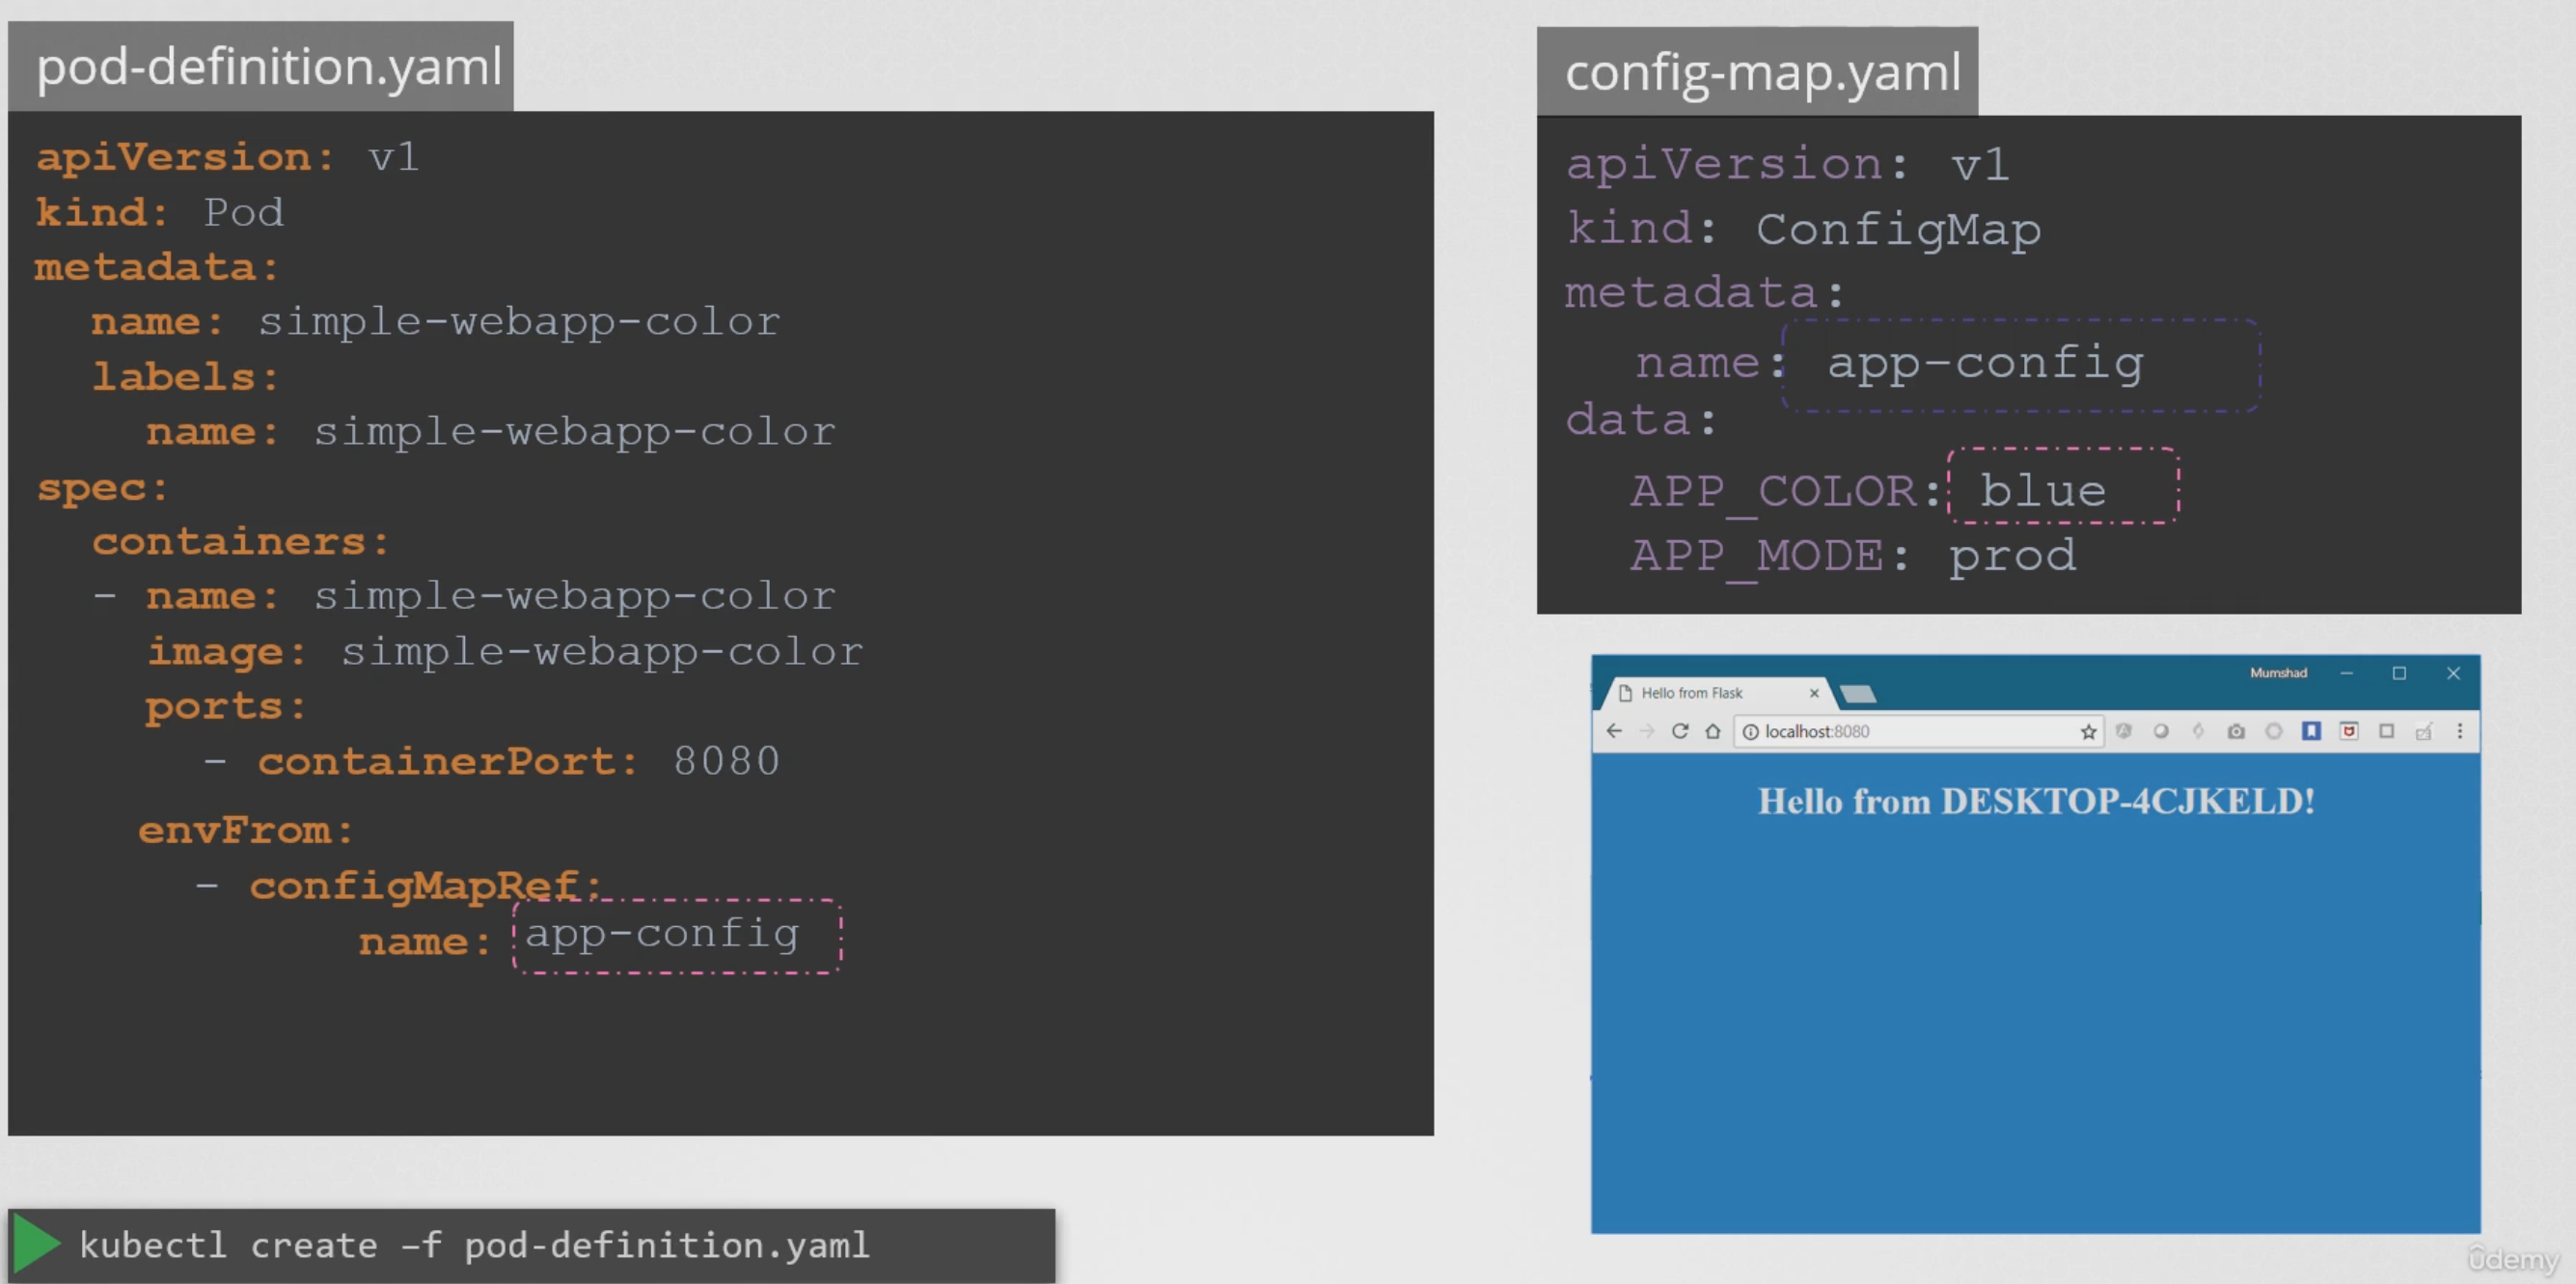
apiVersion: v1
kind: Pod
metadata:
  name: simple-webapp-color
spec:
 containers:
 - name: simple-webapp-color
   image: simple-webapp-color
   ports:
   - containerPort: 8080
   envFrom:
   - configMapRef:
name: app-configapiVersion: v1
kind: ConfigMap
metadata:
name: app-config
data:
APP_COLOR: blue
APP_MODE: prod$ kubectl create -f pod-definition.yamlLoad only what you need from a ConfigMap AS ENVIRONMENT VARIABLE
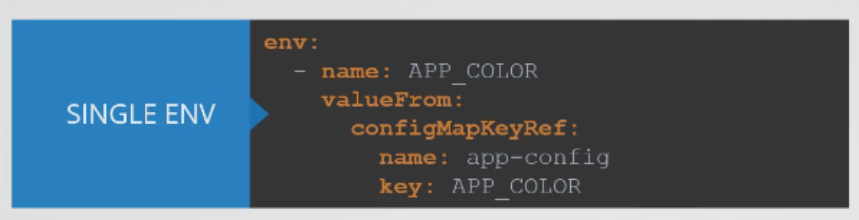
Renaming the key
Scenario: You have a ConfigMap(e.g MyConfig) that has 10 environment variables in it. You only need one of them. The one you need is named “HOST” inside the ConfigMap. However when you want to consume it you want to change it to “HOSTNAME” because your application accepts the HOSTNAME. So the task is to consume the “HOST” from ConfigMap but inject it as “HOSTNAME”
apiVersion: v1
kind: Pod
metadata:
  name: configmap-demo-pod
spec:
  containers:
    - name: demo
      image: alpine
      command: ["sleep", "3600"]
      env:
        - name: HOSTNAME # Notice the RENAME
          valueFrom:
            configMapKeyRef:
              name: MyConfig # The ConfigMap this value comes from.
              key: HOST # The key to fetch.
Consume/inject ConfigMap AS VOLUME

View ConfigMap
To view ConfigMap
$ kubectl get configmaps (or)
$ kubectl get cm
To describe ConfigMap
$ kubectl describe configmaps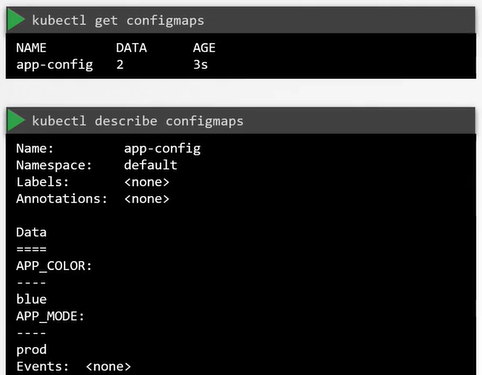
Secrets
Secrets allow for storage of sensitive data such as passwords, Auth tokens and SSH keys. Using Secrets makes it so the data doesn’t have to be put in a Pod, and reduces the risk of accidental exposure. Some Secrets are automatically created by the system, users can also use secrets.
System-created Secrets are important for Kubernetes resources to connect to other cluster resources. Secrets are not encrypted, they are base64 encoded.
Kubernetes offers three types of Secrets:
- docker-registry: Used for connecting to a Docker registry.
- TLS: Used to store TLS key materials.
- generic: Creates a secret from a local file, directory, or literal value.
Use Cases for Secrets in Applications
1. Provide TLS Keys to the Application
kubectl create secret tls my-tls-keys --cert=tls/myscrt --key=tls/my.key2. Securely Store Passwords
kubectl create secret generic my-secret-pw --from-literal=password=verysecret3. Provide Access to an SSH Private Key
kubectl create secret generic my-ssh-key --from-file=ssh-private-key=.ssh/id_rsa4. Provide Access to Sensitive Files
These files are mounted in the application with root access only:
kubectl create secret generic my-secret-file --from-file=/my/secretfileDefining the Secret Type
When creating a Secret, you must specify the type:
kubectl create secret genericReal-World Scenario: Using Secrets vs. ConfigMaps
A common approach is to move application properties and environment variables into a ConfigMap. However, ConfigMaps store data in plain text, making them unsuitable for sensitive information like passwords.
Example of a ConfigMap:
apiVersion: v1
kind: ConfigMap
metadata:
  name: app-config
data:
  DB_Host: mysql
  DB_User: root
  DB_Password: password
Secrets, in contrast, store sensitive information like passwords in an encrypted or hashed format.
Creating Secrets in Kubernetes
There are two primary steps when working with Secrets:
- Create the Secret.
- Inject the Secret into a Pod.
Imperative Secret Creation
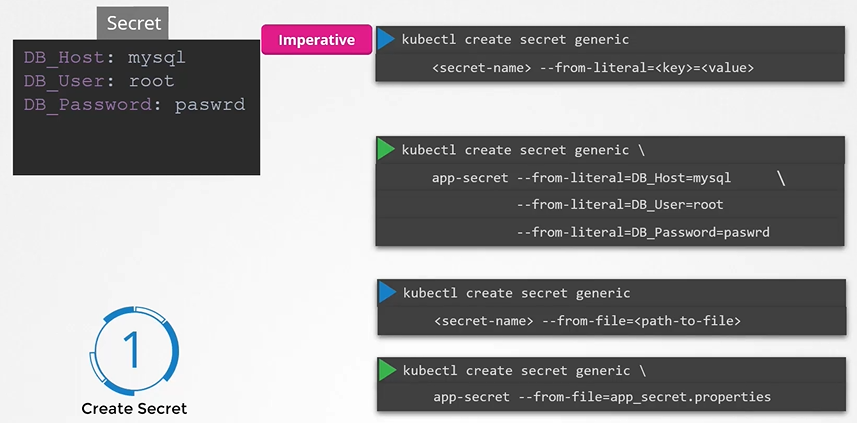
Example 1: Create a Generic Secret
kubectl create secret generic app-secret --from-literal=DB_Host=mysql --from-literal=DB_User=root --from-literal=DB_Password=passwordExample 2: Create a Secret from a File
kubectl create secret generic app-secret --from-file=app_secret.propertiesProvide a Secret to a Deployment Imperatively
kubectl create secret generic dbpw --from-literal=ROOT_PASSWORD=password
kubectl describe secret dbpw
kubectl get secret dbpw -o yaml
kubectl create deploy mynewdb --image=mariadb
kubectl set env deploy mynewdb --from=secret/dbpw --prefix=MYSQL_
Declarative Secret Creation

Generate a base64-encoded value for the secret data:
echo -n "mysql" | base64
echo -n "root" | base64
echo -n "password" | base64
Create a YAML definition for the Secret:
apiVersion: v1
kind: Secret
metadata:
  name: app-secret
data:
  DB_Host: bX1zcWw=
  DB_User: cm9vdA==
  DB_Password: cGFzd3Jk
Deploy the Secret:
kubectl create -f secret-data.yamlViewing and Decoding Secrets
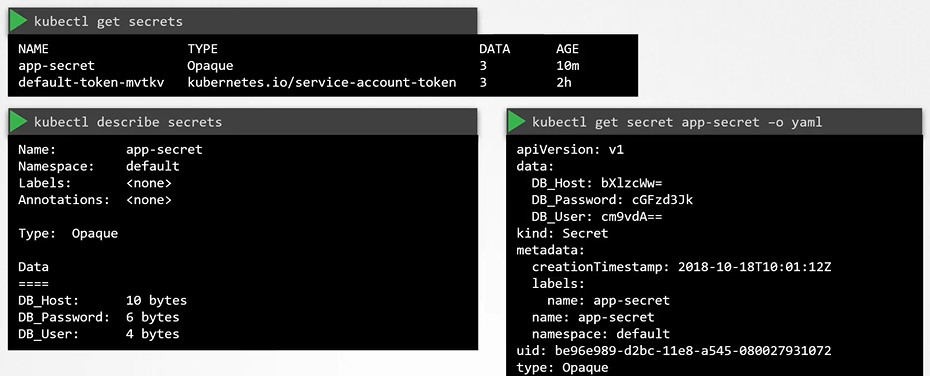
View Secrets
kubectl get secretsDescribe a Secret
kubectl describe secretView Secret Values
kubectl get secret app-secret -o yamlDecode Secret Values
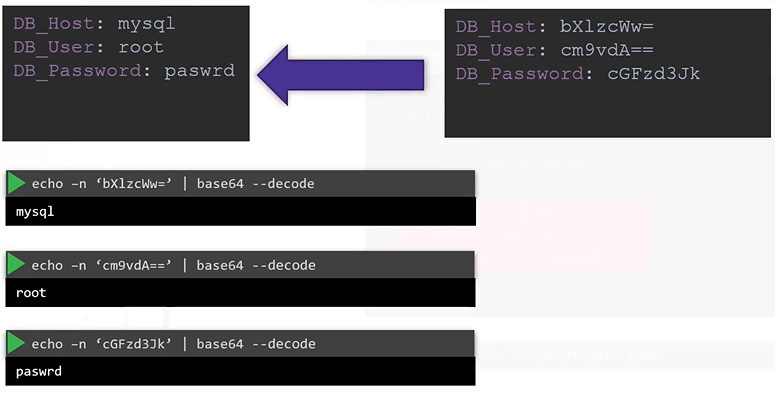
echo -n "bX1zcWw=" | base64 --decode
echo -n "cm9vdA==" | base64 --decode
echo -n "cGFzd3Jk" | base64 --decode
Injecting/Consuming Secrets into Pods
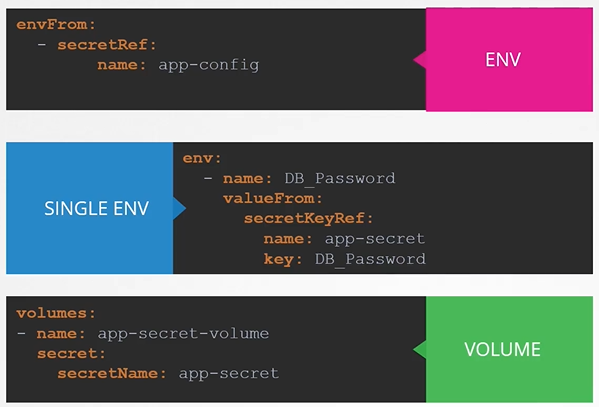
To inject a secret into a Pod, use the envFrom property followed by the secretRef name:
Secret in Pod Definition AS ENVIRONMENT VARIABLE
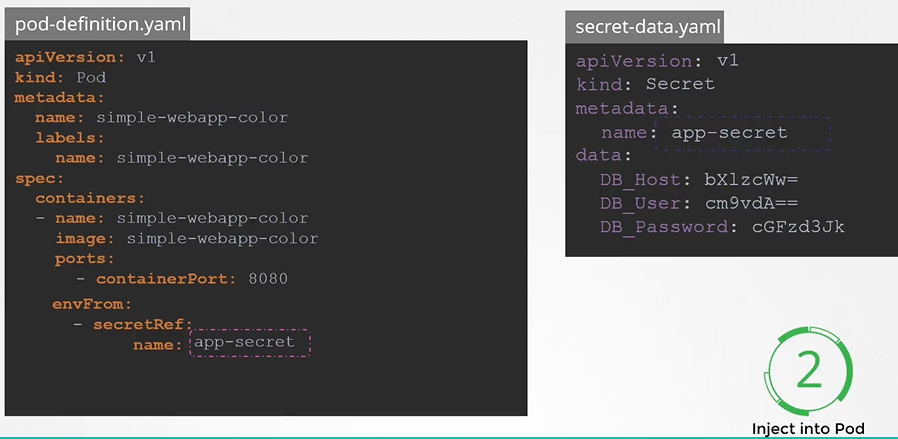
apiVersion: v1
kind: Pod
metadata:
  name: simple-webapp-color
spec:
  containers:
  - name: simple-webapp-color
    image: simple-webapp-color
    ports:
    - containerPort: 8080
    envFrom:
    - secretRef:
        name: app-secret
Deploy the Pod:
kubectl create -f pod-definition.yamlUsing Secrets AS VOLUMES in Pods
Injecting as volume each attribute becomes a file
When mounting secrets as volume each key in the Secret becomes a file, with its value as the file content. For example, a Secret with three attributes will result in three files. If you inspect one of these files (e.g.,
DB_Password), you’ll find the corresponding value.
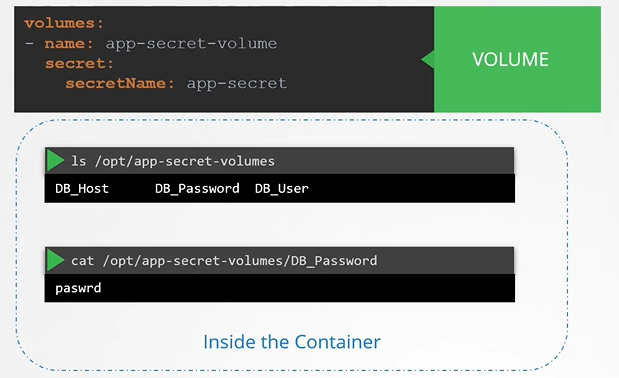 To mount a secret as a volume:
apiVersion: v1
kind: Pod
metadata:
  name: secret-pod
spec:
  containers:
  - name: my-container
    image: nginx
    volumeMounts:
    - name: secret-volume
      mountPath: /etc/secret-volume
  volumes:
  - name: secret-volume
    secret:
      secretName: app-secret
Key Considerations for Secrets
- Secrets Are Only Encoded, Not Encrypted:
Secrets are base64-encoded, not encrypted. Anyone with access to the Secret object can decode it to view the confidential data.- Avoid pushing Secret files to GitHub: Many repositories unintentionally expose sensitive data this way.
- ETCD Is Not Encrypted by Default: Data in ETCD, where Kubernetes stores Secrets, is not encrypted at rest. You should enable encryption using an
EncryptionConfigurationfile and configure thekube-apiserverto use it.
- Namespace and Role-Based Access Control (RBAC):
Anyone with permissions to create Pods or Deployments in a namespace can access Secrets in that namespace. Use RBAC to restrict access and protect sensitive data. - Consider Third-Party Secret Providers:
Using external providers like AWS Secrets Manager, Azure Key Vault, GCP Secret Manager, or HashiCorp Vault offers better security. These providers store Secrets outside ETCD and handle encryption and access control for you. Configuring these tools is more advanced and covered in the Certified Kubernetes Security Specialist course.
How Kubernetes Uses Secrets
To access the Kubernetes API, resources such as Pods need access to TLS keys. These keys are provided by Secrets and are managed through ServiceAccounts.
To check a Pod’s ServiceAccount and associated Secret:
kubectl get pods -n kube-system coredns-xxx-yyy -o yaml
kubectl get sa -n kube-system coredns -o yaml
kubectl get secret -n kube-system coredns-token-xxxx -o yaml
Accessing Docker Registries Using Secrets
To authenticate with a Docker registry, create a Docker Registry Secret:
kubectl create secret docker-registry my-docker-credentials \
  --docker-username=unclebob \
  --docker-password=secretpw \
  --docker-server=myregistry.com