To understand why services exist, it’s important to ask a few questions:
We can connect to our pods using their IP addresses, but is that the best approach? Even if it is, several challenges arise:
- How do we look up the IP address of the pod(s)?
- How do we connect from outside the cluster?
- How do we load balance traffic, or decide which pod to connect to?
- What if a pod fails?
Answer
Kubernetes provides a resource type called Service that addresses all these questions!
Services
Kubernetes Services enable communication between different components within (internal services) and outside (external services) of the application.
A Service is an API resource used to expose a logical set of Pods. By default, Services use round-robin load balancing to forward traffic to specific Pods. The set of Pods targeted by a Service is determined by a selector (a label). The kube-controller-manager continuously monitors for Pods that match the selector, including them in the Service. If Pods are added or removed, they are immediately reflected in the Service.
Services operate independently of the applications they provide access to. They simply monitor for Pods with labels matching the selector specified in the Service. ==This means that one Service can provide access to Pods from multiple Deployments. If deployment gets deleted the service lives==.
Debugging:
When debugging services that aren’t working as expected, check the labels first. You can also use kubectl get endpoints to verify the Services and their corresponding Pod endpoints.
Why endpoints are not shown in k describe svc?
Because endpoints are dynamic. They do not appear on k get svc or k describe svc. Service looks for new pods constantly.
That is why we use k get endpoints to retrieve list of endpoints separately.
Services provide loose coupling between microservices.
External communication
Two different ways an external user can access the web page:
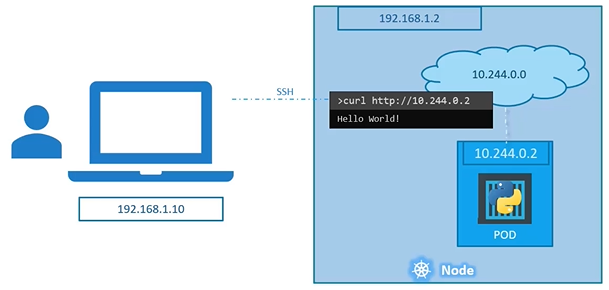
SSH into the node and access the pod: While it’s possible to SSH into the node and access the pod directly, it’s not a practical or recommended approach.
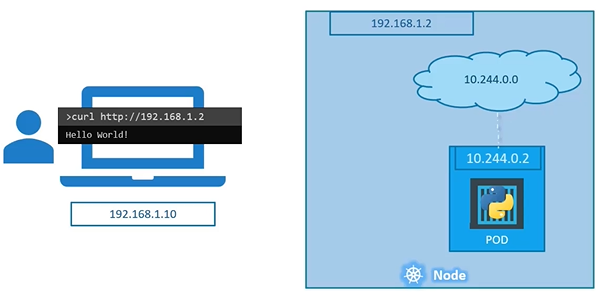
Access through the node: The node can be configured with services that route traffic to the pod, providing a more efficient and standard way for external users to reach the application.
Approach 1)
Approach 2)
Internal communications
Kubernetes also provides service types for internal communications, such as ClusterIP, which exposes the service only within the cluster.
Service Types
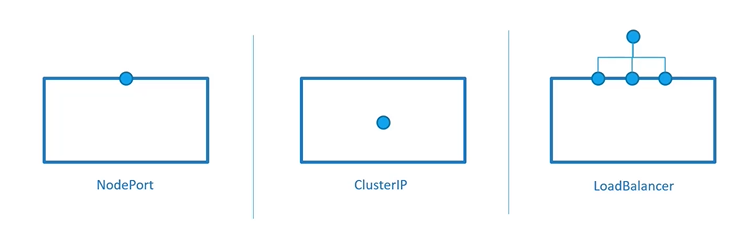
To match networking needs in different environments, different service types are available:
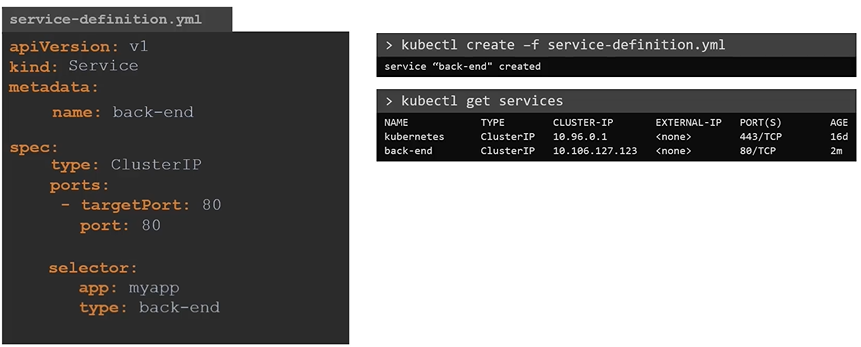
ClusterlP: the default type exposes the service on an internal cluster IP address
NodePort: allocates a specific node port on the node that forwards to the service cluster IP address
Load Balancer: currently only implemented in public cloud
ExternalName: works on DNS names; redirection is happening at a DNS level, useful in migration For CKAD, focus on ClusterlP and NodePort
Create a service redis-service to expose the redis application within the cluster on port 6379.
kubectl expose pod redis --port=6379 --name redis-service
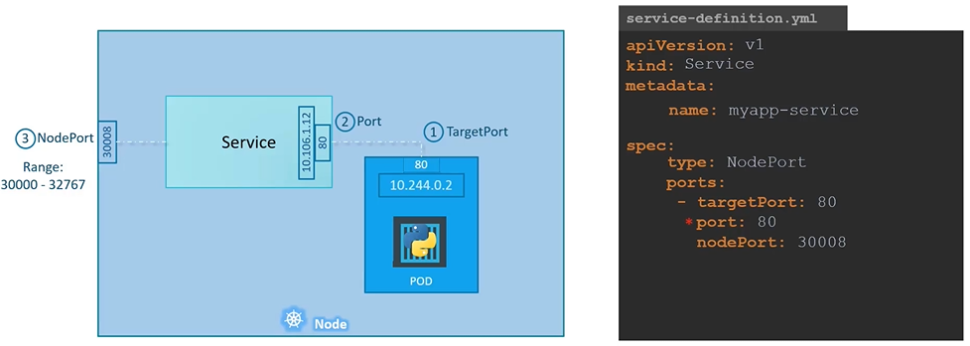
Node port
When the service makes an internal pod accessible on a node:
The port is made available ==on all nodes==, allowing anyone to connect to it.
The application code may need to be updated to connect to the new port number.
Under the hood, kube-proxy sets up several iptables rules on the nodes.
A port number is allocated for the service, typically in the 30000-32767 range by default.
In some cases, this is the only option for external traffic (e.g., in clusters deployed with kubeadm or on-premises setups).
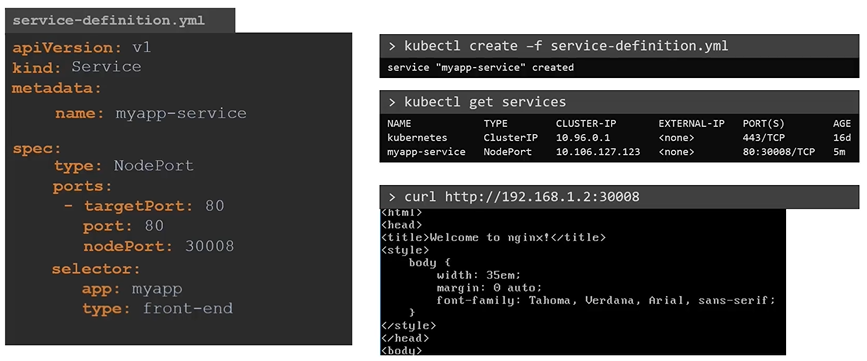
To access the application from CLI instead of web browser
$ curl http://192.168.1.2:30008
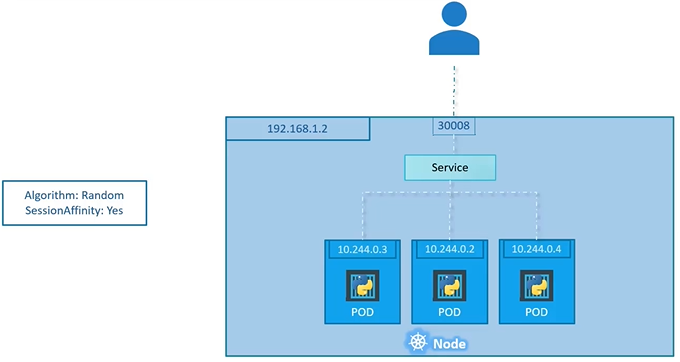
If all the pods with the same label are in one machine, it will distribute the load randomly:
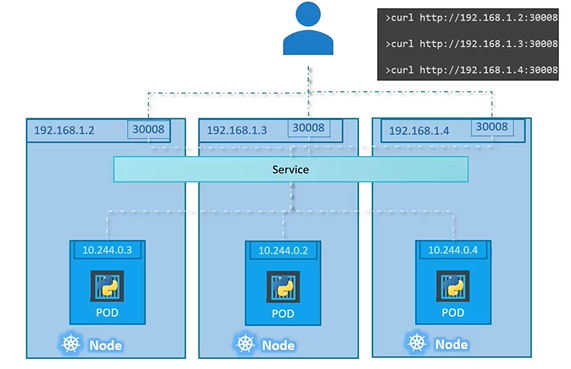
When Pods are distributed across multiple nodes, K8S creates a service that is expanded across multiple nodes. When pods added/removed the service will adjust itself to it.
Try to create an Nginx deployment with 3 replicas, expose it as a service on port 80, verify the service details and endpoints, retrieve the Minikube IP address, and test access to the service using curl.
$ kubectl create deployment nginxsvc --image=nginx --replicas=3$ kubectl expose deployment nginxsvc --port=80$ kubectl describe svc nginxsvc # look for endpoint$ kubectl get svc nginx -o=yaml$ kubectl get svc$ kubectl get endpoints$ minikube ip$ echo $(minikube ip)$ curl [http://$](http://%24/)(minikube ip):3200
Cluster IP
Pods IP addresses are dynamic IP addresses and they change when they go down and come back up. Therefore we can’t rely on the IP addresses for internal communication.
It’s the default service type
A virtual IP address is allocated for the service (in an internal, private range; e.g. 10.96.0.0/12)
This IP address is reachable only from within the cluster (nodes and pods)
Our code can connect to the service using the original port number
Perfect for internal communication, within the cluster
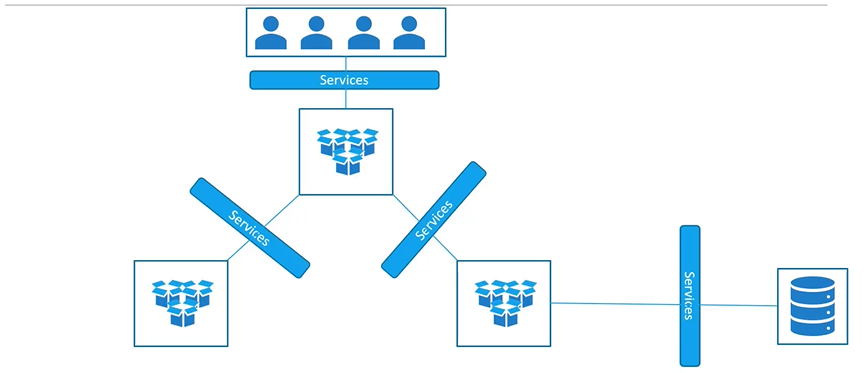
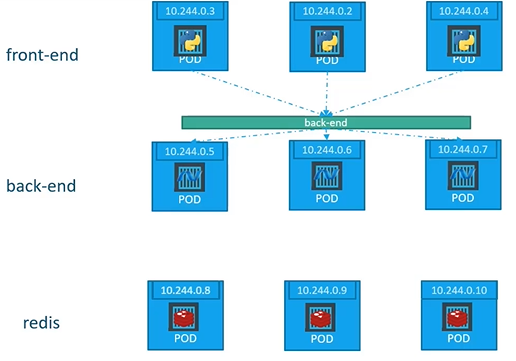
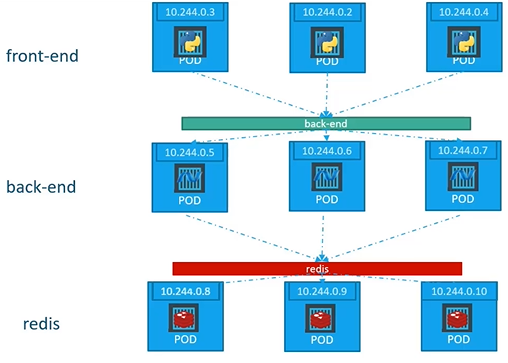
In this case the service creates a Virtual IP inside the cluster to enable communication between different services such as a set of frontend servers to a set of backend servers.
What is a right way to establish connectivity between above services or tiers:
A Kubernetes service can help us group the pods together and provide a single interface to access the pod in a group.
An external load balancer is allocated for the service. This is available only when the underlying infrastructure provides some kind of “load balancer as a service”. Each service of that type will typically cost a little bit of money (e.g. a few cents per hour on AWS or GCE). Ideally, traffic would flow directly from the load balancer to the pods. In practice, it will often flow through a NodePort first
Where the service provisions a loadbalancer for our application in supported cloud providers.
$ kubectl get services$ kubectl get services$ kubectl describe service | grep TargetPort$ kubectl describe service$ kubectl describe service$ kubectl get deployment$ kubectl describe deployment$ kubectl create -f service-definition-1.yaml
Let’s say we have to application example-app-votin.com and example-app-result.com :
Create a new VM for load balancer and install HA proxy or NGINX on it and configure load balancer to route traffic to them.
Or use native cloud platform load platform.
Services and Kube-proxy
The kube-proxy agent on the nodes watches the Kubernetes API for new Services and endpoints.
After creation, it opens random ports and listens for traffic to the Service port on the cluster IP address, and next, redirects traffic to a Pod that is specified as an endpoint.
The kube-proxy works in the background and normally doesn’t require any configuration
Creating Services via kubectl expose
kubectl expose can be used to create Services, providing access to deployments, ReplicaSets, Pods or other services. In most cases kubectl expose exposes a Deployment, which allocates its Pods as the service endpoint. kubectl create service can be used as an alternative solution to create Services. While creating a Service, the —port argument must be specified dictate the Service port.
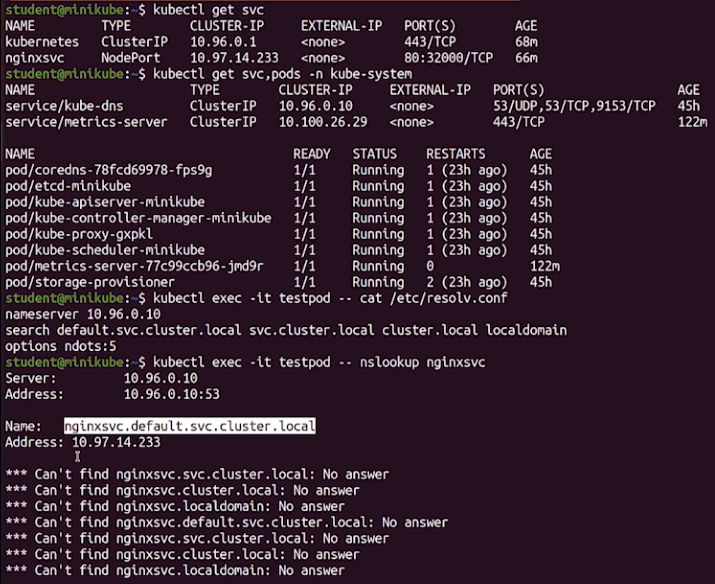
Exposed Services automatically register with the Kubernetes internal DNS
With Services exposing themselves on dynamic ports, resolving Service names can be challenging
As a solution, the coreDNS service is included by default in Kubernetes, and this DNS service is updated every time a new service is added
As a result, DNS name lookup from within one Pod to any exposed Service happens automatically
Imperative commands
Example 1: Creating a ClusterIP Service
To create a service named redis-service of type ClusterIP to expose the redis pod on port 6379:
kubectl expose pod redis --port=6379 --name redis-service --dry-run=client -o yaml
(This command will automatically use the pod’s labels as selectors.)
Alternatively:
kubectl create service clusterip redis --tcp=6379:6379 --dry-run=client -o yaml
This command does not use the pod’s labels as selectors. Instead, it assumes selectors like app=redis. Since you can’t pass in custom selectors with this command, it’s less effective if your pod has different labels. You’ll need to generate the YAML file and manually modify the selectors before creating the service.
Example 2: Creating a NodePort Service
To create a service named nginx of type NodePort to expose the nginx pod’s port 80 on node port 30080:
(This will use the pod’s labels as selectors automatically, but you can’t specify the node port. You’ll need to generate a YAML definition file and manually add the node port before creating the service.)
Alternatively:
kubectl create service nodeport nginx --tcp=80:80 --node-port=30080 --dry-run=client -o yaml
(This will not use the pod’s labels as selectors.)
Scenario
To create a pod called httpd using the image httpd:alpine in the default namespace and expose it with a ClusterIP service targeting port 80, you can achieve this in one step using the kubectl run command.
Here’s the command:
kubectl run httpd --image=httpd:alpine --port=80 --expose --dry-run=client -o yaml
This command:
Creates the httpd pod with the correct httpd:alpine image.
Exposes the pod by automatically creating a ClusterIP service.
Sets the target port to 80 for the service.
If everything looks good in the output YAML, you can remove the --dry-run=client -o yaml options to create the resources:
kubectl run httpd --image=httpd:alpine --port=80 --expose
This will directly create the httpd pod and expose it via a ClusterIP service.
Questions
Create a new pod named custom-nginx using the nginx image, running on container port 8080.
kubectl run custom-nginx --image=nginx --port=8080 --dry-run=client -o yaml
Create a pod called httpd using the httpd:alpine image. Then, create a service of type ClusterIP with the same name (httpd). The service should target port 80.
Command to create the pod and expose it as a service:
kubectl run httpd --image=httpd:alpine --port=80 --expose
Checklist:
Is the httpd pod created with the correct image (httpd:alpine)?
Is the httpd service of type ClusterIP?
Does the service use the correct target port (80)?